24 May 2013
by sparksfromthekitchen
in Lunch, Main Dish
Tags: beef, cheese, sandwich
Yes I know I thought the same thing when I read the name of the dish–YUM!! Putting 2 classics together-that’s genius! I’ve seen a few different recipes for this floating around the internet and blog world for a while but never got around to making one. For this month’s blog swap I was given http://www.tasteofhomecooking.blogspot.com/ and it took me a while to decide to make this dish-Sarah’s got a ton of great sounding recipes on her blog.
I really did enjoy eating these yummy sandwiches. The recipe makes about 4-6 sloppy joes depending on how much you can load into the bun. I toasted the roll with a slice of provolone on each side and then put the beef mixture in the middle. I stuck to her recipe pretty closely with this one-the only changes being that I added a bit of worstershire sauce and used less onion and upped the steak sauce amount and then let it reduce for a while. I think the green pepper added a great depth of flavor too. Next time I make this I will use the leanest ground beef that I can find to cut down on the fat. The beef mixture also reheated extremely well.

Philly Cheese Steak Sloppy Joes
Ingredients:
- 1 tbsp olive oil
- 1 cup yellow onion, chopped small
- 1 green pepper, chopped
- 1 lb lean ground beef
- 4 tbsp A1 Steak Sauce (or similar)
- 3 tbsp Lea & Perrins Worstershire Sauce
- 1/2 cup beef stock
- Salt and Pepper
- 4-6 kaiser rolls
- Provolone cheese-sliced thin
Instructions:
- Add the olive oil to a large skillet set over medium-high heat. when the oil is hot add the onion and geen pepper and cook until starting to brown and slightly soft. Remove the onions and peppers from the pan and set aside for later.
- To the same hot pan add the ground beef and brown, cooking through thoroughly. Drian any fat, add the peppers, onions and stir to combine. Then add the steak sauce, worcestershire sauce, beef stock. Bring it to a boil and then reduce heat and let it simmer about 10 minutes until most of the liquid is gone. Add salt and pepper if necessary to season.
- Cut the rolls in half, place one piece of provolone on each side and toast.
- Mound up the beef onto the rolls and either eat open face or as a sandwich.
Check out the other May blog swap recipies here. Thanks for hosting Sarah!!

21 May 2013
by sparksfromthekitchen
in Freezer, Lunch, Main Dish, Prep-Ahead, Freeze then Cook, Slow Cooker
Tags: beef, burrito
I must have 3 trillion lists that I’ve found on Pinterest and all over the internet from super savvy ladies who make these mountains of meals and stockpile them in their freezer. Seriously they could feed their entire town for a year if they needed to. It makes me feel very inadequate considering I only having frozen berries and ice cream in mine. So I decided to try one and see how it worked out. All in all it was a great success. It was easy to just pull the ziplock bag out of the freezer, thaw it for a bit and then just pour everything into my slow cooker. I honestly didn’t see it saving any time. The thawing time was far more than it would have taken me to chop the onion and measure out a few ingredients but it was nice to have it there and ready to go. I cooked it on Sunday all day and then put it in a container in the fridge with other toppings to eat during the week.
A few weeks ago my supermarket had top round roasts on sale. I bought one, took it home, put it in the ziplock with a bunch of ingredients, zipped it up and put it in the freezer. Easy. I wrote the instructions for cooking with a sharpie on the bag before I put the ingredients in so that I wouldn’t smudge it and I wouldn’t have to write with meat/tomato sauce to lean on. I did add some of this seasoning to the slow cooker too. The best part-the beef was DELICIOUS!! It also didn’t make too much-I’d say enough for between 5-7 burritos depending on how much you put in each.

Beef Burritos in the slow cooker
Ingredients:
- 2lb top round roast
- 2 8oz cans tomato sauce
- 5 garlic cloves minced
- 1 medium yellow onion, chopped
- 2 tbsp peppercorns
- 2 tbsp cider vinegar
- taco seasoning to taste
- 1 small can green chilies, drained
Optional Ingredients (to taste):
- sour cream
- grated cheese (don’t use pregrated-that stuff doesn’t melt nearly as well due to preservatives and anti-sticking additives–YUCK!!)
- sliced avocado
- salsa
- burritos
- refried beans
Instructions:
- Write all cooking instructions on a large freezer bag and make sure it won’t smudge.
- Add all ingredients through and including the cider vinegar to the ziplock bag, remove all of the air from the bag and seal. Place in freezer flat to freeze.
- When you’re ready to cook it thaw the bag in some water until no longer frozen. Place contents of bag in the slow cooker and add the taco seasoning and chilies. Cook on low for 7 hours.
- After 7 hours carefully remove the meat and place on a board. Remove any fat and discard it.
- Pour the liquid through a strainer into a bowl, discard the contents of the strainer.
- Add the beef back into the cooker and shred with 2 forks. Pour enough of the strained liquid over the beef to cover it half way and cook on low for an additional 30 minutes.
Then make a burrito how you like it. This time I used beef, beans, a sprinkle of white cheddar and monterey jack, sliced avocado and sour cream. I put the burrito on my panini press to heat it up and melt the cheese and to give the burrito that nice crispy crunch.
16 May 2013
by sparksfromthekitchen
in Lunch, Main Dish
Tags: bacon, bbq sauce, bread, cheddar cheese, grilled chicken
There’s that saying ‘even the best laid plans’……..well that’s what happened last night. I was all set to go home after work and grill chicken, slice avocado, slap some bacon and pesto and cheese on a delicious toasted roll and enjoy a great sandwich for dinner. Not so much. My supermarket didn’t have any more of the rolls I wanted, my avocado had passed it’s ‘edible’ stage and I screwed up the pesto. So that sandwich never happened. It sill sounds really good so I will make it sometime.
What I ended up with instead was DELICIOUS!! Grilled chicken, melty white cheddar, tangy BBQ sauce, crispy bacon and delicious toasted french bread. Really simple yes but really YUM!!!! After one bite I wasn’t sorry the other sandwich hadn’t worked out. BBQ sauce always reminds me of the west for some reason-like John Wayne riding into the sunset shooting his rifle into the sky as he goes. So that’s why I named this sandwhich what I did. Enjoy!!

Cowgirl Chicken Sandwich
Ingredients (for 2 sandwiches):
- 1 large chicken breast (boneless, skinless) about 1/2 lb cut into 2 even 1/4 pieces (give or take with the weight)
- Salt and pepper for seasoning
- 6 pieces cooked bacon (2 &1/2 for each sandwich, 1 for the dog 🙂
- white cheddar cheese sliced thin-as much as you want
- Sweet Baby Ray’s bbq sauce-as much as you want
- Pieces of french bread cut in half length-wise or kaiser rolls
Instructions:
- Preheat grill pan or grill or panini press or whatever you’ll use to cook the chicken.
- Season the chicken on both sides with S&P and set aside until the cooking vessel is ready.
- Cook the bacon and set aside (and give that one piece to your dog 🙂
- Cook until about 30 seconds from being done then top with the bbq sauce and then the cheese. Since I used my panini press I closed the lid but let it just hover over the chicken to melt the cheese and heat the sauce.
- Put a little sauce on the bottom piece of bread, top with chicken, place the bacon on top of the chicken, add a little more sauce if you want, and then put the top piece of bread.
- Eat it!
06 May 2013
by sparksfromthekitchen
in Lunch, Main Dish
Tags: chicken, honey, mustard
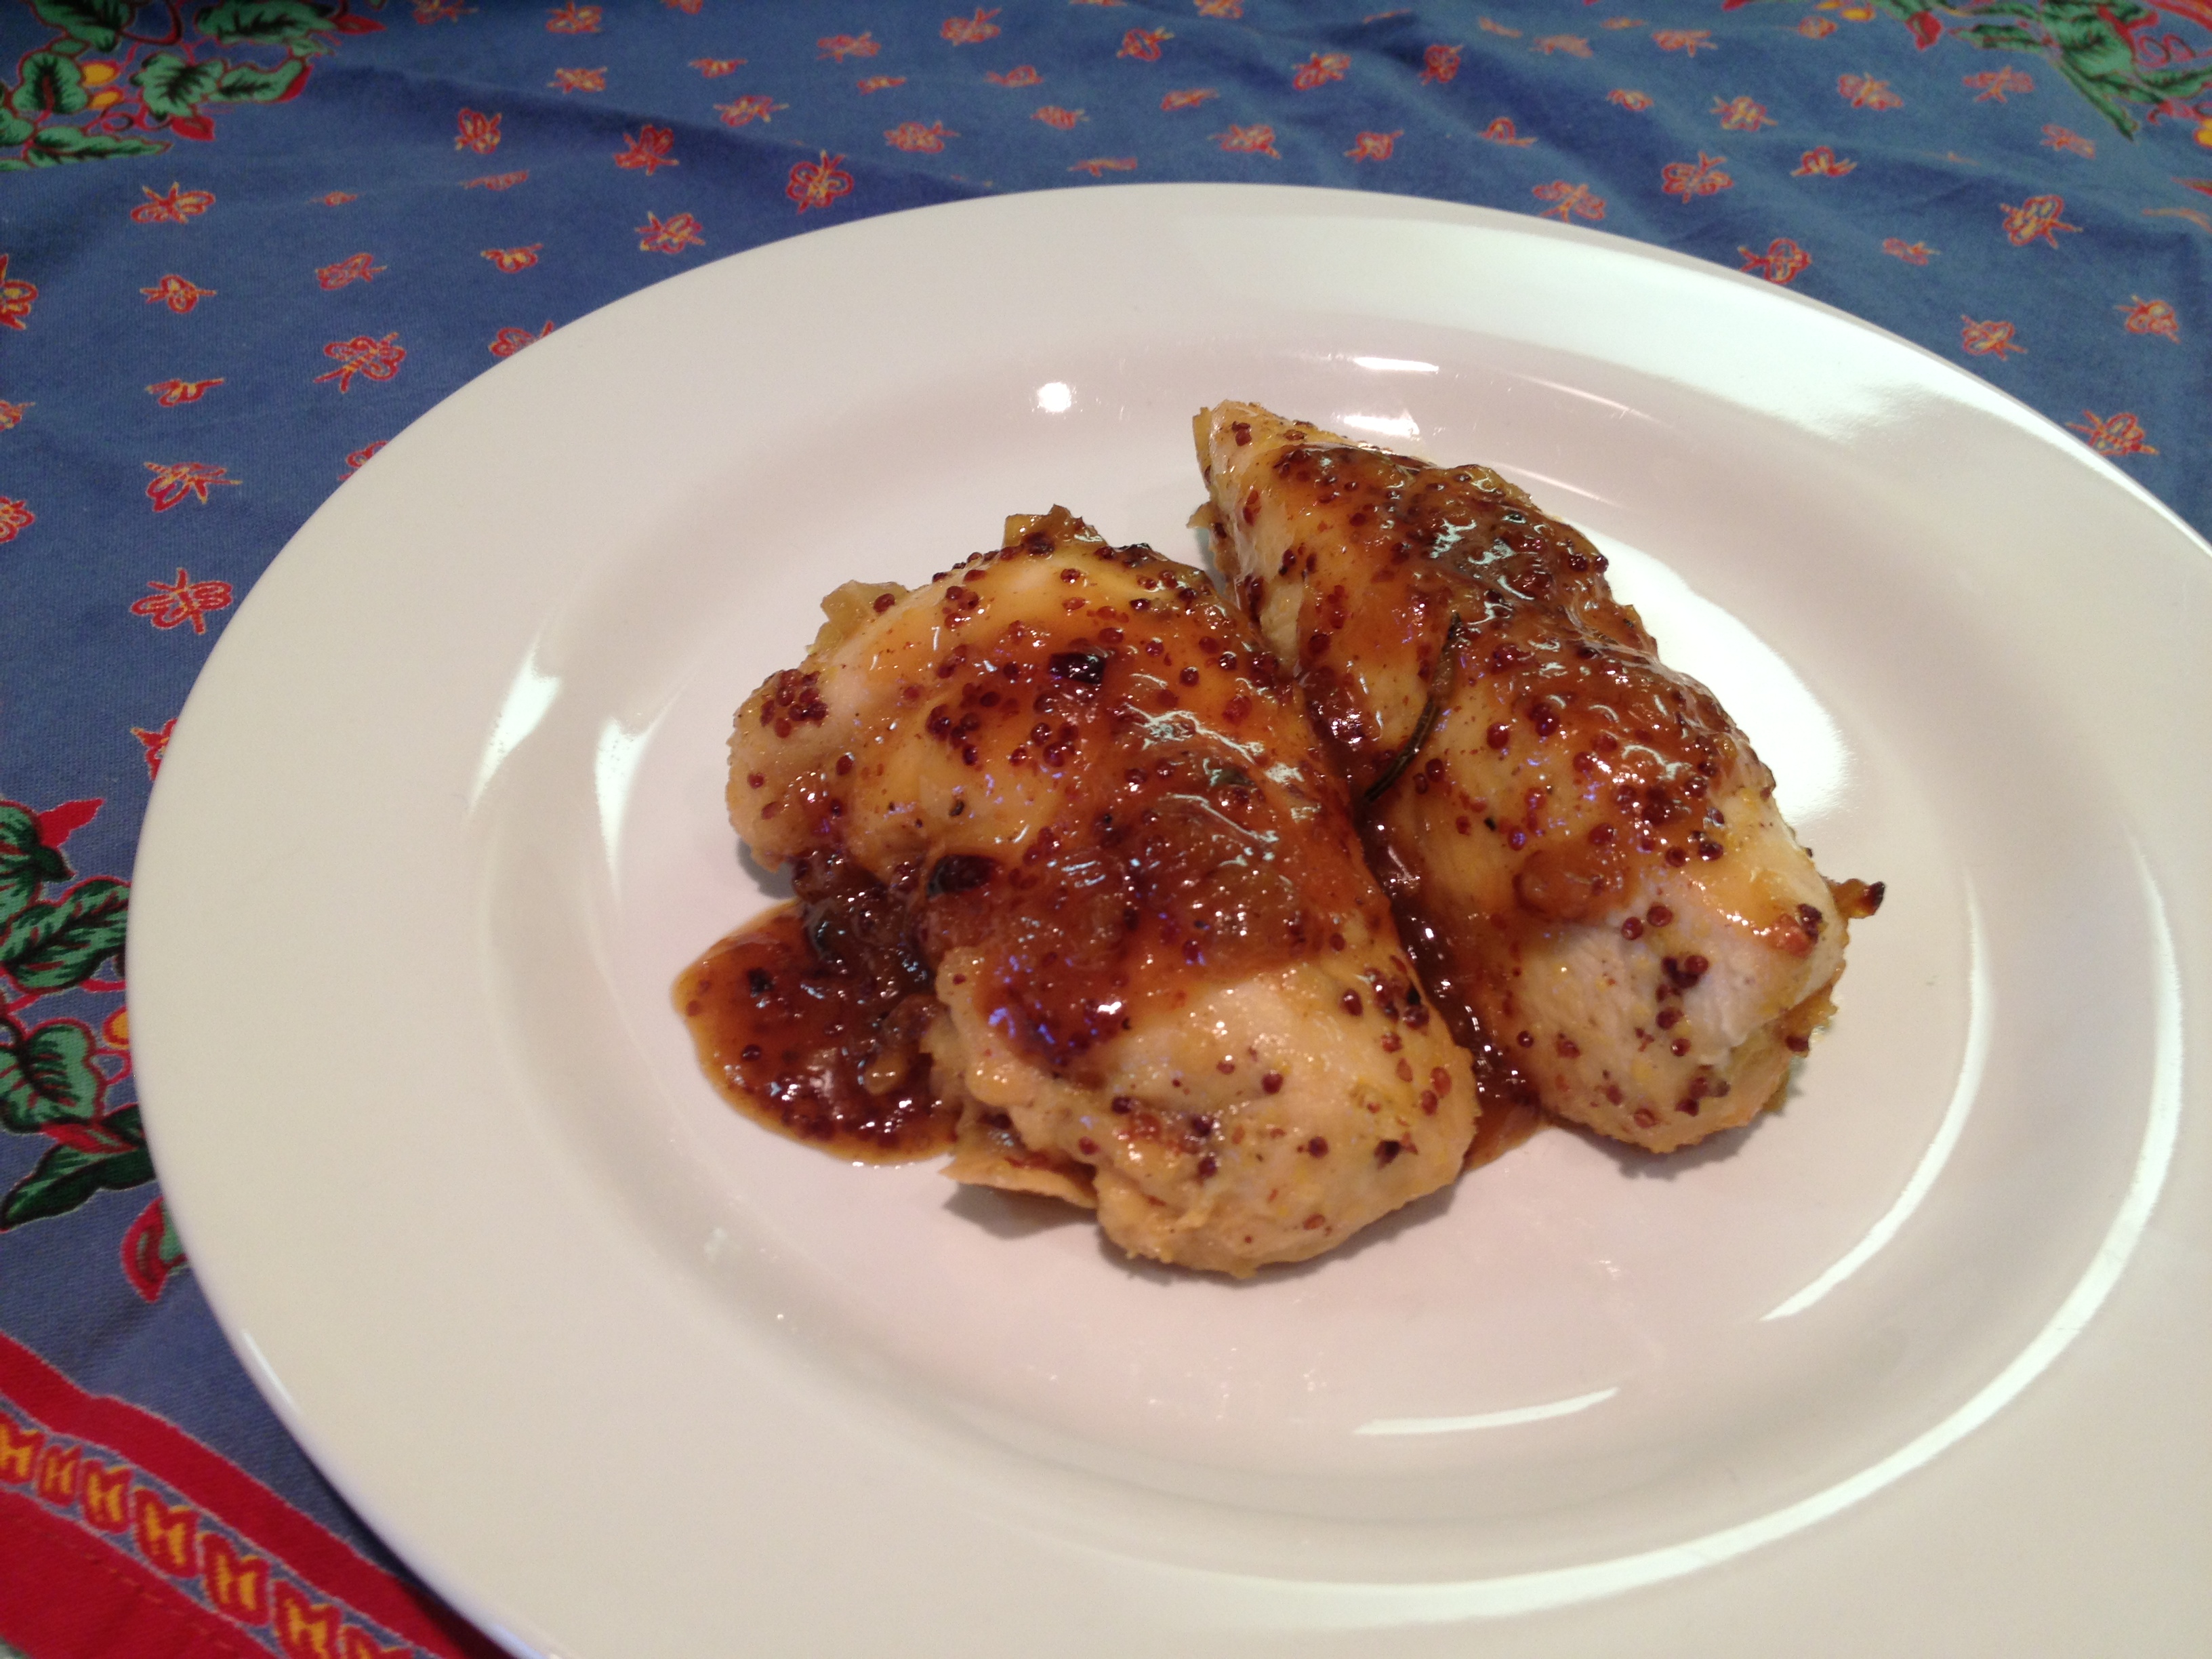
I really don’t have all that much to write about today. I found the original recipe for this on Pinterest and improved upon it a great deal. It came out great, the chicken was nice and juicy, the honey mustard reduction at the end made a delicious sauce-it was sweet and mustardy with just a hint of the rosemary and white wine. The shallot added a nice level of flavor as well. It’s also a one-pan dish which is a plus in my book. The prep for this is pretty non-existent aside of dicing a shallot so it’s very quick to put together. When the chicken is initially finished cooking the sauce is pretty liquid so I thought reducing it would be a great idea! It wouldn’t be good to just leave all of that yummy flavor in the pan. I was right. The reduction is so so so tasty.
I’ll certainly be making this again. I imagine the chicken would be amazing sliced up on a sandwich or over rice if there are left overs.

Baked Honey Mustard Chicken
Ingredients:
- 1 shallot, diced small
- 2 cloves garlic, diced small
- 1 & 1/2 lbs boneless skinless chicken breasts cut into even pieces (my package contained 2 pieces so I ended up with 5 smaller portions).
- 2-3 tsp extra virgin olive oil plus 2 more tsp for honey mustard sauce
- 4 tbsp white wine
- 1/4 cup grainy mustard
- 1/4 cup Dijon mustard
- 1/2 cup honey
- 2 sprigs fresh rosemary
- 1 tsp butter
Instructions:
- Pre-heat oven to 400F.
- In a dutch oven (or other stove and oven safe vessel with a lid) large enough to hold the chicken in one even layer add 2 tsp of the olive oil and heat over medium heat. When hot add the shallot and sautee until translucent-about 5-7 minutes. Then add the garlic and sautee for another minute or so. If you need more oil add extra little by little but you want to get some bits on the bottom of the pan so don’t add too much.
- Deglaze the pan with the wine and scrape up the bits. Let the wine reduce a bit. Be careful-the steam is hot.
- Place the chicken pieces into the pan on top of the onion and garlic.
- In a small separate bowl mix together the mustards, honey and additional 2 tsp olive oil. Pour the mixture over the chicken and move the chicken around to be sure all are coated. Place the rosemary sprigs into the sauce.
- Put the lid on the pan and bake for 20 minutes then remove the lid, baste the chicken with the liquid and return the chicken to the oven and cook another 25-30 minutes until it reaches a safe consumption temperature and has browned slightly around the edges.
- Place chicken pieces on a plate, tent with foil and set aside.
- Over medium heat cook the sauce remaining in the pan until it has reduced to half and is thick. Add the butter and mix it through.
- To serve spoon the reduced sauce over the chicken pieces.
Greatly adapted from this recipe at goodlifeeats.com.
03 May 2013
by sparksfromthekitchen
in Lunch, Main Dish, Salad
Tags: balsamic, salad, strawberry
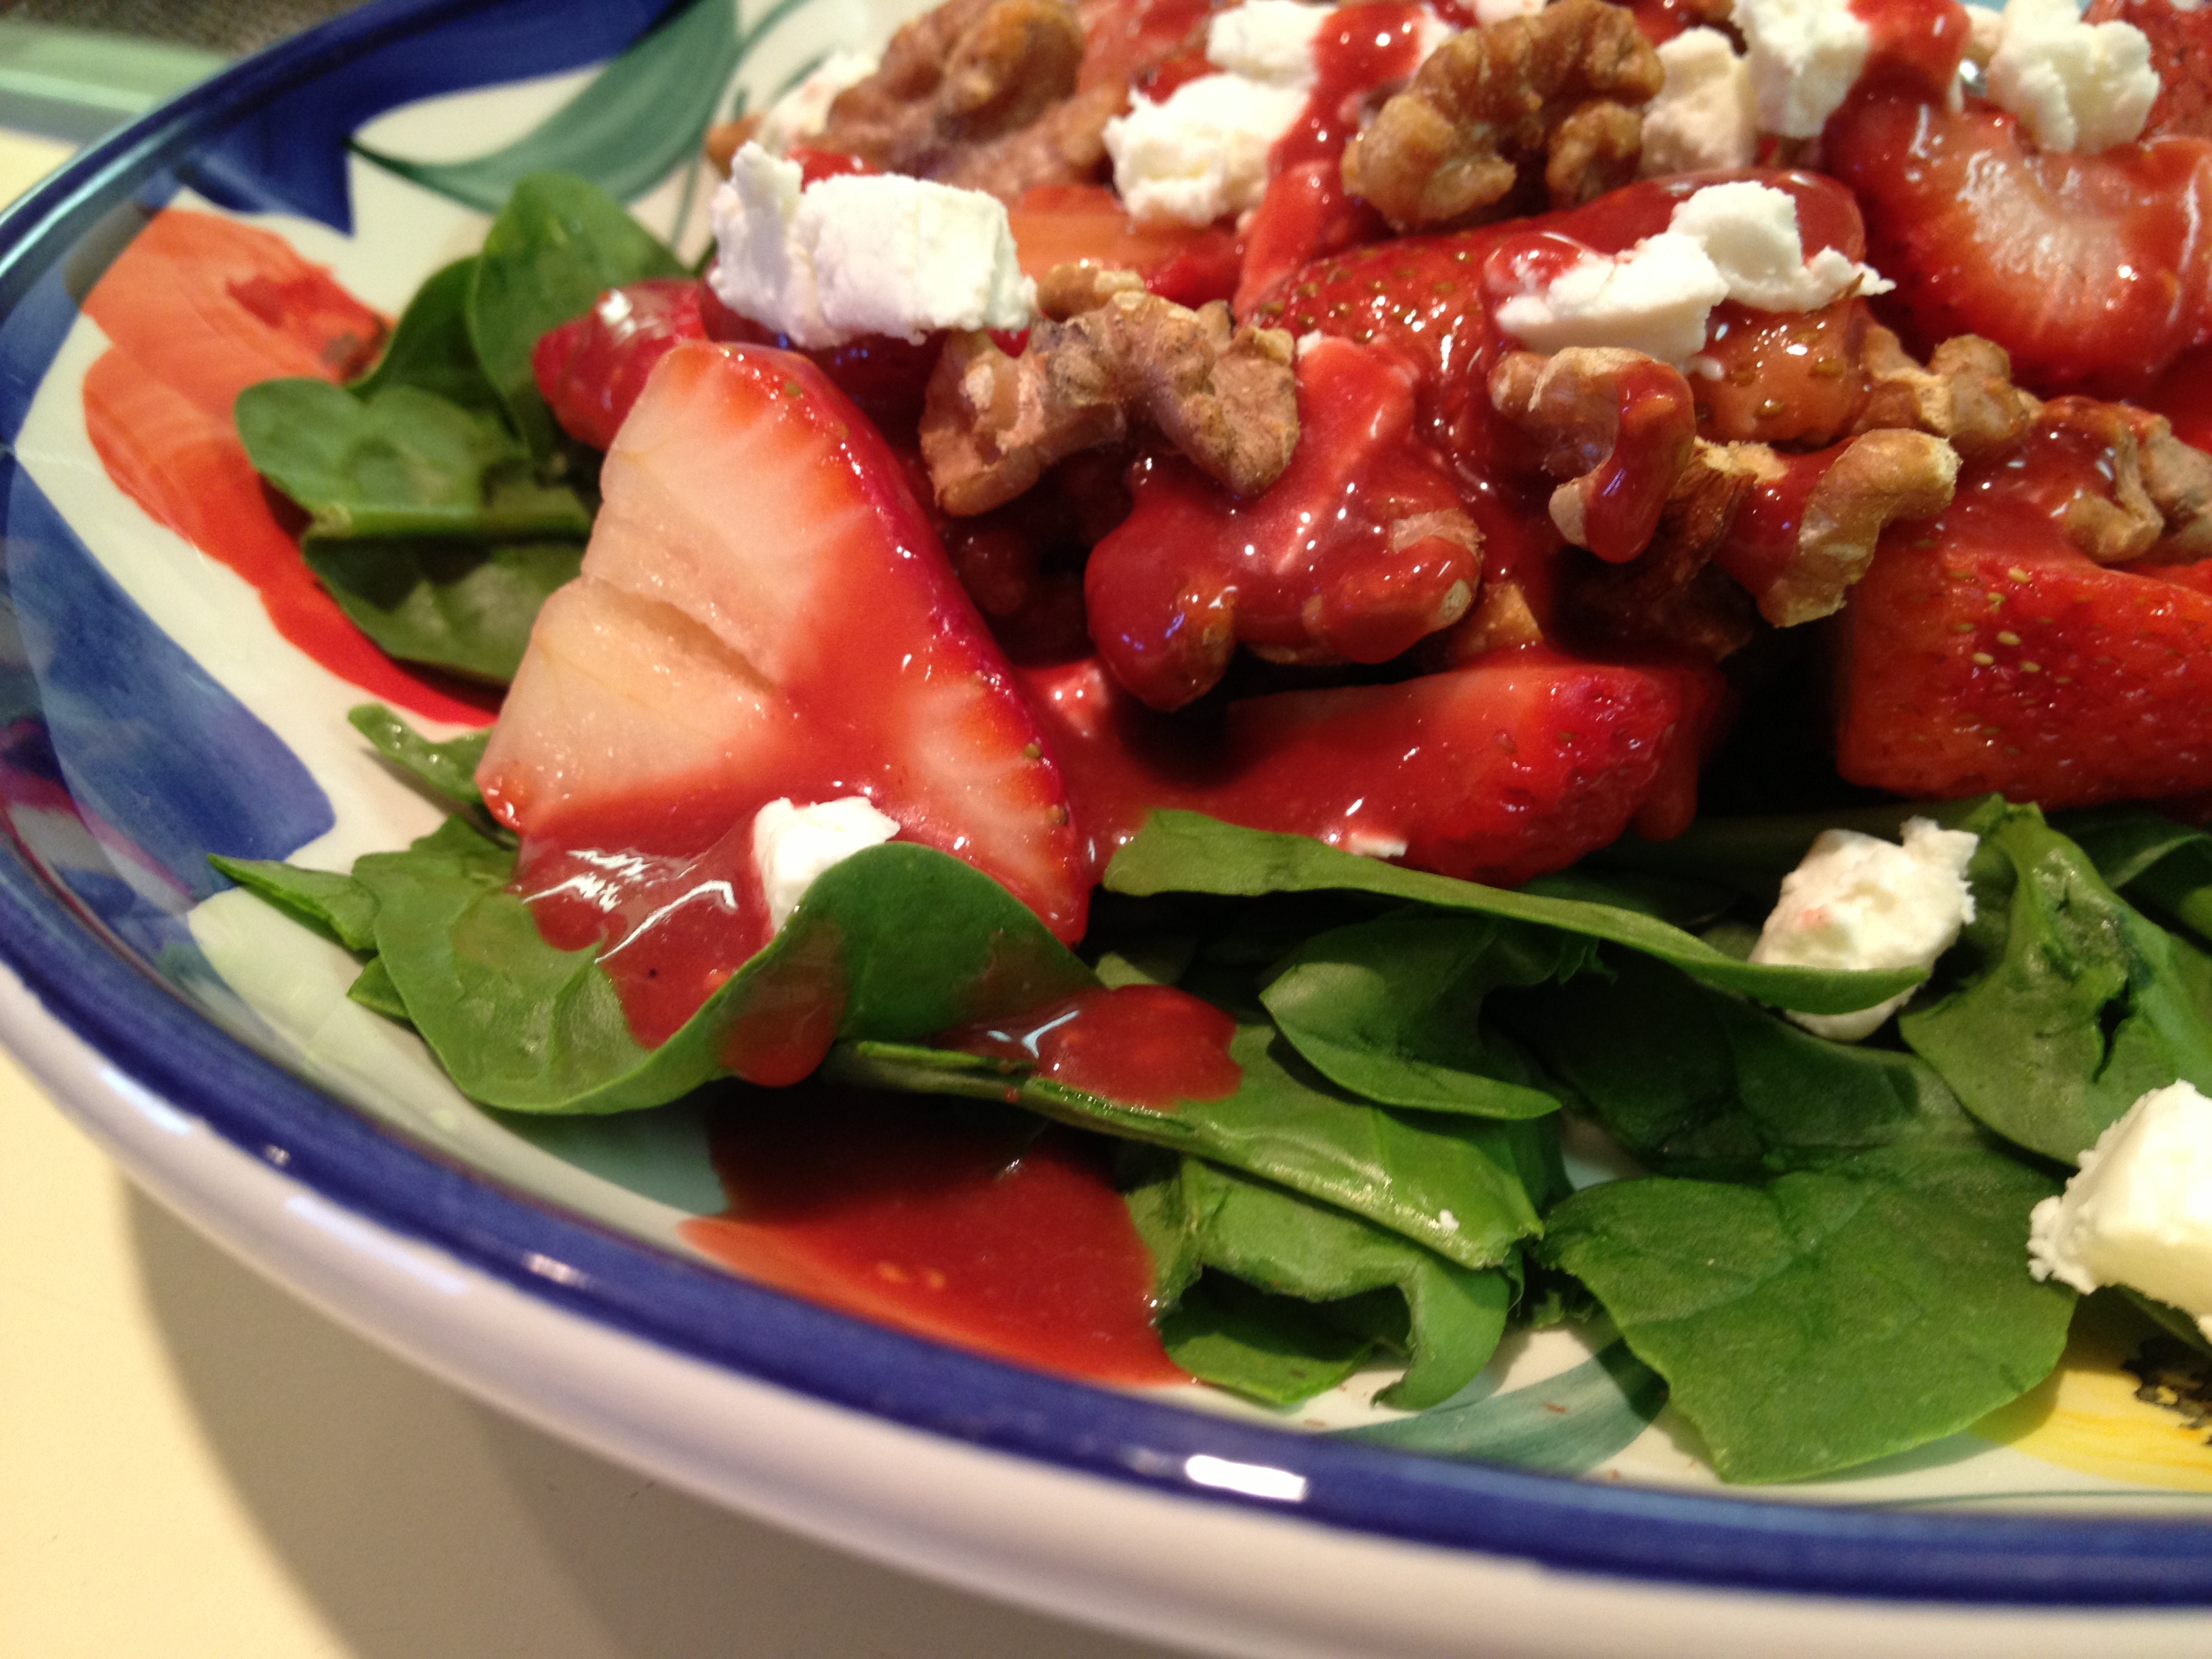
I know, I know. You’re thinking “Ah the ubiquitous strawberry salad”. You’re thinking of those sad restaurant ones that every chain place has that are so sad-a few strawberries, a bit of spinach, sweetened up nuts, maybe a little cheese and a vinaigrette. It’s insulting to the strawberries if you ask me. Those are NOT this salad. I wanted better. I wanted it to be more my way. After roasting rhubarb for (this recipe) dessert a while ago I got to thinking-why not roast strawberries for the salad? Why not have both roasted and fresh strawberries in the salad? 2 different versions. Yum! Feel free to up or less as you please-the amounts below are just how much I used. You like more cheese? Be my guest! I’ll never think badly of anyone who wants to add more cheese. Dont’ like nuts? Perhaps some carrot or celery or crisp apple to replace the crunch. So I hope you love it. It certainly put a new spin on this for me.

Roasted Strawberry Salad with Raspberry Balsamic Dressing
Ingredients:
Salad:
- 1 pint fresh strawberries, washed, patted dry, tops removed, cut in halves
- 2 tbsp olive oil
- 1 tsp granulated sugar
- 1/4 tsp kosher salt
- sprinkle freshly ground pepper
- 2 cups walnut halves, toasted
- 1 oz fresh goat cheese, crumbled
- 3 cups baby spinach, washed and patted dry
Dressing:
- 1/4 cup whole fresh raspberries, washed and gently patted dry
- 4 strawberry halves
- 1 tbsp balsamic vinegar
- 2 tbsp olive oil
- 1-2 tbsp honey (to taste)
- a pinch or 2 of sugar if needed
Instructions:
- Preheat oven to 400. Line a rimmed baking sheet with parchment paper and set aside.
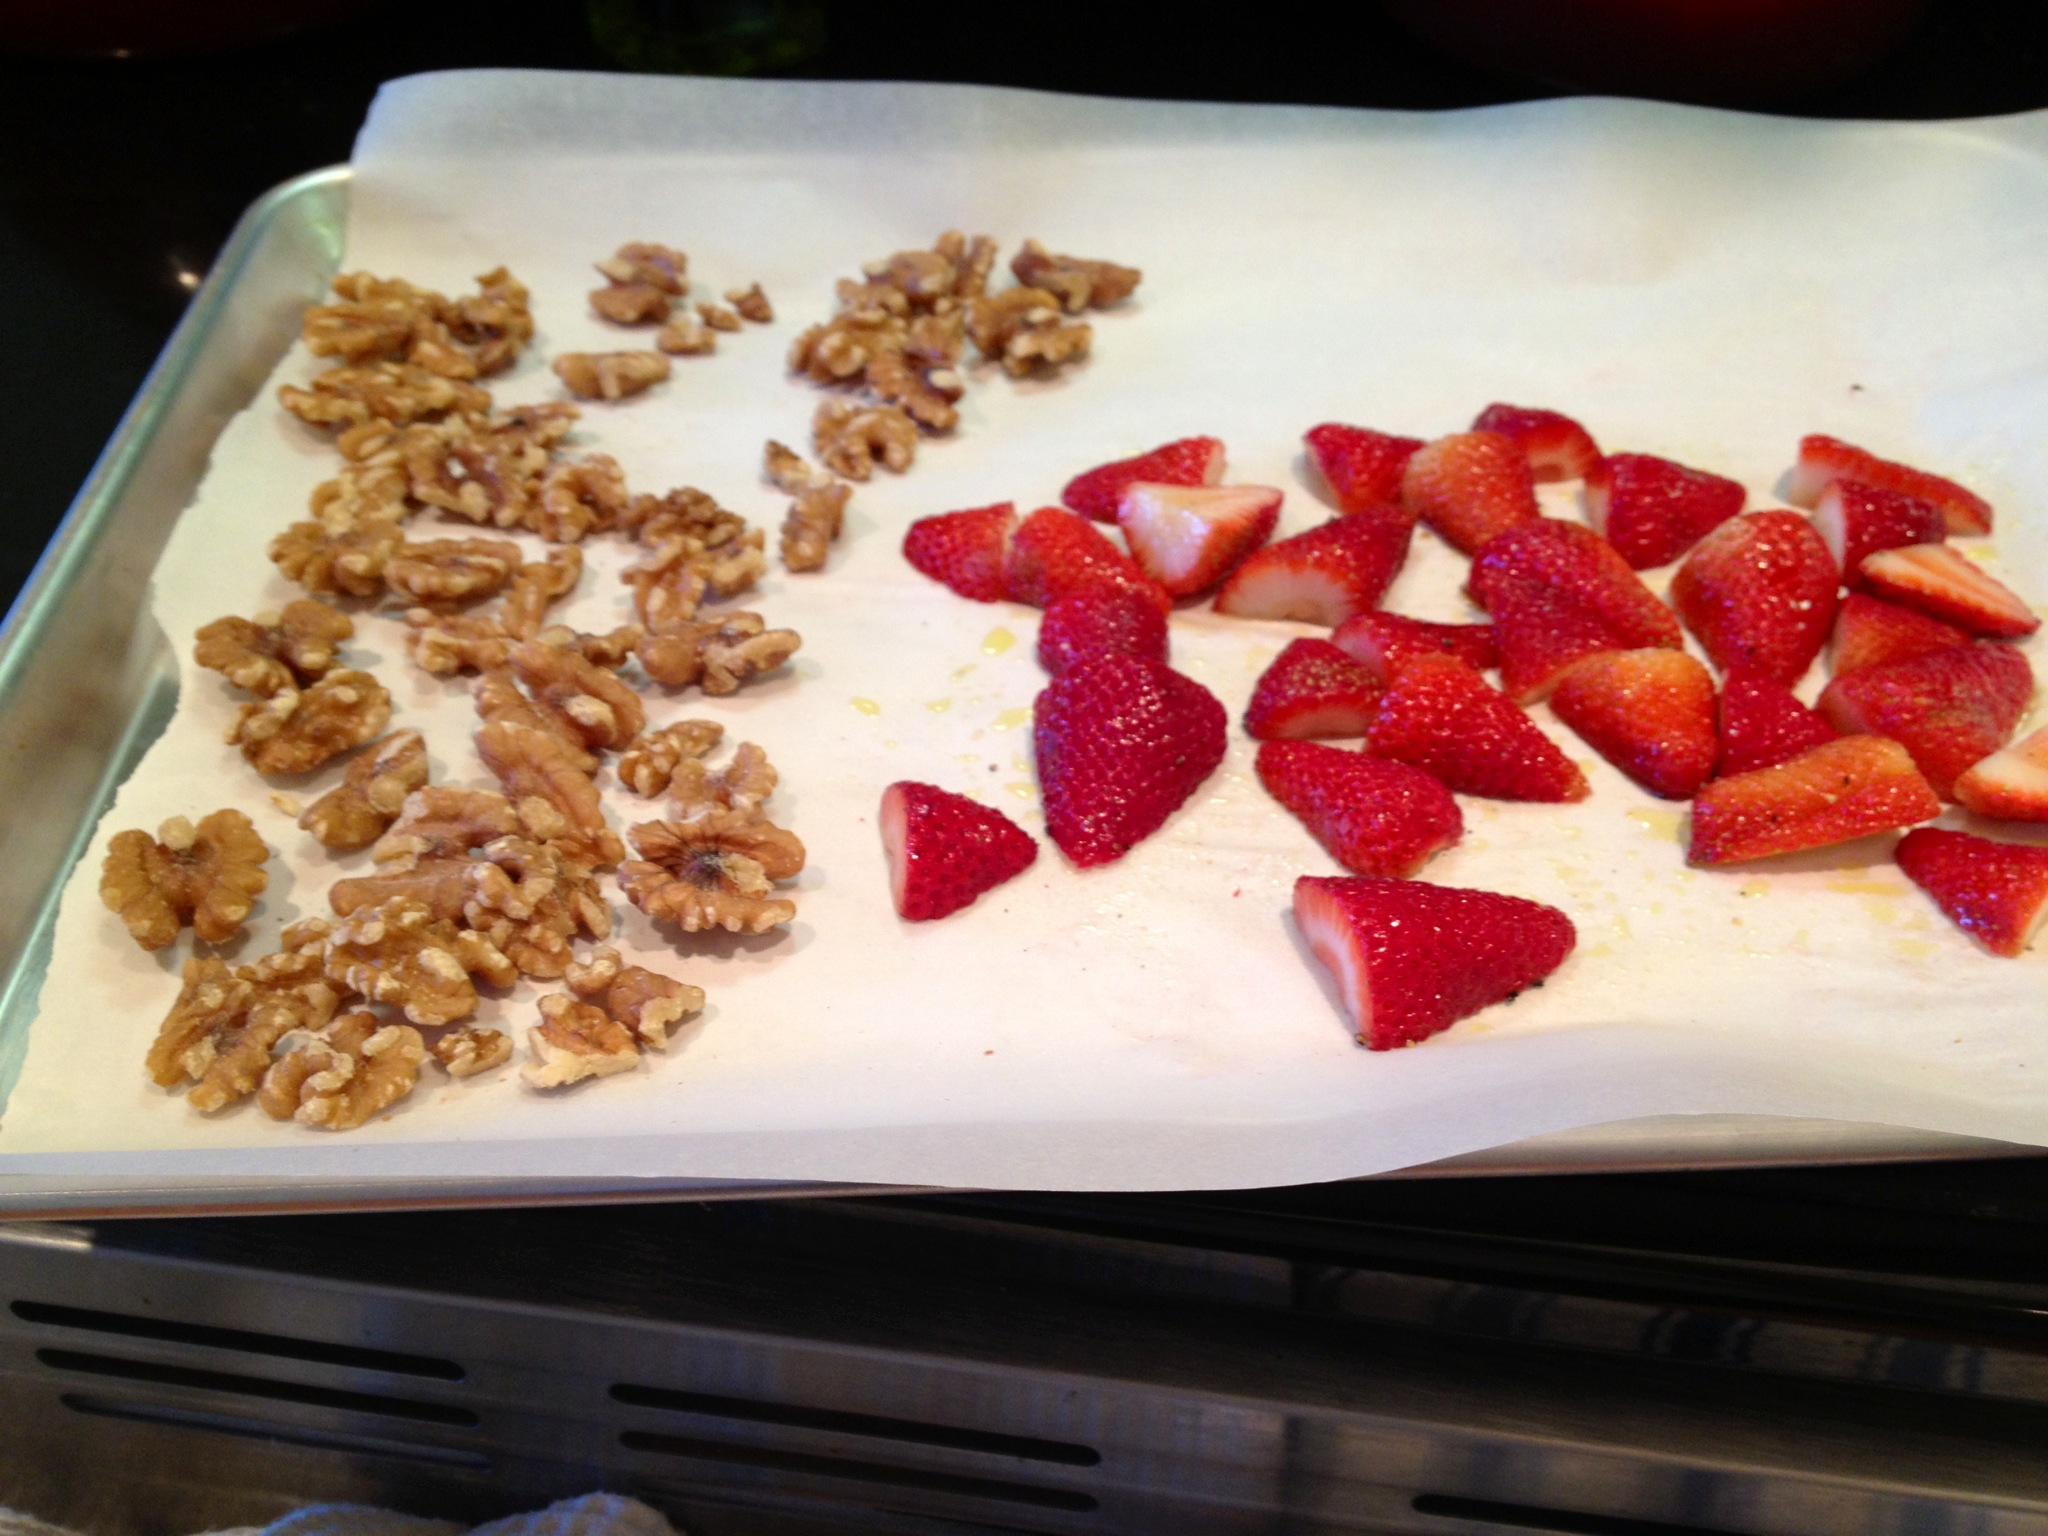
- Take half of the strawberries and lay them on half of the baking sheet, drizzle with olive oil, salt, pepper and sugar. With your hands move them around a bit to make sure they’re all olive oiled.
- On the other half of the baking sheet place the walnuts.
- Roast in the preheated oven for 10 minutes. Let them cool.
- While they are cooling make the dressing. Add all ingredients above to a bowl and use a stick blender to combine. Add more or less honey depending on the tartness of the raspberries and strawberries. If it’s still too tart a sprinkle of sugar should be added.
- Assemble the salad starting with the spinach then half of the roasted and fresh strawberries, half of the walnuts, half of the cheese and dressing as desired.
Makes 2 servings.
See? The walnuts and strawberries are happy to roast together.

01 May 2013
by sparksfromthekitchen
in Lunch, Main Dish, Prep-Ahead, Freeze then Cook, Slow Cooker
Tags: slow cooker, turkey
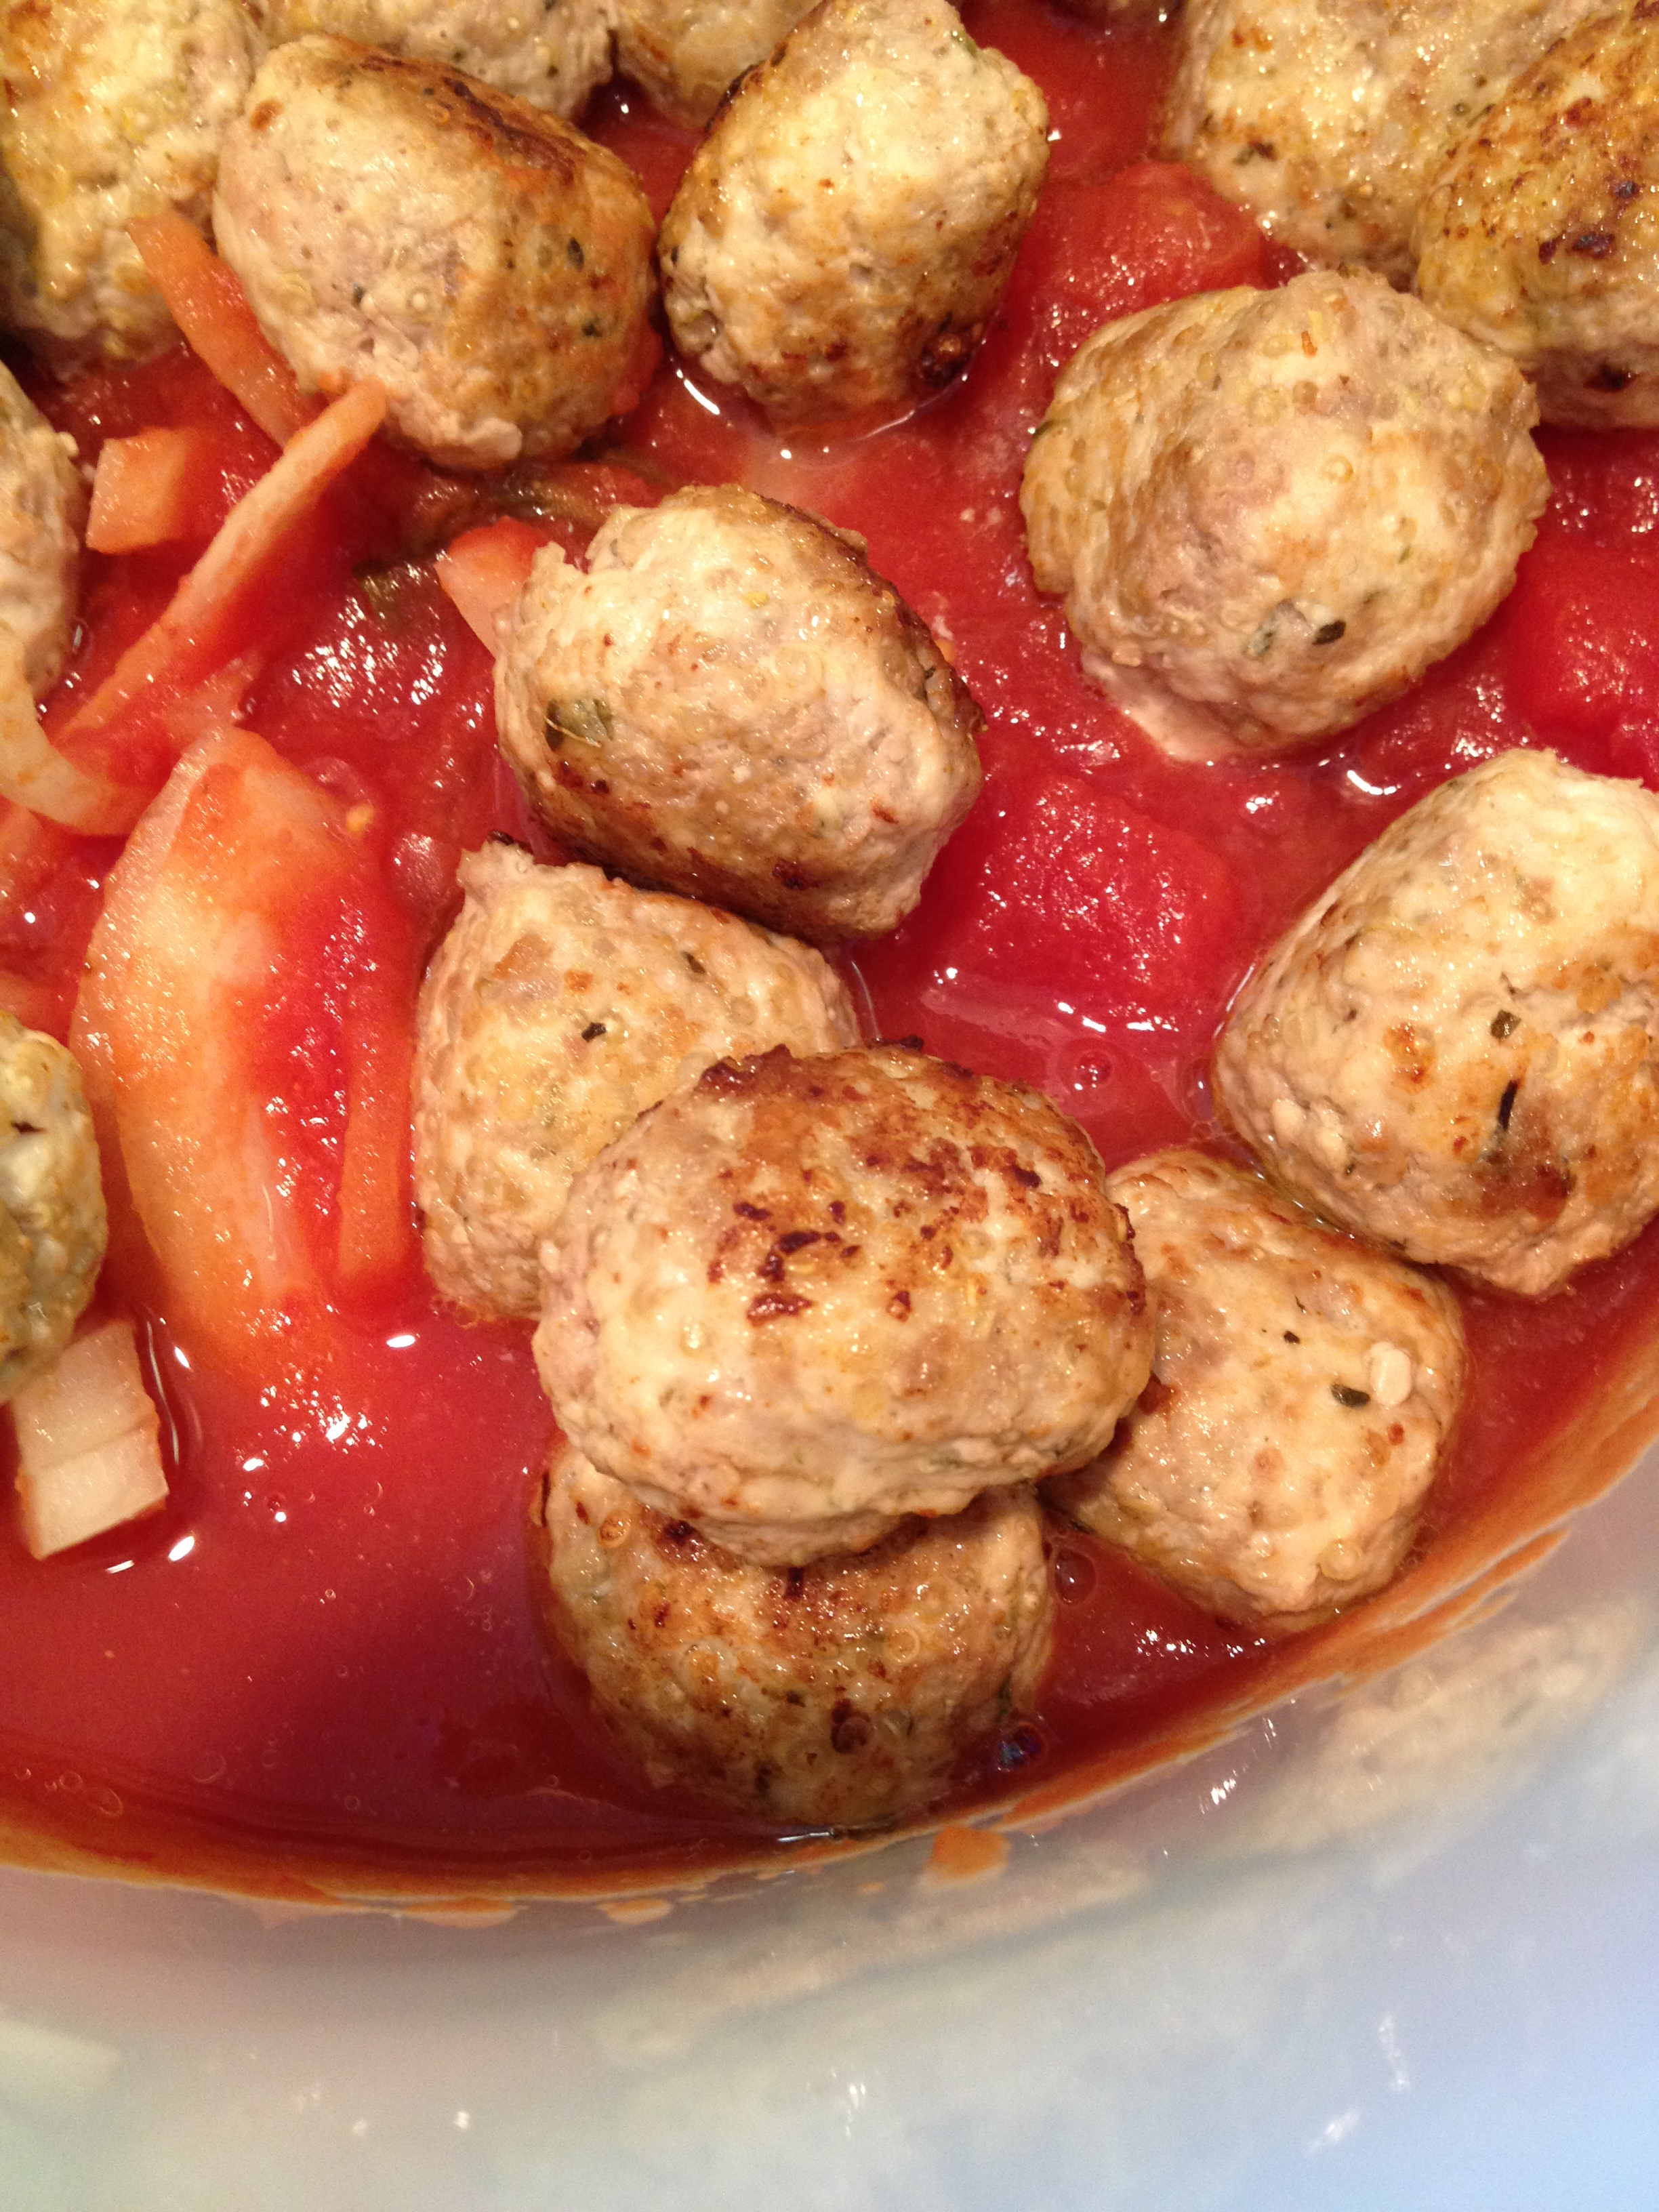
I had pinned this recipe a while ago as I’m always on the lookout for healthier stuff to cook in the slow cooker and they didn’t disappoint. They were easy to put together, smelled awesome while browning and I froze half of the meatball mixture in one bag and half of the tomatoes and onion in another bag to use at a later date . Easy peasy! These would be great on a toasted roll with melted provolone or added to other sandwiches. I just ate them plain and I really enjoyed them. They’re smaller than a golf ball, the tomato sauce is just right. I served them with roasted broccoli.

Miniature Turkey & Quinoa Meatballs for the Slow Cooker
Ingredients:
- 1lb 99% lean ground turkey breast
- 1lb 94% lean ground turkey
- 2/3 cup cooked quinoa
- 4 garlic cloves, minced
- 1 large egg, lightly beaten
- 2 tbsp olive oil (plus more for browning)
- 2 tbsp pecorino romano cheese, freshly, finely grated
- 2 tsp italian spices
- 1/2 tsp granulated onion
- 1/2 tsp sea salt
- 1/2 tsp white pepper
- 1 large sweet onion, cut into rounds
- 2 28 oz cans crushed San Marzano tomatoes
- 1 28 oz can peeled San Marzano tomatoes
- 3 tbsp white wine
Instructions:
- In a large bowl combine all ingredients through and including the white pepper. Mix thoroughly by hand, being careful not to over-mix.
- Roll each meatball to just under the size of a golf ball and set aside.
- Layer sliced onion on bottom of slow cooker insert, add 1 can of crushed tomatoes and 1/2 the can of peeled tomatoes.
- Heat a large skillet over medium high heat. Add 1/2 tbsp to the pan and, when the oil is shimmering, add a few meatballs to brown-about 1 minute on each side. Be careful not to crowd the pan. When browned snuggle them down into the tomato sauce in the cooker, stacking as more are browned.
- When all are browned add the white wine to the pan and deglaze, scraping the brown bits off of the bottom of the pan. Allow the wine to reduce to half then add it to the slow cooker.
- Add the remaining crushed and peeled tomatoes to the cooker, making sure that all of the meatballs are covered.
- Cook on high for 4 hours or low for 6 hours.
Be sure to brown the meatballs! It adds extra flavor and locks in moisture. Lean turkey dries out easily-browning will help avoid that.

Adapted from howsweeteats.
22 Apr 2013
by sparksfromthekitchen
in Lunch, Main Dish
Tags: chicken, pita
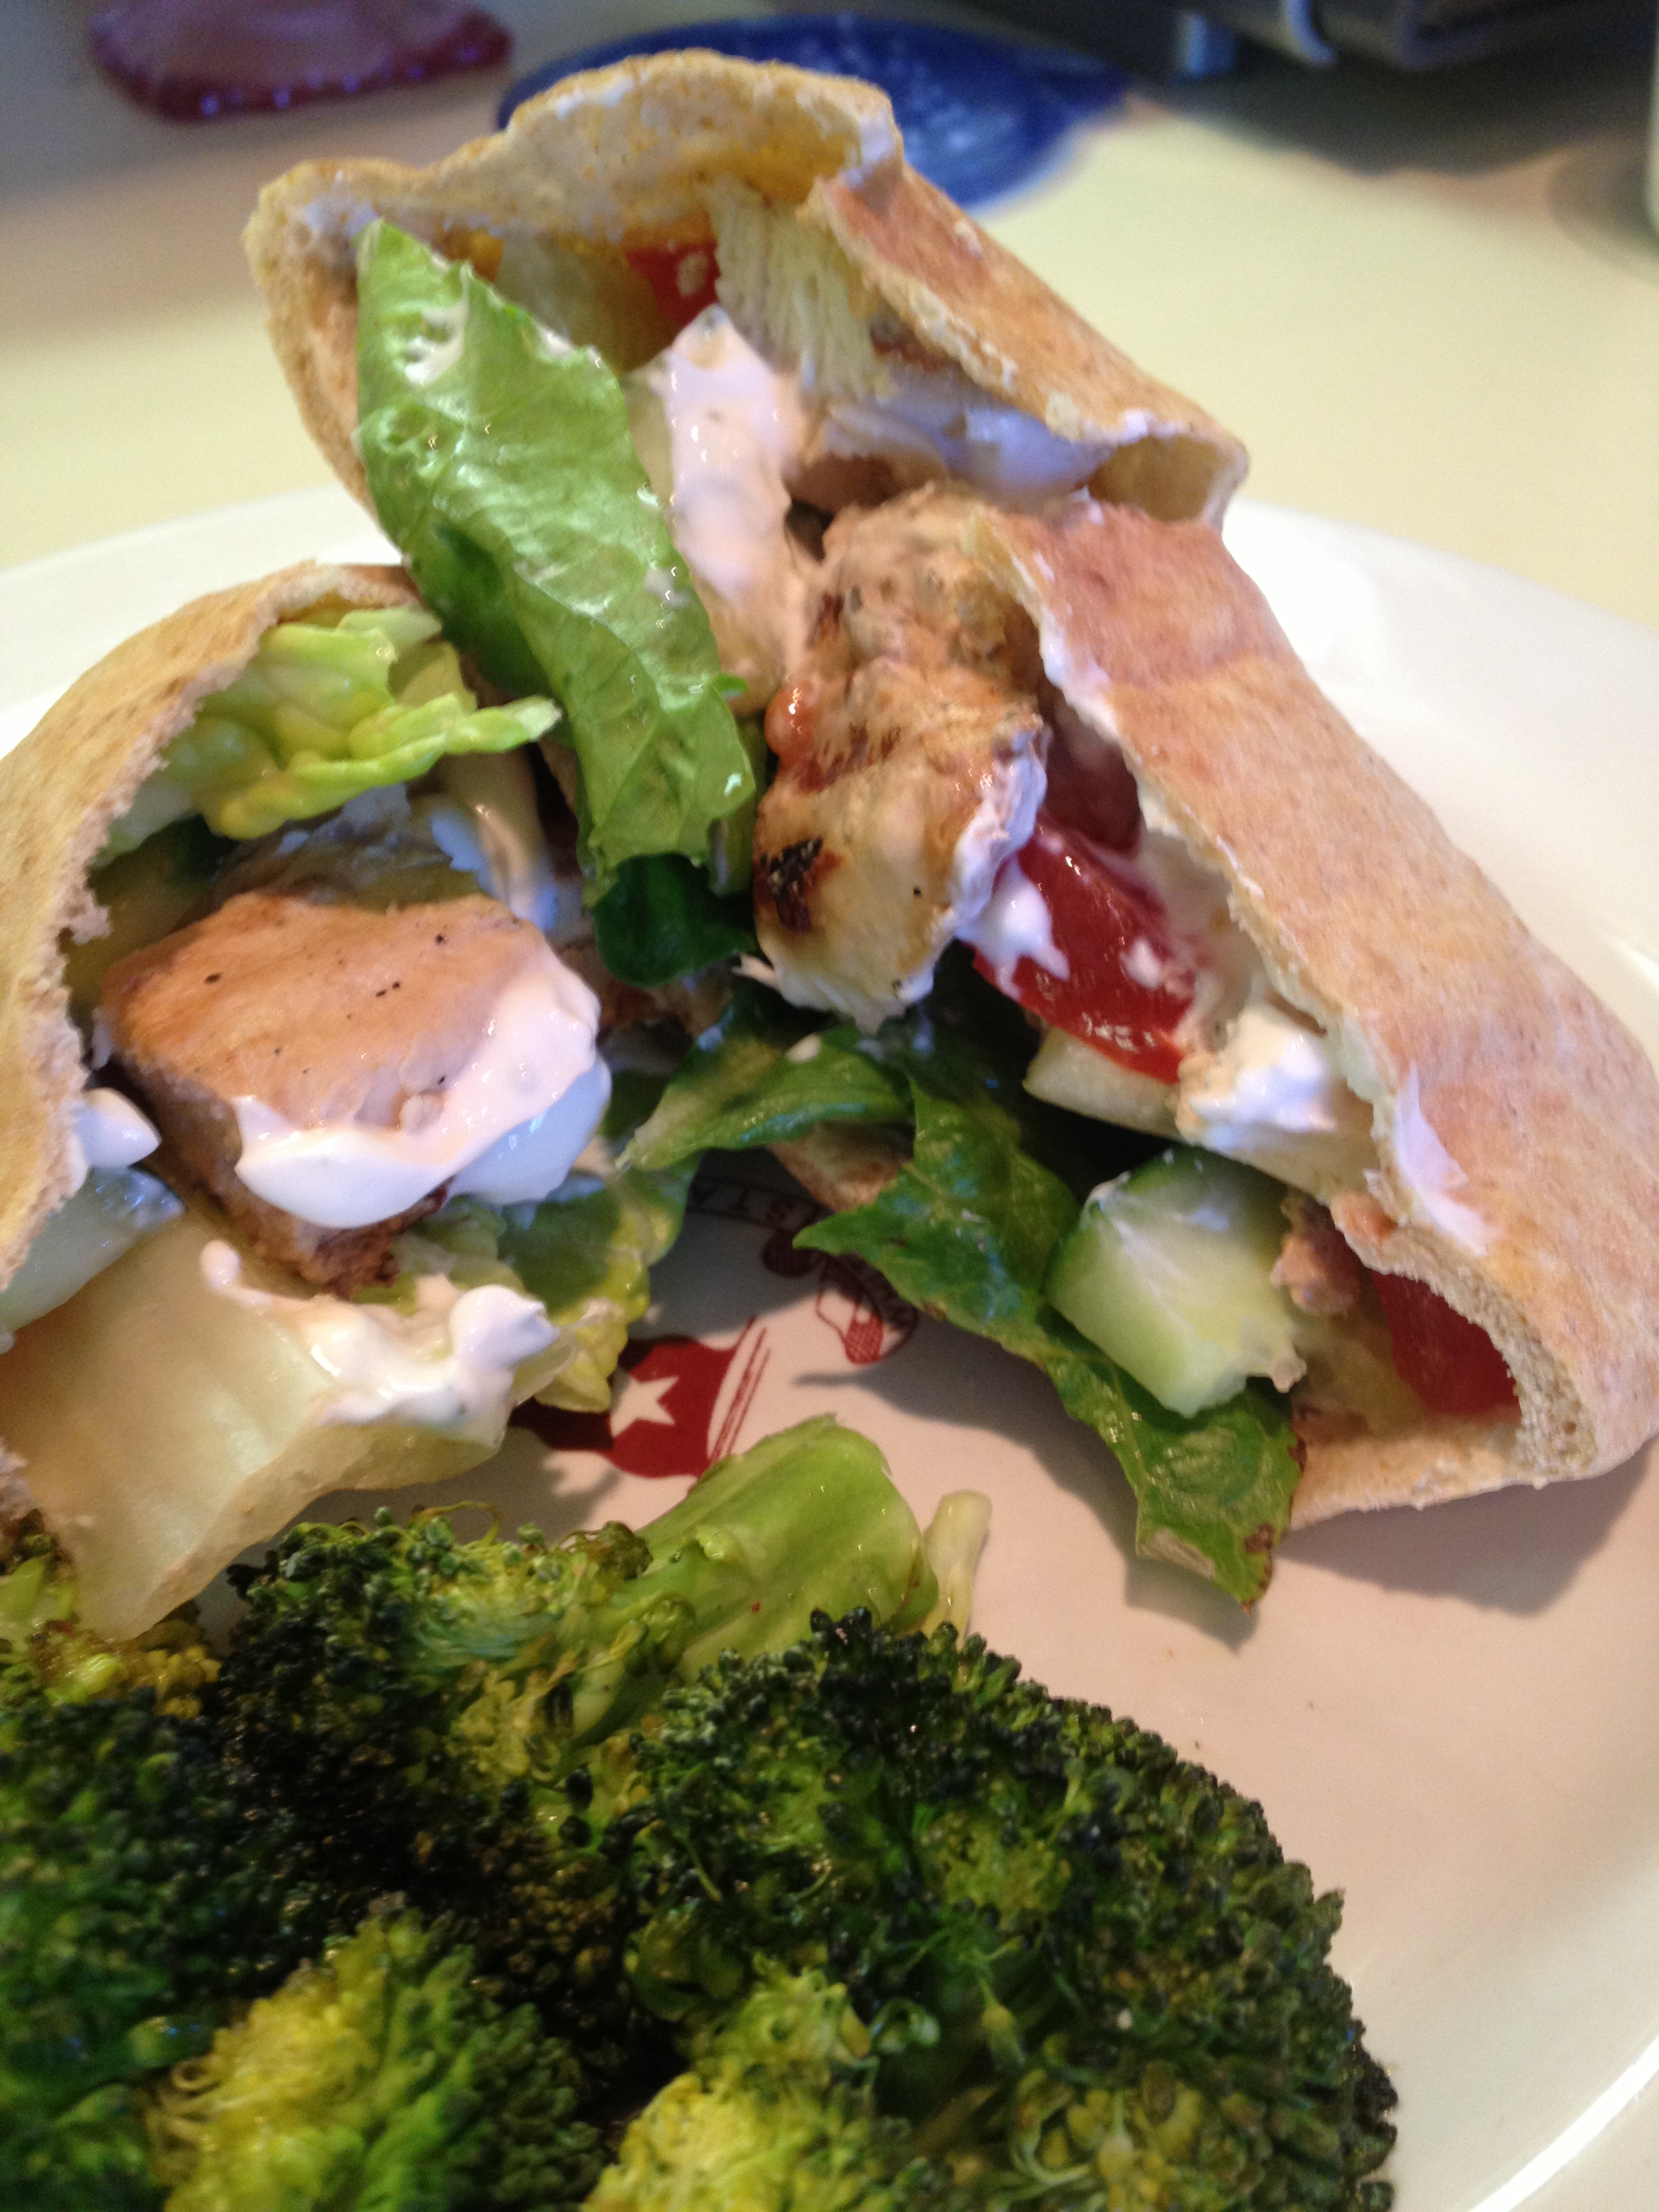
What a great sandwich recipe! It was easy to make ahead of time, the ingredients are inexpensive and you probably already have most, if not all in, your pantry already. The tangy yogurt sauce goes so nicely with the crunchy veggies and the warm grilled chicken. I put the chicken for these in to marinade a day ahead so remember that there is marinating time involved. The instructions below are to prepare everything (while marinating the chicken) a day ahead. These are a snap to put together if everything is precut when you’re ready to assemble the sandwiches. You could also add cheese, olives or a bit of olive oil if you’d like.

Marinated Chicken Pita Sandwich
Ingredients:
For chicken:
- 1.5 lb boneless skinless chicken breasts cut into strips
- 1 6oz container plain greek yogurt
- 2 cloves garlic, chopped small
- juice of 1 lemon
- 1 tbsp Italian seasoning (or a mix of basil, oregano etc…)
For yogurt sauce:
- 1 6oz container plain greek yogurt
- 1/2 clove garlic, smashed to a paste
- 1/2 tsp fresh dill, chopped very small
- 1/4 tsp kosher salt
For sandwich assembly:
- 4 pita breads (I used low-carb)
- romaine lettuce, washed, dried, trimmed and leaves cut in half short ways
- 1 large cucumber, cut into short strips
- 2 vine ripened tomatoes, cut into slices
Instructions:
- Put all chicken marinade ingredients into a large zip-lock bag, smush around to coat, and refrigerate for 24 hours.
- Add all ingredients for the yogurt sauce into a small container with a lid and mix well. refrigerate until ready to use.
- Cut up all veggies and refrigerate until ready to use.
When you’re ready to make the sandwiches:
- Preheat grill, grill pan or panini press (what I used). Cook in batches until cooked thoroughly.
- Cut pita in half, split and spread a layer of the yogurt sauce. Fill the inside with lettuce, cucumber, tomato slices, marinated chicken and a bit more sauce if you’d like. Serve.
03 Apr 2013
by sparksfromthekitchen
in Appetizer, Breakfast, Lunch, Main Dish, Side Dish
Tags: eggs, onion, sausage
I am a huge lover of public television-no commercials and the programming is so great. I don’t know if it’s like this all over but I have a spin-off of one of my regular PBS channels called Create. It’s cooking, crafts, gardening and travel. It’s got great shows-Pepin, Child, America’s Test Kitchen and so on. If you ask me Food Network could learn a lot from them-such variety.
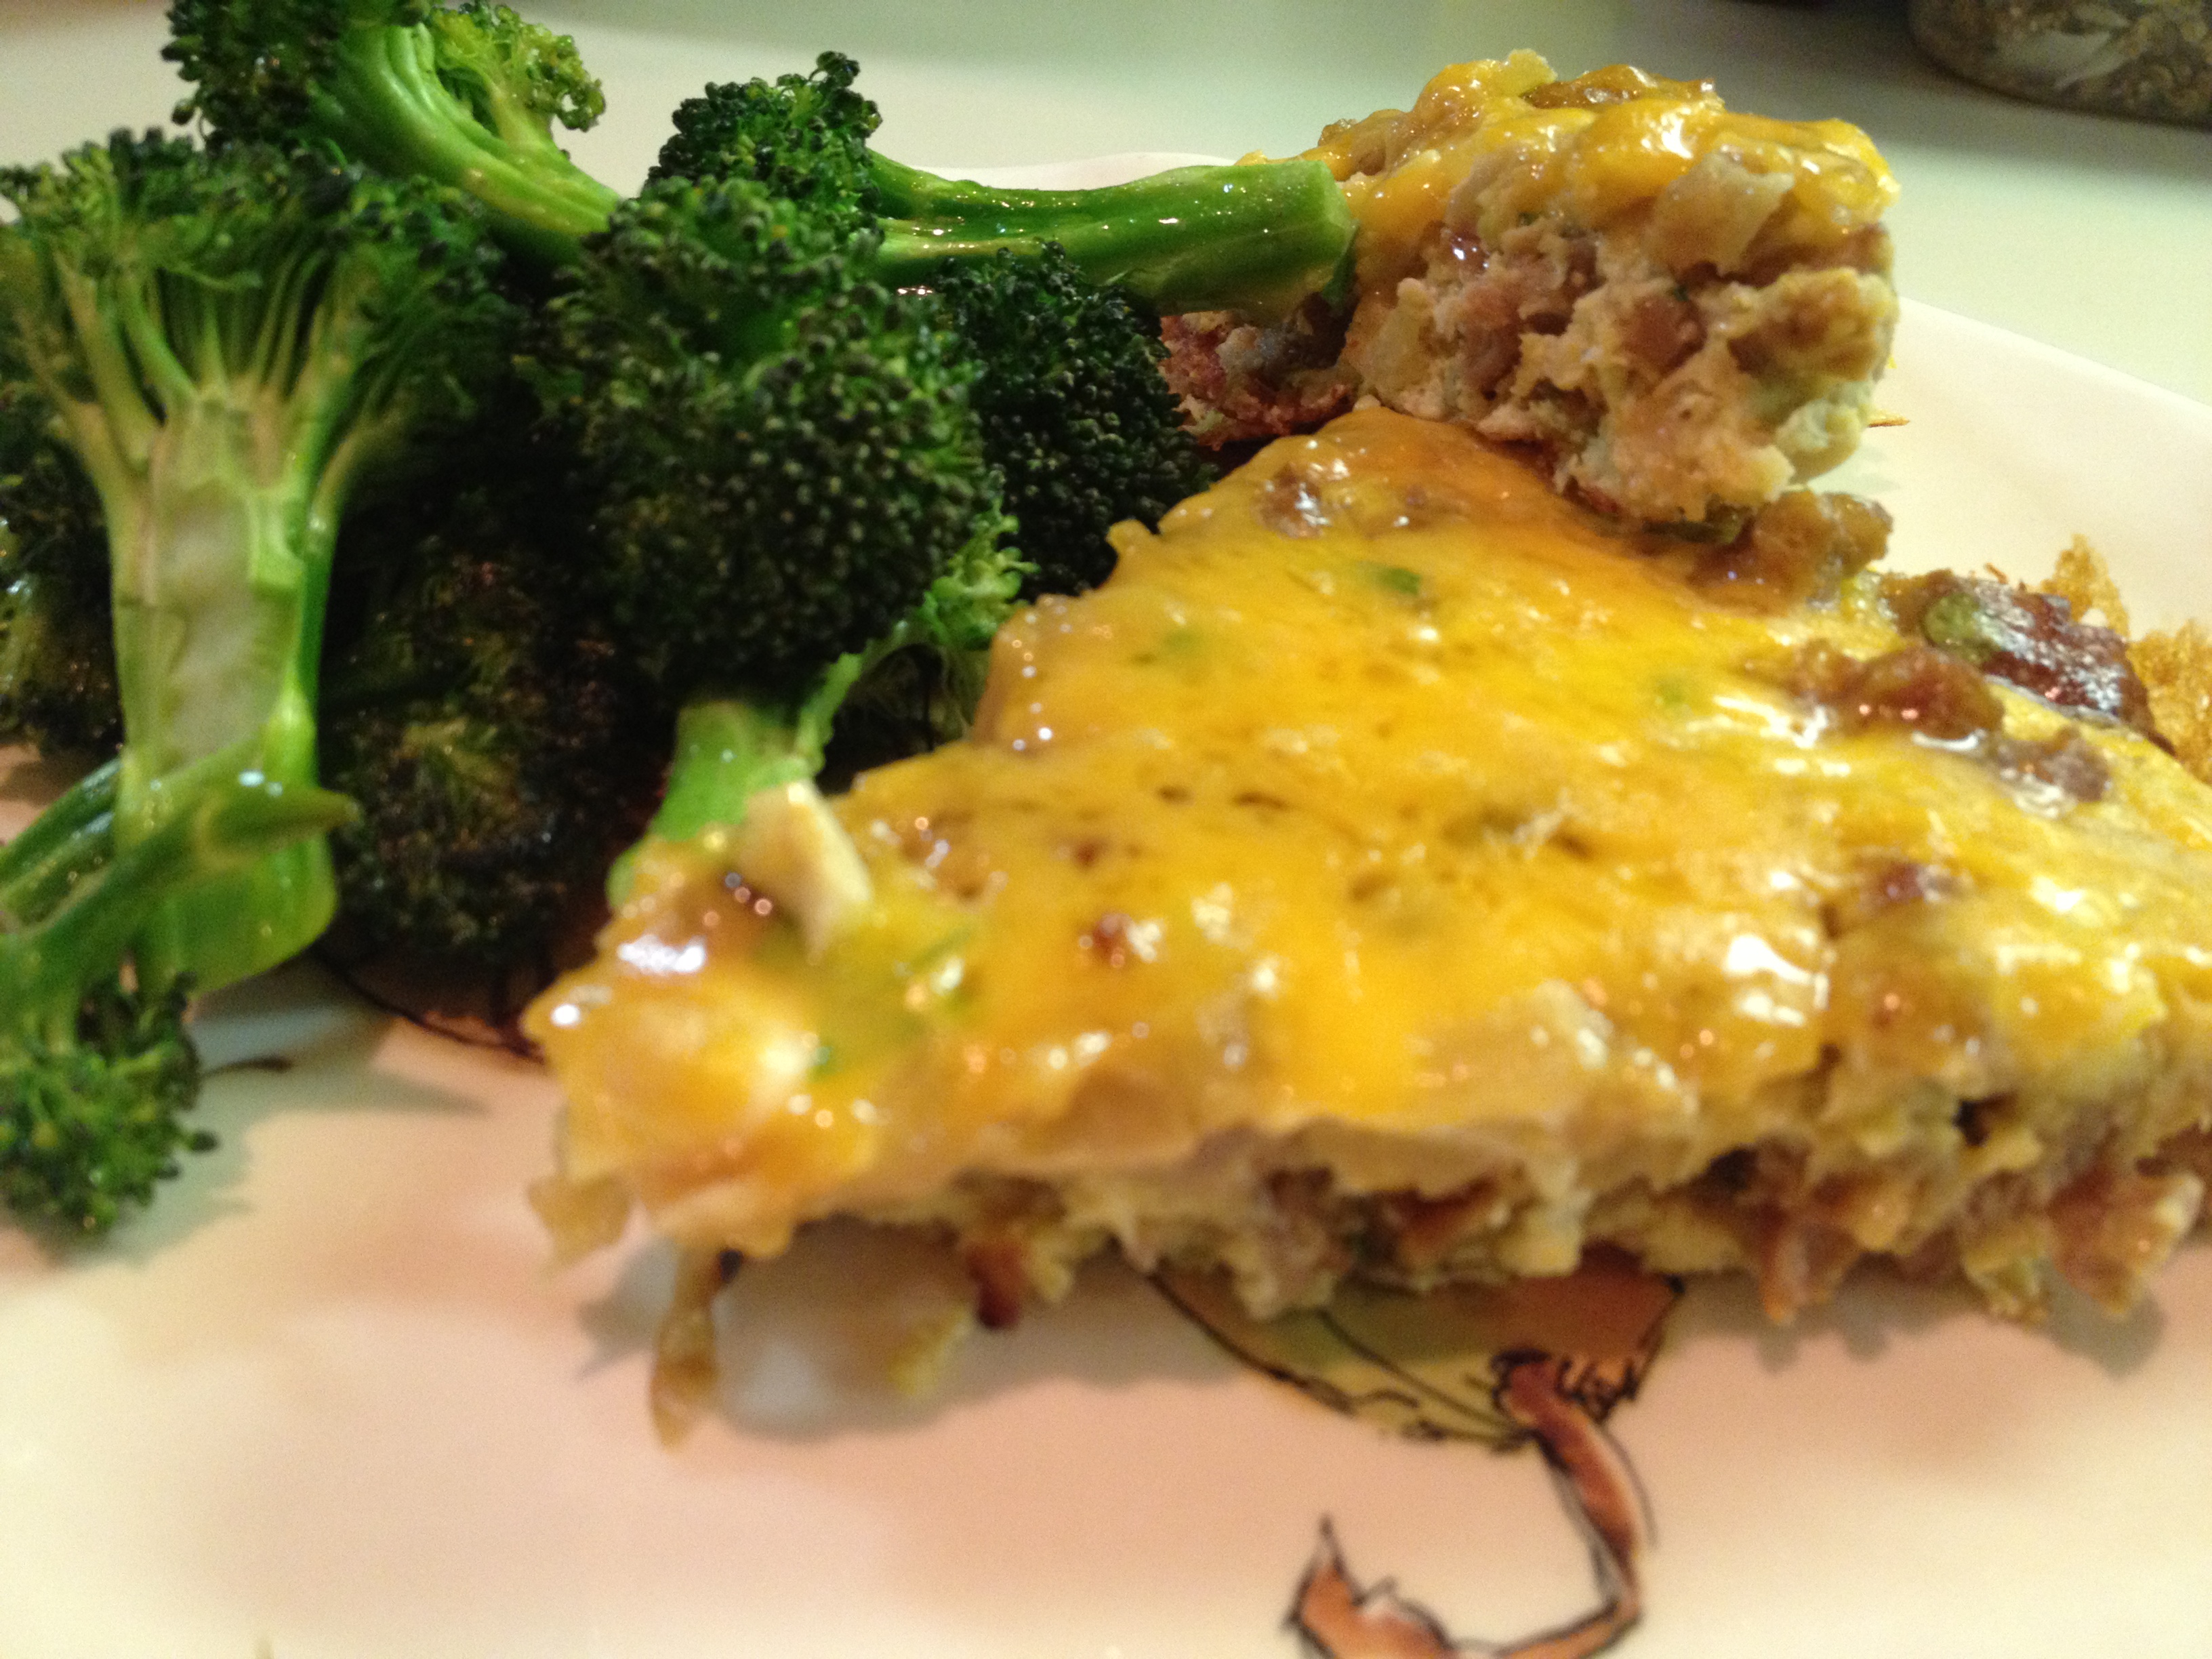
I’m getting off the point here. Nick Stellino is one of the chefs that has a show on the channel and he makes some yummy stuff. The fritatta below was inspired by him. Pretty easy and really tasty. The onions cook for a while so they get nice and sweet. This is delicious warm or great at room temperature the next day or reheated.
I served it with my delicious roasted broccoli.

Fritatta di Saldiccia e Cipolle
Ingredients:
- 6 tbsp olive oil
- 4 onions, sliced
- 1 scallion, sliced
- 1/2 tsp red pepper flakes
- 1&1/2 tsp dried thyme
- 1 tsp kosher salt
- 1/2 tsp white pepper
- 2 tsp garlic, chopped finely
- 1 lb Italian Sausage (I used part sweet part hot) out of the casings
- 2 tbsp fresh parsley, chopped
- 8 eggs
- 1/4 cup freshly grated cheddar cheese
Instructions:
- Cook 3 tbsp oil in an oven-safe 12 inch non-stick skillet over medium-high heat. When it’s hot add the onions, red pepper flakes and thyme and stir well to combine. Reduce the heat to medium-low and cook for 20 minutes, stirring every few minutes to avoid sticking.
- Pre-heat oven to 350F.
- While the onions are cooking brown the sausage. When it’s cooked put the sausage in a strainer to drain of excess fat. Discard the fat and keep sausage on the side for use later.
- In a bowl beat the eggs with 1/2 tsp salt and set aside for use later.
- When the 20 minutes for the onions is up add 1/2 tsp of the salt, the pepper and 1 tsp of the garlic, reduce heat to low and cook for 20 more minutes stirring every few minutes again. Then pour the mixture into a large bowl. Wipe the pan clean.
- Add the cooked sausage and parsley to the onions and mix well. Then add the beaten egg mixture and the remaining garlic and mix well.
- In the pan wiped clean cook the 3 remaining tbsp of oil over medium-high heat. When it’s hot pour the contents of the bowl into the pan. Cook for 2 minutes then stir. Cook for another 5-7 minutes until just set then transfer to the oven and bake for 15 minutes then remove, sprinkle the cheese on the top, and return to the oven for another few minutes until cheese is melted and bubbly. Remove and allow to cool for a few minutes before cutting into wedges and serving.
Serves 4-6
I always worry about burning the hell out of my hand by grabbing the handle of the pan after it’s out of the oven and cooling so usually I keep the handle turned way in so that I can’t grab it. How I never thought to just put an oven mit over the handle before is beyond me. Now I don’t have to worry (and yes those are margaritas on the oven mit :).

29 Mar 2013
by sparksfromthekitchen
in Lunch, Main Dish, Side Dish
Tags: parmesan, quinoa
Parmesan Quinoa
For this month’s blog swap I was assigned Jenna’s blog. Wow she has some great recipes-go take a look! Bee sure to check out the other great recipies from the swap-just click the frog link below.
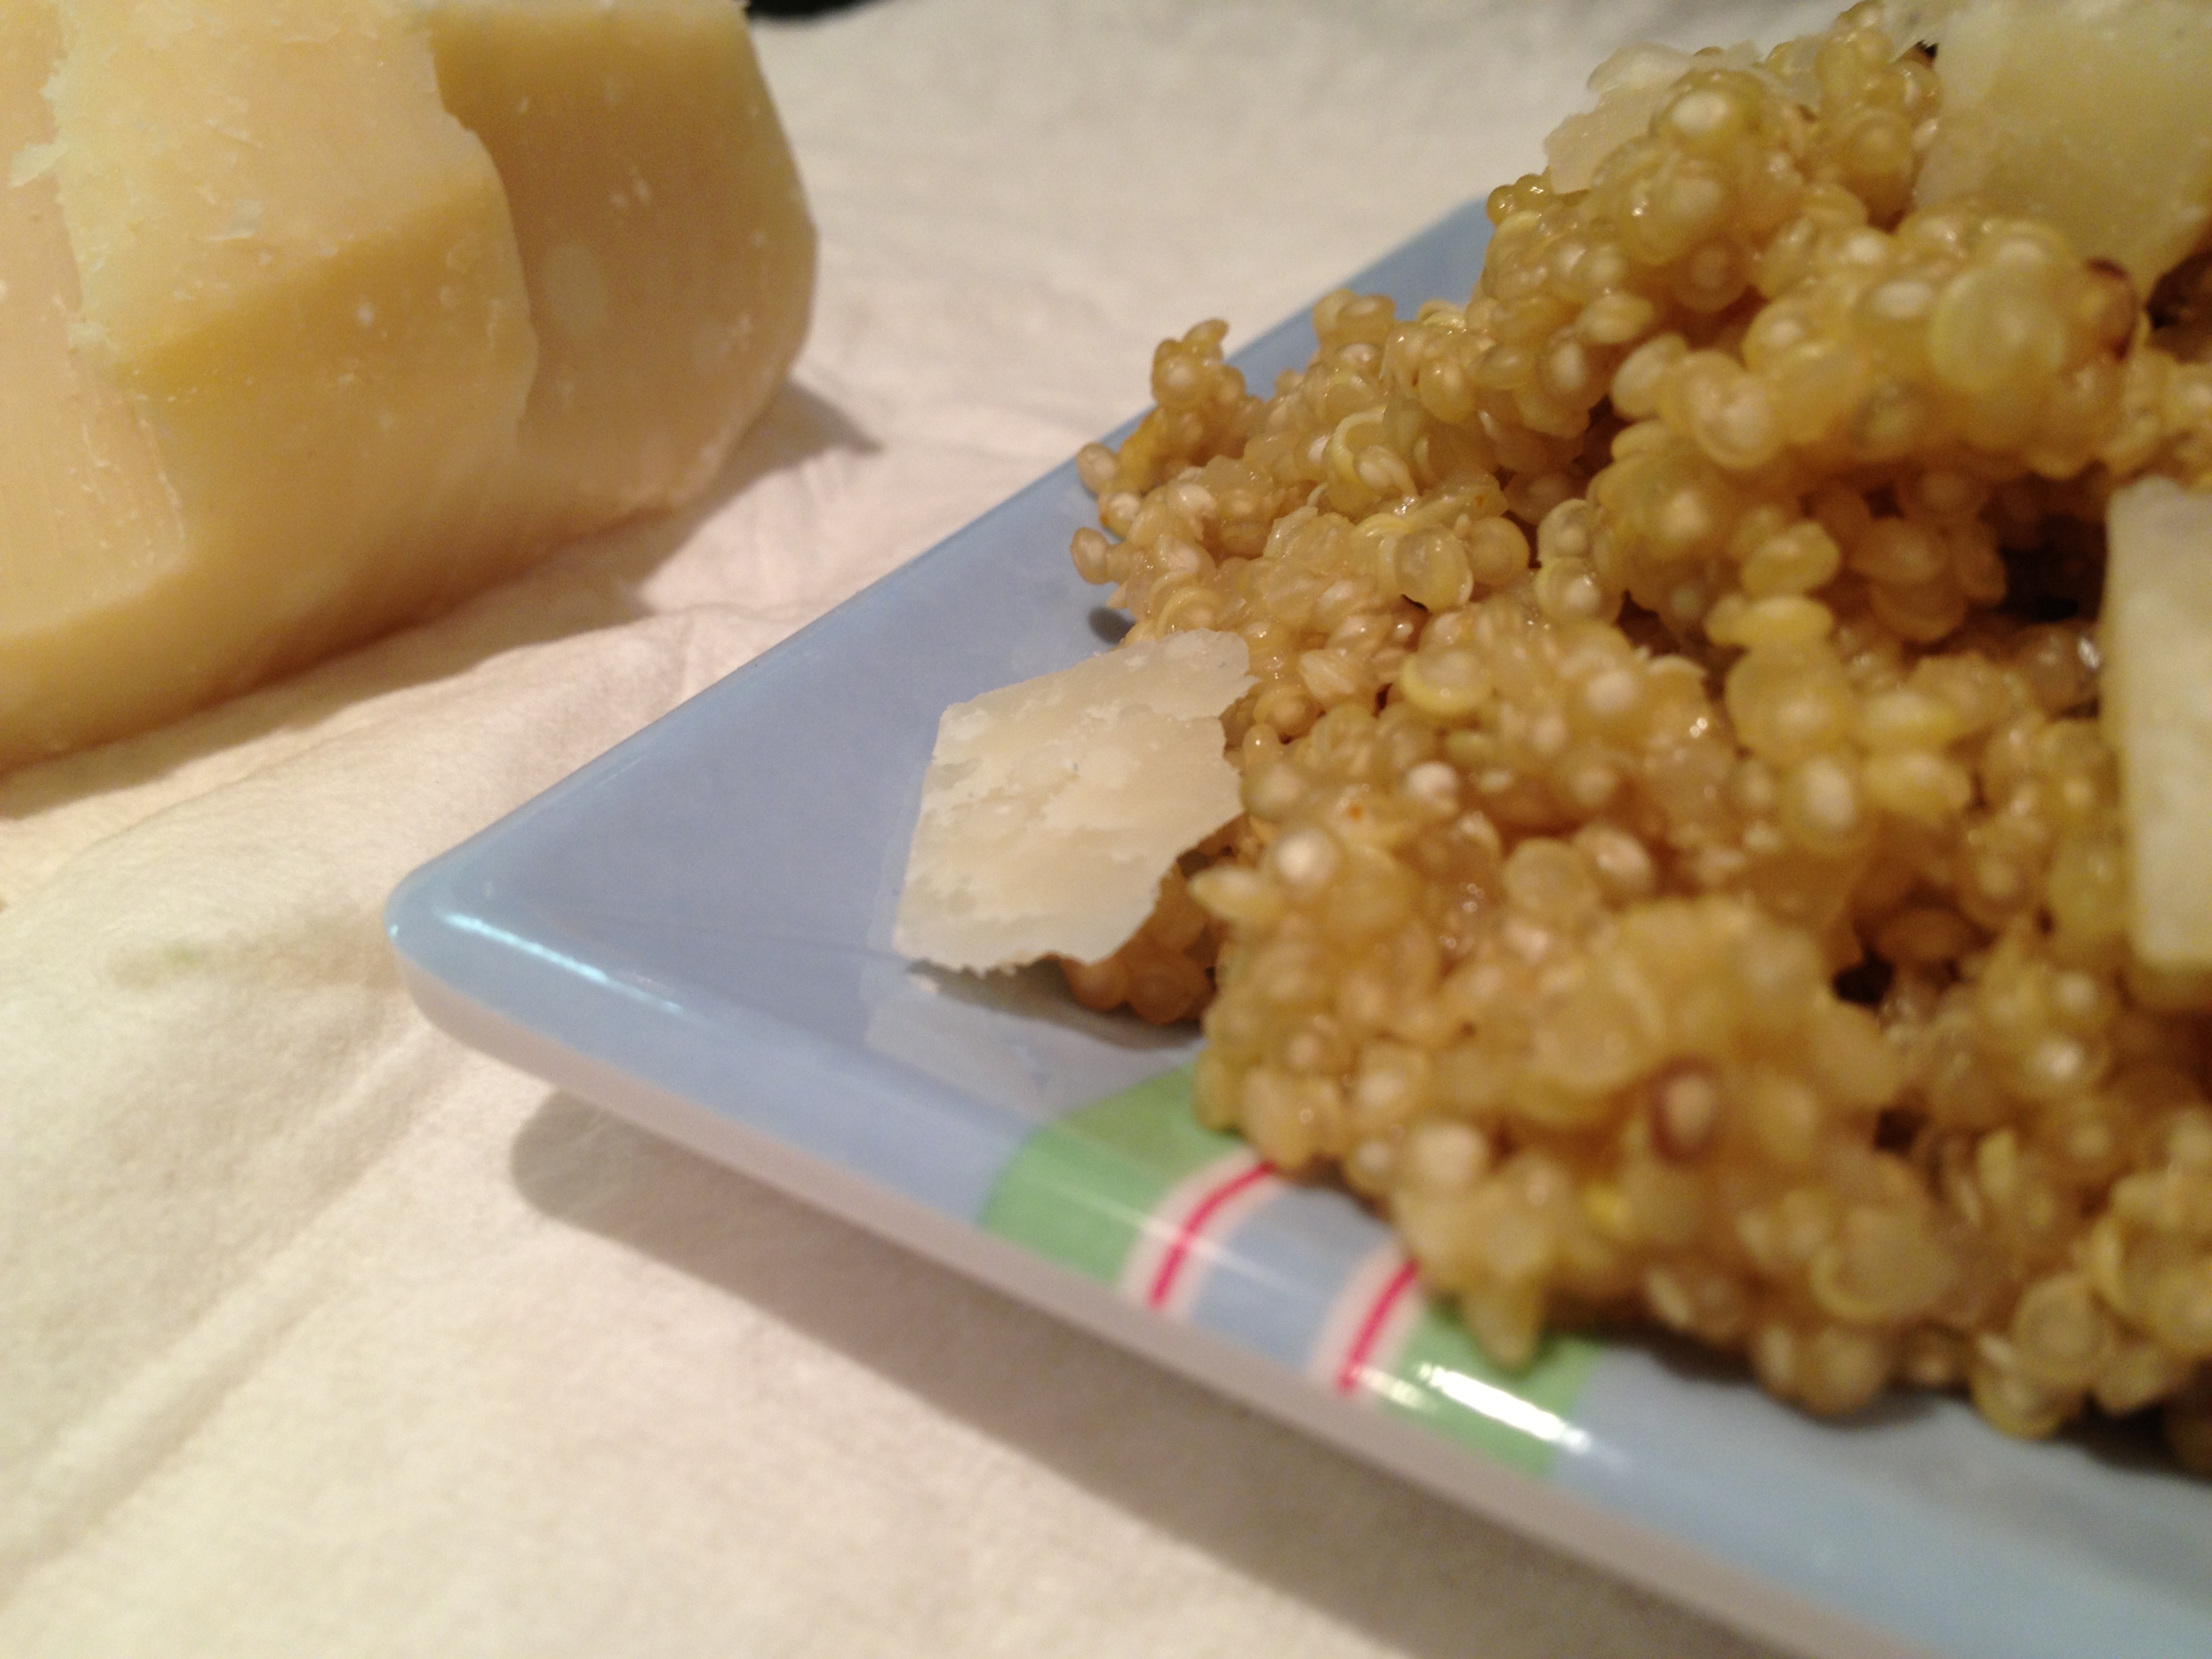
It was tough choosing only one from all of them but in the end I chose Parmesan Quinoa. I’m trying to learn new ways to serve this delicious little grain and, since I put Parmesan on basically everything, this was the natural choice.
In her recipe it calls for a miniscule 2 pinches of Parmesan. Sacrilege darling!! That’s far too little. I upped it quite a bit.

Parmesan Quinoa
Ingredients
- 1 cup uncooked quinoa
- 2 cups fat free low sodium vegetable stock
- ½ cup freshly grated parmesan
Instructions:
- Add the stock and quinoa to a medium sauce pan and place it over high heat. Cook for a total of 12 minutes (it will be a little al dente which is how I like it. Cook it longer if you like it softer).
- Remove from heat and drain. Stir in parmesan and serve.
Note: I buy quinoa that I don’t have to rinse so I omitted that step from the recipe.
Use a high-quality parmesan and a micro-plane to grate it.
Thank you Sarah from http://tasteofhomecooking.blogspot.com/ for hosting the swaps.

27 Mar 2013
by sparksfromthekitchen
in Appetizer, Lunch, Main Dish, Slow Cooker
Tags: buffalo, chicken, slow cooker
This past Saturday was a very windy chilly day. It was sunny but you could tell that it’s still winter for the most part and hasn’t started the turn to spring. Much to my dismay.
I love buffalo chicken. I found a recipe for it and threw the ingredients in to my slow cooker at noon and was eating a delicious buffalo chicken wrap by 7:30. There is almost no prep-unless you consider twisting the cap off of the buffalo sauce bottle. You can do a lot with the finished product too. I made wraps but you could also wrap it in lettuce to eat or eat it with tortilla chips for a snack, put it on a salad—the list goes on and on.

Buffalo Chicken-slow cooker
Ingredients:
- 3 lbs boneless, skinless chicken breast (not frozen. I used 3-1 lb breast pieces)
- 12oz bottle of Buffalo Hot Sauce (I used Tobasco brand)
- 1oz packet of Hidden Valley Ranch Dressing Mix (the dry stuff)
- 2 tbsp light butter
Instructions:
- Place the chicken in the slow cooker. Pour the sauce over it and then sprinkle the dry Ranch Mix over that.
- Cook on low for 6 hours.
- Remove meat and shred with 2 forks.
- Add the butter to the sauce in the cooker and stir to combine.
- Return chicken to the cooker, stir to coat chicken in sauce, and cook for another 30 minutes.
To make the wrap in the photo above I smeared some Ranch dressing on the wrap then piled on some chicken and then some celery. Then just wrap it up and eat.

Very slightly adapted from emilybites.com
Previous Older Entries Next Newer Entries