Cornbread

I don’t think there’s anything that goes better with chili than fresh cornbread. Sure you can buy a boxed mix or muffins but it’s so easy to make from scratch why bother with either of those? 

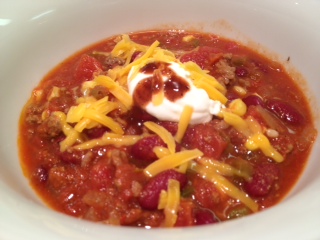
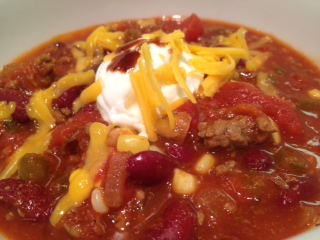
Husband and I had planned to go out and watch Sunday football this past weekend but were unable to due to unforseen circumstances. So we decided to make it a fun day inside instead. I served this bread with Sunday Aftenoon Chili.

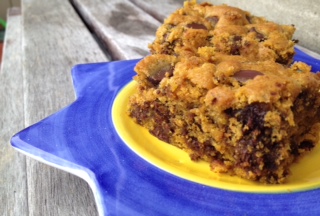
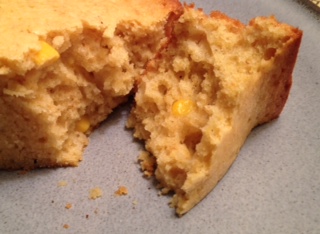
Here’s an easy recipe that delivers a tall bread perfect for dipping or sopping up or just enjoying plain. It’s got that slightly sweet cornbread taste, isn’t gritty, and is delicious hot but also very tasty cold for left overs. The crust is beautifully crisp. It contains corn kernels which adds a nice texture and taste but you could just as easily leave them out or replace with something else-scallions, bacon pieces or anything else that you’d like. See those yummy kernels in there?

cornbread2

Cornbread

Ingredients:

  • 1 cup cornmeal
  • 1 cup all purpose flour
  • 1/2 cup granulated sugar
  • 1/2 tsp baking soda
  • 1/2 tsp salt
  • 2 large eggs
  • 1 cup buttermilk
  • 1/2 cup (1 stick) unsalted butter, melted and cooled
  • 1/2 cup corn kernels

Instructions:

  1. Pre-heat the oven to 350.  Spray a 9×9 pyrex or similar baking dish with non-stick baking spray and set aside.
  2. In a large bowl whisk ingredients cornmeal through and including salt.
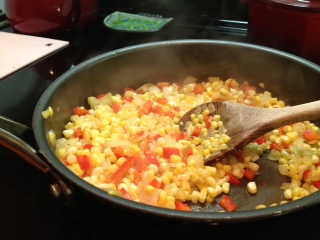
  3. In another bowl beat together the eggs, buttermilk and butter. When combined add the corn.
  4. Add the wet mixture to the dry and fold until just combined.
  5. Pour the batter into the prepared baking dish and bake for 30 minutes until a toothpick stuck into the center comes out clean.
  6. Remove the dish from the oven and let the cornbread rest for 5 minutes before serving.

cornbread1

Recipe from Brother Jimmy’s BBQ cookbook.

Advertisement

Sunday Afternoon Chili

The fall bug has bitten! I can’t wait to make up all kinds of soups and stews and have a gray afternoon with something simmering on the stove all day.

As I wrote in the post for the cornbread that I served with this chili, Husband and I had a Sunday football day at home instead of heading out to the bar with friends. That cornbread and this chili was our dinner and it was delicious. This chili is meaty, it’s bean-y, it’s got some underlying spice and heat but it’s not spicY or hot. You can always add a squirt of hot sauce if you’d like but I like to keep the heat factor down a bit and go up from there.

The original recipe called for smoking the meat but since we don’t own a grill or a smoker we skipped that step.

chili1

Sunday Afternoon Chili

Ingredients:

  • 1&1/2 lbs ground sirloin
  • 2 cups diced Spanish onion (about 1 large)
  • 2 cups diced green pepper (about 2 large)
  • 3 garlic cloves, smashed to a pulp
  • 1 jalapeno pepper, diced, seeds and spine removed
  • 1&1/2 tbsp ground cumin
  • 1&1/2 tbsp ground coriander
  • 1 tsp ancho chili powder
  • 1/2 tsp chipotle chili powder
  • 1/2 tsp chili powder
  • 1 tsp dried oregano
  • 1&1/2 tsp kosher salt
  • 1 32 oz can crushed tomatoes
  • 1 15 oz can diced tomatoes, not drained
  • 2 15 oz cans dark kidney beans, drained and rinsed
  • 6 ozs beer (we used Belfast Bay Lobster Ale-a red ale)
  • toppings of your choice-fat free sour cream, grated cheese, scallions etc..

Instructions:

  1. Brown the beef until almost cooked through in a heavy bottomed stock pot, drain the excess fat, then add the onion and green pepper, garlic and jalapeno and cook until beef is cooked through.
  2. Add the rest of the ingredients and bring to a boil. Reduce heat to a simmer and cook, stirring occasionally, for at least 90 minutes.
  3. Serve as is or top with a dollop of sour cream, grated cheese, squirt of hot sauce, scallions etc……

chili3

Adapted from Brother Jimmy’s BBQ cookbook Smoky BBQ Chili.

Chicken Enchiladas with Salsa Verde

I will warn you before you start reading this-this is not a fast 30 minute recipe. In fact it’s more like 90 minutes but most of that time is simmering or reducing or things you can do while paying attention to other stuff so don’t be afraid of it. But it’s worth it! These came out so great. I did cook them on a weeknight so it can be done. Perhaps next time I can prepare the chicken and sauce over the weekend ahead of time and then just heat/bake to serve. That would make this a super fast dinner to put together. In any event they’re surprisingly filling and very very very tasty.  Don’t skip the sauce reducing or the chicken poaching-those steps develop very delicious flavor levels. 

I served these with the sweet corn and bell  saute on the side. Very nice together.

enchilada2

Chicken Enchiladas

Ingredients:

  • 4 cups cold water
  • 2 cups fat-free lower sodium chicken broth
  • 1 tbsp whole black peppercorns
  • 5 garlic cloves crushed
  • 2 6oz skinless, boneless chicken breasts
  • 2 celery stalk, chopped coarsely
  • 1 large carrot, peeled and cut into 1/2 inch pieces
  • 1 serrano pepper, cut in half most of ribs and seeds removed (remove all or none to taste. The more seed/ribs the hotter it is)
  • 1/2 medium yellow onion, cut into wedges
  • 1 7oz can salsa verde
  • 1/4 cup heavy whipping cream
  • 1 cup tomato, seeds removed and chopped
  • 1 tbsp dried cilantro
  • 1/4 tsp kosher salt
  • 1/2 tsp ground cumin
  • 1/4 tsp cayenne pepper
  • 4 ozs whipped greek yogurt cream cheese (or regular cream cheese)
  • 8 10 inch tortillas
  • cooking spray
  • 2 ozs freshly grated low-fat sharp cheddar cheese
  • fat-free sour cream for topping
  • salsa for topping

Instructions:

  1. Combine the first 9 ingredients (water through and including onion) in a pot over medium heat and bring to a simmer. Cook it for 8 minutes or until chicken is done (time may vary depending on thickness of chicken pieces).  Remove the chicken and set aside. Drain the cooking liquid through a colander over a bowl. Keep the liquid and discard the vegetables.  When the chicken is cool enough shred it with two forks and set aside.
  2. Pour the cooking liquid back into the same pot and add the salsa verde and bring to a boil over medium-high heat. Cook until it’s reduced to about 1&1/2 cups (30-40 minutes). Reduce to low heat, stir in whipping cream. 
  3. Preheat oven to 400.
  4. Spray an 11×7 baking dish with cooking spray and set aside.
  5. Place the chicken into a medium mixing bowl. Add tomato and next 5 ingredients (through and including cream cheese). Stir to combine.
  6. Dip each tortilla into the liquid for a few seconds then shake to remove excess. Place 1/3 cup of chicken mixture onto the tortilla and roll it up. Place the filled tortilla seam side down in the prepared baking dish. Repeat until you can’t fit any more tortillas in the dish. Spoon some of the liquid over the top of the tortillas and then sprinkle all of the cheese evenly on the top.
  7. Bake at 400 for about 25 minutes or until lightly browned.
  8. Serve immediately with toppings suggested above or anything else you’d like.

Adapted from Cooking Light, October 2013.

Pumpkin & Chocolate Chip Squares

This past weekend was the autumnal equinox and it’s finally fall! I can’t think of any other time of year that I like more. That being said it’s time for pumpkin.  Husband and I were heading over to my Grandmother’s house for lunch on Saturday with her and my Mom and I wanted to bring something with me for all of us to have as a treat after our lunch. This was a perfect recipe to make! I started a little later than I wanted to on Saturday morning so the tasties didn’t have time to cool completely but it was ok-I put them in a container with an ice pack and they were nice and cool by the time we got to her house.

They’re not overly spiced or overly pumpkin and using dark chocolate is the right way to go. They’re just right.

Make sure you buy pumpkin puree NOT pumpkin pie filling (has the spices in it).

And how cute is this photo? That’s Timothy, our dog,  and while he really wanted a piece I couldn’t give him any because of the chocolate. He got a biscuit instead and was fine with it.  I think I should rename these Timothy squares-they’re the same colors as he is.

pump2

Pumpkin Chocolate Chip Squares

Ingredients:

  • 2 cups all-purpose flour
  • 1&1/2 tsp cinnamon
  • 3/4 tsp ground ginger
  • 1/2 tsp ground nutmeg
  • 1/2 tsp allspice
  • 1/2 tsp ground cloves
  • (you may sub 1 tbsp pumpkin pie spice for the last 5 ingredients above)
  • 1 tsp baking soda
  • 3/4 tsp salt
  • 1 cup (2 sticks) unsalted butter, at room temperature
  • 1&1/4 cups granulated sugar
  • 1 large egg
  • 2 tsp vanilla extract
  • 1 cup canned pumpkin puree
  • 12 ozs semi-sweet chocolate chips

Instructions:

  1. Pre-heat oven to 350.  In an 9/13 baking pan or dish lay one piece of aluminum foil the long way and press into the pan. Then lay another piece of foil the short way. In both directions leave enough extra foil to have a  bit of an overhang so that you can pull the squares out easily. Set it aside.
  2. In a medium bowl add the flour, pie spice or spices, baking soda and salt. Whisk to combine thoroughly and set aside.
  3. In the bowl of a stand mixer cream the butter and sugar together using medium-high speed until smooth.  Beat in the egg and vanilla until combined then add the pumpkin puree (mixture may appear curdled but that’s ok). Change the speed to low and add the dry ingredients a bit at a time until just combined. Remove the bowl from the stand, add the chocolate chips and gently fold them into the batter using a spatula. Be careful to not over-mix.
  4. Pour the batter into the prepared dish-spread to even out. Bake for 35-40 minutes until a toothpick stuck into the middle comes out with just a few crumbs attached.
  5. Move pan to a cooling rack and allow to cool completely.

pump1

From marthastewart.com

Red Bell Pepper & Sweet Corn Saute

Sweet yellow summer corn, crunchy red bell pepper, tangy onion and savory garlic all sautéed in a touch of butter and rounded out with just the tiniest hint of soy sauce.   This might just be one of the tastiest sides I’ve ever eaten. It’s so easy that someone who’s never cooked before could master it on the first try. It’s tasty enough to serve alongside with anything at the fanciest of restaurants or the most casual of tables—and it’s just really pretty to boot.

Note: the original recipe called for frozen corn but since delicious sweet corn is still available at the market I used that instead. Feel free to sub the frozen corn when fresh is not available.

corn2

Red Bell Pepper & Sweet Corn Saute

Ingredients:

  • 1&1/2 tsp butter
  • 1/2 cup onion chopped small
  • 1 red bell pepper chopped small
  • 2 garlic cloves, smashed to a pulp
  • 3 ears fresh sweet corn, husked and kernels removed from cob
  • 1/4 tsp freshly ground black pepper
  • 1 tsp low-sodium soy sauce

Instructions:

  1. In a large non-stick skillet over medium-high heat melt the butter. Add the onion, red bell pepper and garlic and saute about 4 minutes. Add the corn and pepper and saute until the corn is cooked through and starting to soften.
  2. Remove from heat, add the soy sauce and stir to incorporate. Serve immediately.

corn1

Adapted from Bell Pepper and Corn Saute Cooking Light October 2013.

Sugar Snap Peas & Sprouts

Sometimes the most difficult part of a meal is choosing the side dish. Often I know that I want something tasty but not too involved and perhaps something versatile that can be changed up every now and again while using the same basic recipe.  I give you Sugar Snap Peas & Sprouts-which is exactly that. A tasty, fast-cooking, minimal prep, delicious side that is easy to put different spins on. Perhaps silvered almonds, perhaps hoisin sauce, perhaps add cooked brown rice for more of a fried rice feeling without the guilt. Either way it’s a winner.

swap2

Sugar Snap Peas & Sprouts

Ingredients:

  • 1 tbsp dark sesame oil
  • 1 tbsp freshly grated ginger
  • 2 garlic cloves, minced
  • 1/2 lb sugar snap peas
  • 1 tbsp sesame seeds
  • 1/3 cup sprouts (I used a combo of chick pea, lentil and bean sprouts)
  • 2 tbsp low sodium soy sauce

Instructions:

  1. Heat sesame oil in a large pan over medium-high heat
  2. Add ginger and garlic and saute about 2 minutes until fragrant
  3. Add the sesame seeds and cook for another minute
  4. Add the sugar snap peas and saute for about 3 minutes then add the sprouts and soy sauce and continue to cook another minute or 2 until the peas are crisp-tender.
  5. Serve immediately.

Recipe adapted from Mary Ellen at http://mecookingcreations.blogspot.com/

Thanks again to Sarah @ http://tasteofhomecooking.blogspot.com/ for hosting this month’s swap.

Taco Casserole Bake

It seems that over the last week that the weather has turned more towards fall even though it’s still summer until the 22nd. And with fall comes cozy Sundays watching football. And with Sunday football comes yummy food. And that yummy food category just got a new additon. This casserole is as easy to make as it is tasty. I found the original recipe on BettyCrocker.com and lightened it up a ton by using fat-free refried beans, super-lean ground beef, reduced fat cheese and fat-free sour cream.  Even better-I had all of the ingredients I needed in my pantry already.

taco3

Taco Casserole Bake

Ingredients:

  • 1lb lean ground beef
  • 1 16oz can fat free Refried Beans (Old El Paso)
  • 8 ozs medium spicy salsa (I used Fairway brand)
  • 1 8oz can tomato sauce
  • 1 Taco Seasoning Packet or homemade taco seasoning
  • 2&1/2 cups smashed tortilla chips
  • 1 red bell pepper, chopped small
  • 4 scallions, chopped
  • 2 vine-ripened tomatoes, chopped, seeds and cores removed
  • 1 cup freshly-grated reduced fat cheddar cheese
  • fat free sour cream, salsa, shredded lettuce, olives, other toppings of choice

Instructions:

  1. Pre-heat oven to 350.
  2. In a large skillet brown the beef over medium-high heat and drain. Stir in the beans, salsa, tomato sauce and taco seasoning. Reduce heat to medium and cook for a few minutes, stirring constantly, to combine.
  3. On the bottom of a 2 quart baking dish place 2 cups of the smashed toritlla chips then pread the beef mixure evenly over the chips then sprinkle the pepper, onion, 1 cup of the chopped tomato and the cheese.
  4. Bake uncovered 25-30 minutes until bubbling and cheese has melted.
  5. Serve with the remaining tomatoes and chips on the side topped with anything else you’d like.

Note: this also reheats beautifully for left overs.

Taco1

Crispy Baked Cod with Tangy Dill & Pickle Sauce

I’m a sucker for a good piece of fish. When I received my latest issue of Cooking Light and saw Crispy Fish with Lemon-Dill Sauce I knew that I had to make it right away. I changed a few things about it–especially the sauce. That’s why I changed it’s name.

The title didn’t lie. It’s crispy. Really crispy. And that’s a good thing. I chose to make this dish with Cod but you could also use flounder, bass, tilapia etc… It cooks fast and is a really simple dish to put together-great for a fast weeknight meal or, in my case, a great dinner after a busy Saturday of running around.

cod1

Crispy Baked Cod with Tangy Dill & Pickle Sauce

Ingredients:

  • 1 large egg white, beaten
  • 1 cup panko
  • 1/4 tsp hot paprika
  • 1/2 tsp granulated onion
  • 1/2 tsp garlic powder
  • 2 4oz skin-less fresh cod filets
  • 1/2 tsp freshly ground black pepper
  • 1/4 tsp kosher salt
  • Cooking spray
  • 2 tbsp – mayonnaise (Hellmann’s)
  • 1-2 tbsp finely chopped dill pickle (to taste)
  • 1/2 tsp fresh lemon juice
  • 1/4 tsp dried dill

Instructions:

  1. Pre-heat broiler to high.
  2. Place egg white in a shallow dish.  In a 2nd dish combine panko and next 3 ingredients and mix to combine.
  3. Spray a broiler pan with cooking spray.
  4. Sprinkle salt and pepper onto both sides of fish then dip each fillet in the egg and then roll in panko to coat evenly.  Place fillets on the prepared broiler pan and broil 4 minutes on each side or until cooked through. Time will depend on fillet size.
  5. While fish is cooking prepare the sauce. Combine the last 4 ingredients in the list above in a small bow, stir and serve on the side with the fish.

Swiss Smashed Baked Potato

I’ve been on a baked potato kick lately and created a really super tasty one last night that I wanted to share with you. I’m always trying different toppings-salsa with sour cream, chives etc.. If you’re looking for something a bit different but amazingly tasty look no further. The swiss cheese makes it tangy yet incredibly smooth.

You can see in the photo below how light and creamy the potato is. It couldn’t be simpler to make.

swiss potatos

Swiss Smashed Baked Potato

Ingredients:

  • 1 Yukon gold potato
  • 1 wedge Laughing Cow Light Creamy Swiss Cheese
  • Sprinkle of butter powder or pat of butter (I used the butter powder that we put on fresh home-made popcorn).
  • Salt & pepper to taste

Instructions:

  1. Poke holes in the potato with a fork then wrap it in a paper towel. Microwave the potato for about 6 minutes (depending on microwave).
  2. Remove the potato from the microwave, discard the paper towel and put the potato into a small bowl. Cut into the potato crossways then the long ways going all the way through. Push the pieces apart to make room for the butter and cheese.
  3. Sprinkle butter over the potato then mash in the swiss cheese evenly. Taste and add salt and pepper to taste. Mash it all around again.
  4. Serve immediately.

I didn’t have any but I would imagine that sliced green onions would be fabulous on top of this potato.

SFTK original.

Turkey Taco Soup-slow cooker

I realize that since it’s only September 9th that there are still 2 weeks of summer left. You’d never know that it’s still summer. Everyone apparently times the beginning of fall by when their kids go back to school. Well since my dog doesn’t go to school I go by the real seasonal calendar.

That’s not to say that  I won’t embrace everything fall early. I’m looking forward to making soups and apple this and that and pumpkin this and that. And I did have my first Pumpkin Spice Latte from Starbucks yesterday: non-fat, no foam, 140 degrees, half syrup-and it was perfect.  It’s the PSL’s 10 year anniversary this year. Happy birthday you delicious wonder!!!

So on that note my first soup of the time surrounding the beginning of fall is here. It’s a delicious concoction of ingredients you probably have all of (or most of)in your pantry.fridge.freezer already. If you read my other slow cooker recipes you know that I became quickly enamored with that little machine.  Here’s another recipe to feed that obsession. 

It’s hearty but not heavy, it’s well spiced but not hot, it’s not too thick or too thin.  In other words-it’s just right.  I just served this plain in the bowl but you could always put a dollop of sour cream or green onions or cheese.

taco soup

Turkey Taco Soup-slow cooker

Ingredients:

  • 1 lb lean ground turkey
  • 1 medium yellow onion, chopped small
  • 1 16 oz can kidney beans
  • 1 16 oz can pinto beans
  • 1 15 oz can sweet corn
  • 1 8 oz can tomato sauce
  • 2 14.5 oz can diced tomatoes
  • 1 4 oz can diced green chiles
  • 1 package taco seasoning or 2-3 tbsp home-made taco seasoning

Instructions:

  1. In a pan over medium heat brown the turkey, drain it and set it aside.
  2. Place the turkey and onions in the slow cooker, pour everything else in and stir.
  3. Cook on low for 6&1/2 hours.

Adapted from allrecipes.com. The original recipe called for adding 2 cups of water but I didn’t add any and the liquid amount was fine.  The original recipe also called for using ground beef but I changed it to turkey to cut calories and fat and to use up some ground turkey that I had in my freezer. I’m sure you could also omit the meat all together and add tofu to make it vegetarian.

Previous Older Entries