Pumpkin Steel Cut Oatmeal

Fall is definitely here and pumpkin is out and about in all of it’s glory.  This past Sunday morning was a beautiful Long Island fall morning-chilly and crisp with the leaves just only barely beginning to change colors.  In other words the perfect morning for some delicious warming oatmeal.  Last October I posted this recipe for Maple & Brown Sugar Steel Cut oats and I used it as the basis for the oatmeal below. It’s a perfect satisfying delicious start to the day.

This isn’t a sweet or pumpkin pie like oatmeal-if you’d like it more sweet feel free to add it in, but I’m ok with just a sprinkle of brown sugar. For more of a pumpkin pie flavor add some pumpkin pie spice.  Also note: it saves and reheats wonderfully.  The recipe below makes a few cups.

sparksfromthekitchen.com pumpkin steel cut oatmeal

Pumpkin Steel Cut Oatmeal

Ingredients:

  • 2 cups water
  • 1 cup unsweetened almond milk with coconut
  • 1 cup steel cut oats
  • 1/2 cup pumpkin puree (not pumpkin pie filling)
  • pinch of cinnamon (to taste)
  • 2 tsp real maple syrup
  • 2 tsp vanilla extract
  • brown sugar (for topping)
  • walnut pieces (for topping)

Instructions:

  1. In a deep sauce pan boil the water. Lower the heat to low and add the milk and oatmeal. Stir occasionally and cook for 20 minutes.
  2. In the mean time cook the pumpkin puree over medium heat in a small skillet with the cinnamon over medium heat for about 5 minutes.
  3. Add the syrup, vanilla and pumpkin puree to the oatmeal, stir and cook for another 5 minutes.
  4. Top with brown sugar and walnuts and enjoy.
Advertisement

Sausage, Egg and Cheese Panini

I love the egg sandwiches that we get at delis and bagel shops (having such great delis and bagel places here on Long Island I get spoiled) but making them at home is easy too-and better for you since you can control the ingredients and skip the butter and extra grease. I’ve heard from people visiting (the NY metro area) that egg sandwiches don’t exist where they live.  They have my full sympathy. I can’t fathom life without great delis, bagel shops and pizzerias. Here we get them on bagels or on kaiser rolls. I didn’t have either but the flatbread in my panini press worked perfectly. They’re heaven.

Feel free to use egg whites, egg beaters, bacon, different cheeses etc.. to make it your own.  Some people put ketchup on it too but I don’t.

image


Sausage, Egg and Cheese Panini

Ingredients:

  • 5 large eggs, scrambled in a bowl
  • 2 tbsp milk (any is fine-skim, whole, 2%)
  • 7 sausage links or 2 patties
  • 2 flatbreads
  • 4 slices american cheese (we use the Boar’s Head brand. It melts differently than others and in my opinion has a nicer texture).

Instructions:

  1. Cook the sausage as to package instructions then set onto paper towels to drain. Chop into small pieces and return to paper towels and set aside.
  2. While the sausages are  cooking make the eggs. In a medium non-stick frying pan with a flat base over medium heat cook the eggs,. Using a rubber spatula frequently pull the cooked eggs away from the edge, tilt the pan to allow the raw eggs to flow to the pan surface.  Turn when needed trying to keep the eggs together. When they’re all cooked remove from the heat and set aside.  (Sprinkle with a bit of salt and pepper if desired but I don’t generally because of the seasonings in the sausage. )
  3. Microwave the flat bread for a few seconds to loosen it up.
  4. On one half of the flatbread place half of the cheese, eggs and sausage.  Fold the other half of the bread over the top and place on the panini press until bread is crisp and cheese has melted fully.
  5. Serve immediately.

Makes 2.

Brown Sugar & Maple Steel Cut Oats

Like many people I found myself toting along those small envelopes of instant maple and brown sugar oatmeal to work.  We all know that oatmeal is so good for you and keeps you full and gives you lots of energy for the morning so it’s good to eat but…… I don’t know about you but my initial reaction when eating the stuff from the envelope wasn’t ever ‘wow yummy!’ it was more along the lines of ‘wow it’s glue’.  Yuck.  For a while I was measuring out 1/4 cups of rolled oats and bringing them to the office too which was somewhat better but still pasty.

I say no more!!!!

Recently I was inspired by one of the America’s Test Kitchen episodes that featured steel cut oats and how to cook them overnight to avoid the 45 minutes of cooking in the morning that they normally take. So I bought a can (how retro) to see what I could do.  I was thinking if I can cook them overnight then reheat in the AM why can’t I cook them normally and then reheat?  And I can!! And how easy it is!!! There’s literally 2 minutes of attention that you have to pay to the pot during the whole 40 minutes that it’s cooking (aside of a few stirs). I let it cook while I vacuumed yesterday.

Do you know that steel cut oatmeal reheats amazingly well? The texture is still al dente (for lack of a better way to say it) and the flavor is the same as when it was first made. Below you will find instructions for a week’s worth (plus a pretty good sized bowl right away) of small containers of steel cut oatmeal. I prepare it on Sunday and pack it into small 1/2 cup containers to bring to the office all week. So give it a try! I’m sure that you won’t want to go back to the paste after this.

oat2

Brown Sugar & Maple Steel Cut Oats

Ingredients:

  • 3.5 cups water
  • Pinch of salt
  • 1 cup steel cut oats (I used John McCann’s Irish Oatmeal)
  • 1.5 tbsp vanilla extract
  • 1.5 tbsp maple syrup (try to use the real stuff) plus more for drizzling
  • 1/2 cup milk (use whatever kind you like-skim, whole, etc..)
  • brown sugar for topping

Instructions:

  1. In a small nonstick stockpot bring the water to a boil and add salt.
  2. Stir in oatmeal and reduce heat to low.
  3. Cook for 25 minutes, stirring occasionally.
  4. Add the vanilla, syrup and milk and stir until thoroughly combined.
  5. Cook for another 10 minutes, stirring occasionally.

At this point you’re ready to eat it. Enjoy!!!

If you’re going to store it to eat later allow the oatmeal to cool in the pan, stirring from time to time. When it’s cool spoon it into containers with lids and keep it in the fridge. I used 1/2 cup containers. To eat I put the oatmeal in a small bowl, break it up with a spoon and microwave for a minute or so until it’s hot.  Then I sprinkle with brown sugar and drizzle the syrup on it. YUMMY!!

This recipe is all mine. I’m interesting in exploring other toppings, mixing ins etc… I saw one the other day that had toasted hazelnuts on top and that sounded declicious. Perhaps I’ll bake an apple and mix that in……hmmmm

Baked French Toast

I  haven’t posted anything new (aside of the 1 year blogiversary) because I had a lovely vacation and birthday in New Hampshire with family.  The hotel where we stayed has full kitchens in the units so we do some cooking while we’re there.  I made a taco dinner one night  with this delicious slow cooker taco beef, along with cilantro lime rice, zingy corn salsa and yummy cookies

I chose to make this Baked French Toast one morning for breakfast. There were 6 of us there and we only had one small piece left over.

It was easy to make-I just brought the ingredients and a baking dish with me. It was a fast assembly and easy cooking-perfect for a crowd and not a lot of work.

break1

Baked French Toast

Ingredients:

  • 1/2 cup granulated sugar
  • 1 tbsp ground cinnamon
  • 16 slices white bread (1lb or 650gram loaf such as Pepperidge Farm)
  • 1 stick unsalted butter, softened
  • 3 cups whole milk
  • 6 large eggs
  • 1/4 tsp table salt

Instructions:

  1. Pre-heat oven to 450. In a small bowl whisk the cinnamon and sugar together and set aside. On 1 or 2 baking sheets (you’ll have to lay the bread slices flat. If you have 2 baking sheets use them, if not you’ll just use 1 twice) with foil. Spread about 1tsp of butter onto one side of each slice of bread.  Place non-buttered side down on the baking sheet until all are buttered. Sprinkle each with 1tsp of the cinnamon sugar.  Put the tray(s) into the oven and bake until the bread is golden and the cinnamon sugar is a bit crusty–about 8-11 minutes. Watch the bread carefully.  When the bread is finished cooking reduce the oven temp to 375 and set the bread aside to cool a bit. Set the extra cinnamon sugar aside for later.
  2. Butter a 9×13 baking dish well. Cut 2 slices of bread in half horizontally and set aside. Lay half of the bread in one row and half in another row the length of the dish, overlapping each other.  Finish the last piece in each with one of the halves and snuggle the other 2 halves under the bread on the other end of the row.  They will look like those rows of cards that fall onto each other (see photo above).
  3. In a bowl whisk the milk, salt and eggs together and pour evenly over the bread. Let it sit for 15 minutes minimum (or overnight).
  4. Use the remaining cinnamon sugar from step 1 and sprinkle it over the bread before you put the dish in the oven. Bake for about 30 minutes until slightly puffy and golden. Press gently from one side to the other to make sure that no liquid will press out of the bread.
  5. Serve immediately with syrup or powdered sugar or anything else you’d like.

break2

Adapted from Smitten Kitchen.

Note: the next time I make this I will use less custard to keep the bottom layer more crispy.

Strawberry Delight Muffins

These muffins are lovely and light and oh so tasty–perfect muffins to go with slices of delicate strawberries for the summer.  

There’s not really all that  much else to write except for the recipe…..

muf4

Strawberry Delight Muffins

Ingredients:

  • 6 ozs Greek Yogurt (I used Fage 0%)
  • 2 ozs fat-free Sour Cream
  • 1/4 cup unsalted butter, softened
  • 1&1/2 cup granulated sugar
  • 1/2 cup Egg Beaters (or 2 large eggs)
  • 1/2 cup milk
  • 1/2 tsp vanilla extract
  • 1/4 tsp strawberry extract
  • 2 cups AP flour
  • 1&1/2 tsp baking powder
  • 1/2 tsp baking soda
  • 1/4 tsp salt
  • 1/4 tsp cinnamon
  • 1 cup fresh strawberries, chopped small

Instructions:

  1. Pre-heat oven to 350.
  2. Place liners in muffin tin and set aside.
  3. In a large bowl using an electric mixer cream together the yogurt, sour cream, butter and sugar. Then add the Egg Beaters, milk, vanilla and strawberry extract.  Stir until  combined-being careful to not over-mix. Set aside.
  4. In another bowl place the flour, baking powder, baking soda, salt and cinnamon and whisk to combine.
  5. Add 1/4 of the dry ingredients to the wet and stir until just combined. Continue adding the dry ingredients in increments and mixing. Do not over mix.   Gently fold in the fresh strawberries.
  6. Fill the liners in the muffin tin to about 3/4 of the way full and bake for about 23-28 minutes or until the tops are light golden brown. Allow to cool in the tin for about 10-15 minutes then remove the muffins from the tin and place onto a cooling rack.

Yield: about 18-20 muffins.  I made 12 muffins and froze the remainder of the batter to use another time.

muf1

Greatly adapted from the Strawberry Cream Cheese Muffins from http://www.bos-bowl.com

Fritatta di Saldiccia e Cipolle (Sausage & Onion Fritatta)

I am a huge lover of public television-no commercials and the programming is so great.  I don’t know if it’s like this all over but I have a spin-off of one of my regular PBS channels called Create. It’s cooking, crafts, gardening and travel. It’s got great shows-Pepin, Child, America’s Test Kitchen and so on. If you ask me Food Network could learn a lot from them-such variety.

I’m getting off the point here. Nick Stellino is one of the chefs that has a show on the channel and he makes some yummy stuff. The fritatta below was inspired by him. Pretty easy and really tasty.  The onions cook for a while so they get nice and sweet.  This is delicious warm or great at room temperature the next day or reheated.

I served it with my delicious roasted broccoli.

frit

Fritatta di Saldiccia e Cipolle

Ingredients:

  • 6 tbsp olive oil
  • 4 onions, sliced
  • 1 scallion, sliced
  • 1/2 tsp red pepper flakes
  • 1&1/2 tsp dried thyme
  • 1 tsp kosher salt
  • 1/2 tsp white pepper
  • 2 tsp garlic, chopped finely
  • 1 lb Italian Sausage (I used part sweet part hot) out of the casings
  • 2 tbsp fresh parsley, chopped
  • 8 eggs
  • 1/4 cup freshly grated cheddar cheese

Instructions:

  1. Cook 3 tbsp oil in an oven-safe 12 inch non-stick skillet over medium-high heat. When it’s hot add the onions, red pepper flakes and thyme and stir well to combine. Reduce the heat to medium-low and cook for 20 minutes, stirring every few minutes to avoid sticking.
  2. Pre-heat oven to 350F.
  3. While the onions are cooking brown the sausage. When it’s cooked put the sausage in a strainer to drain of excess fat.  Discard the fat and keep sausage on the side for use later.
  4. In a bowl beat the eggs with 1/2 tsp salt and set aside for use later.
  5. When the 20 minutes for the onions is up add 1/2 tsp of the salt, the pepper and 1 tsp of the garlic, reduce heat to low and cook for 20 more minutes stirring every few minutes again.   Then pour the mixture into a large bowl.  Wipe the pan clean.
  6. Add the cooked sausage and parsley to the onions and mix well. Then add the beaten egg mixture and the remaining garlic and mix well.
  7. In the pan wiped clean cook the 3 remaining tbsp of oil over medium-high heat. When it’s hot pour the contents of the bowl into the pan. Cook for 2 minutes then stir. Cook for another 5-7 minutes until just set then transfer to the oven and bake for 15 minutes then remove, sprinkle the cheese on the top, and return to the oven for another few minutes until cheese is melted and bubbly. Remove and allow to cool for a few minutes before cutting into wedges and serving.

Serves 4-6

I always worry about burning the hell out of my hand by grabbing the handle of the pan after it’s out of the oven and cooling so usually I keep the handle turned way in so that I can’t grab it. How I never thought to just put an oven mit over the handle before is beyond me.  Now I don’t have to worry (and yes those are margaritas on the oven mit :).

frit2


Yummy Granola

Have you bought granola recently? Holy cow it’s a fortune!! I’ve seen a few recipies here and there for it but I never tried to make it.  Recently I took the cookbook ‘Quinoa 365’ out of the library and spotted their ‘Ultimate Granola’. Well-it wasn’t MY ultimate granola as I can’t stand raisins and I’m not much of a pumpkin seed fan-so I made it my own.  It’s full of all kinds of good stuff-the flake coconut and the tart cranberries are so great together and I love the whole almonds and parts of walnuts.

Feel free to make the same kind of adjustments to YOUR ultimate granola.

gran2

Yummy Granola

Ingredients:

  • 2.5 cups rolled oats (not instant)
  • 1 cup whole almonds
  • 1 cup sunflower seeds
  • 1/3 cup sesame seeds
  • 1/3 cup uncooked quinoa
  • 1/2 cup flaked coconut (unsweetened and crushed into small bits)
  • 1/2 cup walnut pieces
  • 1 cup real maple syrup
  • 1 tsp vanilla extract
  • 2 tsp cinnamon
  • 3/4 cup cranberries

Instructions:

  1. Pre-heat oven to 225F.
  2. Combine all ingredients through and including walnuts in a large bowl and mix well.
  3. In a small bowl mix the syrup and vanilla and stir to combine.  Pour the syrup over the oat mixture and stir until evenly distributed.  Add the cinnamon and stir again until evenly mixed.
  4. Spread mixture evenly onto a rimmed baking sheet and bake for 1 hour in the preheated oven.
  5. Remove from the oven and allow to cool. Mix in the cranberries and extra coconut if desired. I did  🙂

Store in a sealed container for up to 4 weeks.

Makes 7 cups.

gran1

Quiche Lorraine

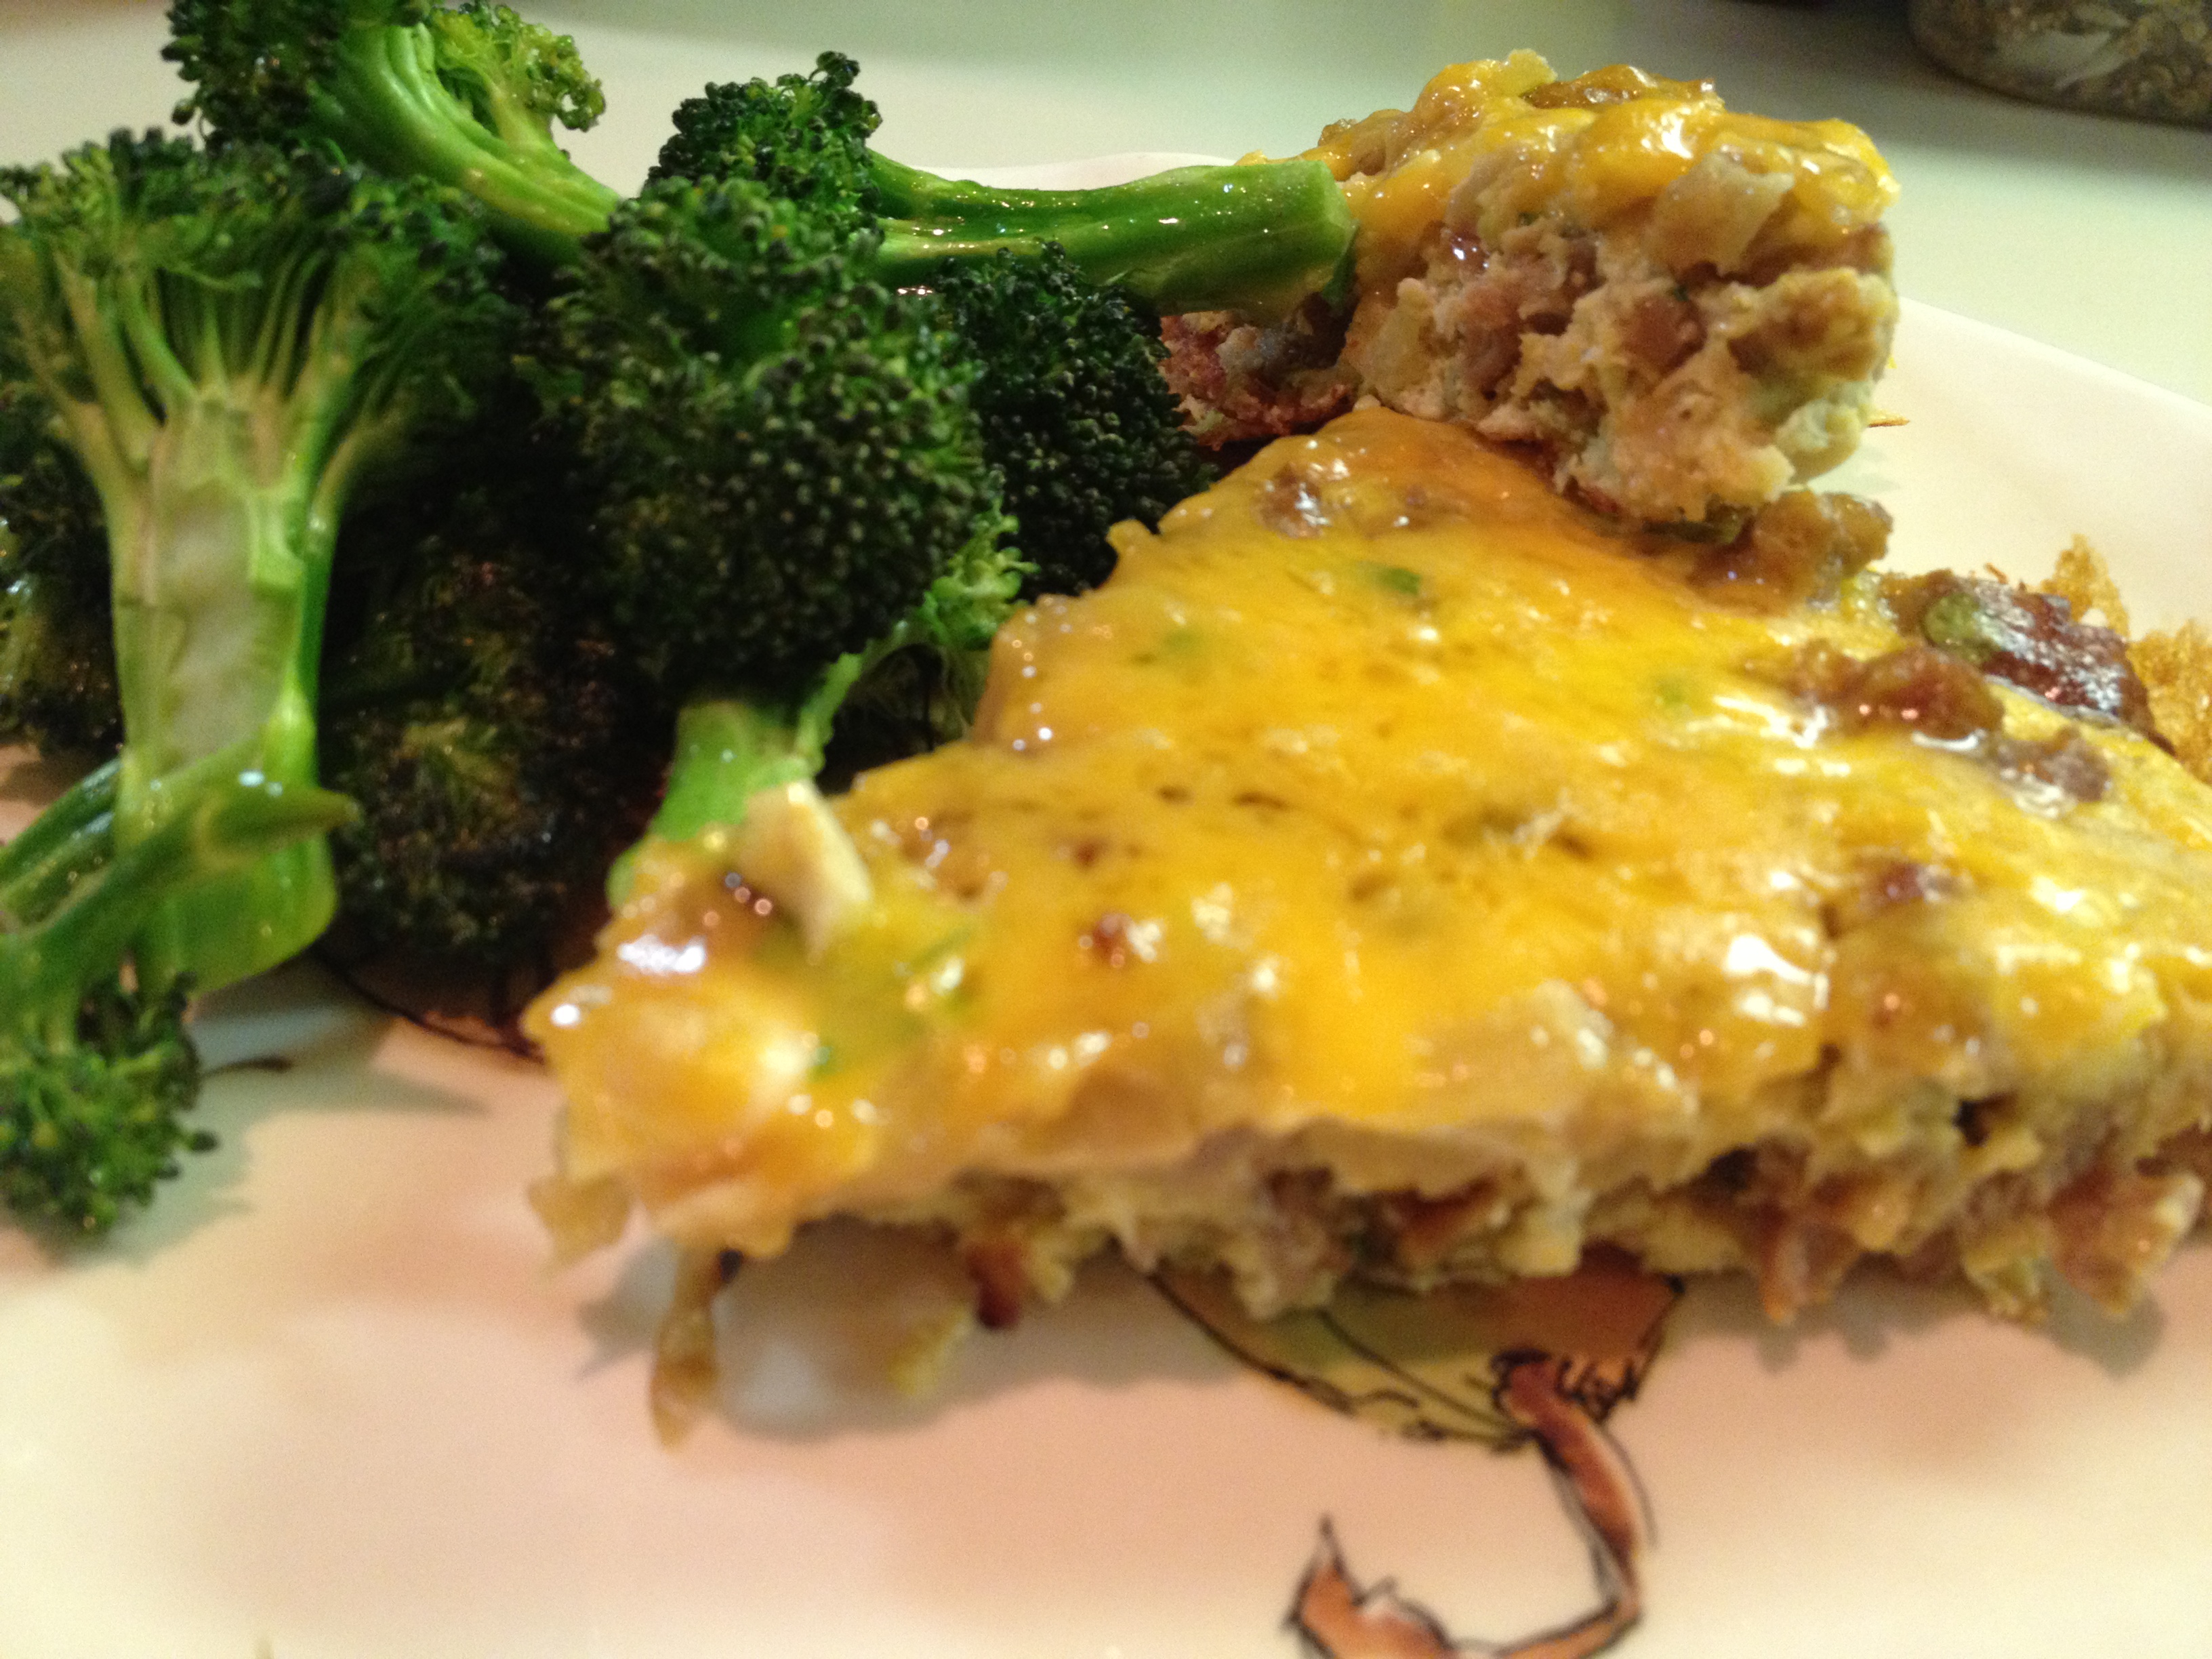
I’ve always loved quiche. My Mom makes a delicious spinach quiche and that’s what got me to love them when I was little.  I haven’t made a quiche in a while but over this past weekend I made this Quiche Lorraine. I used Cooks Illustrated’s recipe and adjusted it a bit.

Give yourself time to make the crust.  A homemade crust makes all the difference in quiche and, while the instructions are long for the crust, it’s really really easy-just time it out right. I rolled it between the 2 sheets of plastic wrap and it saved me from making a huge mess with flouring the board etc.. I used 2 sheets of plastic for the top and 2 for the bottom and overlapped them to allow for the correct size of the crust.  The dough can be made up to 2 days in advance.

Quiche1

Quiche Lorraine

Ingredients

For the Dough  

  • 1 1/4 cups unbleached all-purpose flour plus more for rolling out the dough
  • 1/2 teaspoon table salt
  • 1 tablespoon granulated sugar
  • 4 tablespoons cold unsalted butter, cut into 1/4-inch pieces
  • 3 tablespoons vegetable shortening
  • 4 – 5 tablespoons ice water

For the Filling  

  • 8 ounces pancetta (cut to thickness of regular bacon) cut into 1/2-inch pieces
  • 2 large eggs
  • 2 large egg yolks
  • 1 cup whole milk
  • 1 cup heavy cream
  • 1/2 teaspoon table salt
  • 1/2 teaspoon ground pepper
  • 7 ounces Gruyère cheese grated 

Instructions

FOR THE DOUGH 
Pulse flour, salt, and sugar in food processor workbowl fitted with steel blade. Scatter butter pieces over flour mixture, tossing to coat with flour. Cut butter into flour with five 1-second pulses. Add shortening and continue cutting in until flour is pale yellow and resembles coarse cornmeal, with butter bits no larger than small peas, about four more 1-second pulses. Turn mixture into medium bowl. Note: you can cube the butter ahead of time and then put it back in the fridge to get cool again.

Sprinkle 4 tablespoons ice water over mixture. With blade of rubber spatula, using folding motion to mix. Press down on mixture with broad side of spatula until dough sticks together, adding up to 1 tablespoon more ice water if it will not come together. Shape dough into ball, squeezing two or three times with hands until cohesive, then flatten into 4-inch-wide disk. Dust lightly with flour, wrap in plastic, and refrigerate at least 30 minutes, or up to 2 days, before rolling.

 Remove dough from refrigerator; let stand at room temperature to soften slightly, about 10 minutes if dough has chilled for 30 minutes or 20 minutes if it has chilled overnight. (The dough should be pliable. Use your hands to squeeze the dough; if you can squeeze it without applying too much pressure, it is ready to roll.) Roll dough on lightly floured work surface or between two sheets plastic wrap to a 12-inch disk about 1/8-inch thick. Fold dough in quarters, then place dough point in center of pie pan. Unfold dough. Alternatively, roll dough in 2-gallon zipper-lock bag to a 12-inch disk about 1/8-inch thick. Cut away top of bag. Grasping bottom, flip dough into pie pan and peel off bag bottom.

 Working around circumference of pan, press dough carefully into pan corners by gently lifting dough edges with one hand while pressing around pan bottom with other hand . Trim edge to 1/2-inch beyond pan lip. Tuck this rim of dough underneath itself so that folded edge is about 1/4-inch beyond pan lip; flute dough in your own fashion. For quiche or tart pans, lift the edge of the dough, allowing the extra dough to flop over the sides. Then run the rolling pin over the top of the pan to remove excess dough. Next use your forefinger and thumb, press the dough evenly up the sides from the bottom to increase the height of the rim. Refrigerate pie shell for 40 minutes and then freeze for 20 minutes.

 Meanwhile, adjust oven rack to middle position and heat oven to 375 degrees. Press doubled 12-inch square of aluminum foil inside dough shell; evenly distribute 1 cup or 12 ounces ceramic or metal pie weights over foil. Bake, leaving foil and weights in place, until dough dries out, about 17 minutes. Carefully remove foil and weights by gathering sides of foil and pulling up and out. For partially baked crust, continue baking until lightly golden brown, about 9 minutes more; for fully baked crust, continue baking until deep golden brown, about 15 minutes more. Transfer to wire rack to cool.

FOR THE FILLING
Adjust oven rack to center position and heat oven to 375 degrees. Fry bacon in skillet over medium heat until crisp and brown, about 5 minutes. Transfer with slotted spoon to paper towel-lined plate. Meanwhile, whisk all remaining ingredients except cheese in medium bowl.

Spread cheese and bacon evenly over bottom of warm pie shell and set shell on oven rack. Pour in custard mixture to 1/2-inch below crust rim. Bake until lightly golden brown and a knife blade inserted about one inch from the edge comes out clean, and center feels set but soft like gelatin, 32 to 35 minutes. Transfer quiche to rack to cool. Serve warm or at room temperature.

Helpful notes from Cooks Illustrated:

Published September 1, 1997. 

The center of the quiche will be surprisingly soft when it comes out of the oven, but the filling will continue to set (and sink somewhat) as it cools. If the pie shell has been previously baked and cooled, place it in the preheating oven for about five minutes to warm it, taking care that it does not burn. Because ingredients in the variations that follow are bulkier, the amount of custard mixture has been reduced to prevent overflowing the crust.

Quiche2

Cinnamon Sugar Doughnut Muffins

Delicious little goodies!! These muffins have the consistancy of a doughnut inside but look like a muffin on the outside. They were SO easy to make and came out great. The original recipe was for mini-muffins but since I didn’t have a mini-muffin pan I made them regular sized. I also lightened up the topping a bit by using less butter and brushing it on rather than dipping them in the butter. 

When I was little my Mom always used to make me toast with cinnamon sugar on top and the cinnamon sugar was always in this cute white with orange polka dots shaker.  I have that shaker now and since I was born in 1975 it’s got to be over 30 years old. It was a nice memory. ***update: my Mom saw this and reminded me that my grandmother gave her this shaker so it’s at least 50 years old***

Enjoy 🙂 they’re yummy!!!


Cinnamon Sugar Doughnut Muffins

Ingredients: Muffins

  • 1&1/2 cups all purpose flour
  • 1 tsp baking powder
  • 1/2 tsp salt
  • 1/2 tsp ground nutmeg
  • 1/4 tsp baking soda
  • 2/3 cup milk or buttermilk
  • 1/4 cup sour cream
  • 6 tbsp butter, softened
  • 1/4 cup granulated sugar
  • 3 tbsp brown sugar
  • 1 large egg

Ingredients: topping

  • 1 tablespoon butter, melted
  • 1/4 cup sugar combined with 1 teaspoon cinnamon (or adjust to your taste)

Instructions:

  1. Preheat oven to 350 degrees.  Put muffin papers in the pan (15 or so).
  2. In a small bowl, combine flour, baking powder, salt, nutmeg, and baking soda. In another bowl, combine milk and sour cream; stir to combine.
  3. In a mixer bowl, cream the butter, sugar, and brown sugar until light and fluffy. Beat in the egg. Add the flour mixture alternatively with the milk mixture, beginning and ending with the flour mixture. Mix until all of the ingredients are incorporated, but don’t overmix.
  4. Fill each muffin cup 3/4 full of batter. Bake muffins until they are golden and a toothpick inserted in the center comes out clean, about 14-17 minutes. Cool in the pan for 5 minutes and then turn them out of the pans. Apply topping while warm.
  5. To apply the topping brush on the melted butter with a silicone brush and then sprinkle with cinnamon sugar.

Makes 15 muffins.

Adapted from Cookies on Friday.


Breakfast Burritos-make ahead and freeze!!

For the last few weeks I’ve been thinking of making something for breakfast (other than just toting an apple to work) that I can make ahead, freeze and then just pull out and zap in the morning. It also has to be something that the Husband loves. So I looked around at some online recipies and got an idea to make Breakfast Burritos. I used the recipies on line for only an idea of how to wrap and how long to heat up etc.. so this is my own recipe-and first try.  I made them last night-took maybe an hour, and ate one this morning and it was delicious.  This is a photo of the one that I ate this morning after I heated it up.

Breakfast Burritos

Ingredients:

  • 12 large eggs
  • 1/4 cup milk
  • 1 lb breakfast sausage, casing removed
  • 1 16oz bag frozen hash browns
  • Cheddar cheese-freshly grated-the amount is up to you
  • Sandwich Wraps/Burritos/Tacos-large
  • Salt and pepper to taste

Instructions:

  1. In a large pan (it has to be large enough to hold all of the sausage, eggs and hash browns) cook the sausage and crumble into small pieces as it cooks.  When it’s completely cooked remove from pan and place on a plate with paper towels to absorb the excess oil.
  2. In the same pan cook the hash browns as per instructions on the bag.  
  3. While the hash browns are cooking crack all of the eggs into a medium bowl, add milk, salt and pepper to taste, whisk and set aside.
  4. When the hash browns are completely cooked add the sausage back to the pan and then add the eggs.  Stir gently until the eggs are completely cooked. Remove pan from heat.
  5. Set one wrap on the counter and spoon about 1.5 cups of the eggs onto the left/middle of the wrap.  Sprinkle with the desired amount of cheese.  Fold the left and the right side of the wrap over the ends of the eggs, push the egg mixture in a bit and then roll towards the empty end of the wrap.  ( It should be tightly wrapped-if not you didn’t push the egg mixture together enough or you put too much–dont worry it will still freeze it will just come out a bit. )  Place burrito on a length of plastic wrap and roll it along folding in the sides as you go. Place in freezer immediately.  Repeat until all of the wraps or egg mixture is used up.

To heat: remove from freezer and unwrap completely. Wrap it in a paper towel and put it on a plate in the microwave for about 2 minutes. At the end of 2 minutes turn it over and heat for another minute. Remove, cut in half, and heat for another minute or until it’s heated all the way through.

I only bought one pack of wraps for this as I didn’t know how many it would make.  I could’ve made about 4 more because I had a lot of egg mixture left. But my Husband doesn’t mind, he can eat all of the leftovers for breakfast 🙂

sparksfromthekitchen.com original

Previous Older Entries