Pomodori Gratinati (gratineed tomatoes)

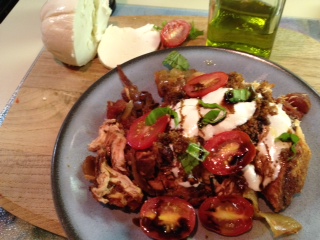
I hemmed and hawed over how to write this little blurb about this recipe. I thought of talking about how the perfect summer tomatoes are so delicious and how the filling is a bit crunchy and so so tasty from the different herbs and 2 cheeses. I must have written 10 drafts and deleted them all. They seemed too wordy for a dish so simple it’s almost silly.

But in the end, what came to mind the most, were my visits to Florence/Tuscany over the last few years. I mean-that makes sense since I found the recipe in my book, Twelve, which is a month by month Tuscan cookbook. But if you’ve been there you’ll understand what I mean when you taste these. If you haven’t been there you need to change that immediately.

It’s amazing how a bite of something can instantly mentally take you out of your kitchen and zip you into a chair at a table on the perimiter of a piazza with a gorgeous plate of cheese and veggies like these and a glass of chianti.

tomato1

Pomodori Gratinati

Ingredients:

  • 6 plum tomatoes, vine ripiened, washed and dried
  • 3 tbsp chopped parsley
  • 1 garlic clove, chopped small
  • 10 basil leaves, chopped
  • 1 tbsp frehsly grated parmesan cheese, plus sprinkle for topping
  • 1 tbsp freshly grated pecorino romano cheese, plus sprinkle for topping
  • 1/4-1/3 cup fine breadcrumbs
  • 8 tbsp olive oil

Instructions:

  1. Preheat oven to 350.
  2. Slice the tomato in half from stem to stem and, very gently, using a spoon remove the flesh and seeds-reserving them. Put the tomato halves into a baking dish, cut side up. Chop up some of the reserved insides and set aside.
  3. In a bowl mix the parsley, garlic, basil, cheeses, breadcrumbs and 4 tbsp olive oil. Season with kosher salt and freshly ground pepper if desired. If desired you can also add some of the chopped tomato insides (I added just a bit). Spoon the mixture into the tomato halves.
  4. Drizzle with the remaining olive oil and bake int he oven for 20-30 minutes until they are lightly golden and cooked through.
  5. Sprinkle with extra topping cheese and serve.

Note: since it was only I eating I only made one tomato. It was very easy to scale the recipe down so don’t feel that you have to make all 6 tomatoes.

Adapted from Twelve, A Tuscan Cookbook

This simple and very delicious recipe fit in perfectly with this month’s What’s Baking challenge theme of ‘Italian’. For the other recipes in the swap click here here

WB

tomato2

Advertisement

Artichoke & Parmesan Tilapia

This fish is very light but incredibly flavorful.  Tilapia is so mild and the slight nutty tang from the cheese really does perk it up a bit.  Paired with the artichoke hearts, breadcrumbs and lemon it’s a perfect combination of flavors for the fish. 

This recipe comes together so fast and the prep time is a short-only about 5 minutes. The fish will be on the table 20 minutes later. Conveniently you can also roast vegetables at the same time and have everything finish cooking at the same time.

tilapia1

Artichoke & Parmesan Tilapia

Ingredients:

  • 2 4oz fresh tilapia filets
  • 6 oz artichoke hearts, drained and chopped
  • 1/4 cup breadcrumbs
  • 1/4 cup freshly grated parmesan cheese
  • 1 tsp fresh lemon juice
  • kosher salt and freshly ground black pepper to taste

Instructions:

  1. Pre-heat oven to 375.  Line a baking dish just large enough to hold the fish with parchment paper and give it a bit of non-stick spray or olive oil.
  2. Wash the fish, pat them dry and sprinkle salt and pepper on both sides then place them into the baking dish.
  3. Combine the artichoke hearts, breadcrumbs, parmesan and lemon juice in a small bowl and stir to combine.
  4. Spoon half of the artichoke mixture over each piece of fish. Bake in the oven for 15-20 minutes or until fish is cooked thoroughly.

Adapted from laloosh.com

Grape, Pear and Curry Cashew Salad

I have loved this salad for years. I think I first made it about 5 years ago. I love salads that have different components and flavors and this fits that profile perfetly. It’s sweet, it’s slightly spicy, it’s tangy, and it’s just delicious. The dressing is a perfect honey mustard balance and compliments the other flavors perfectly. Genius. 

The amount of pear and grapes and lettuce is up to you so I didn’t put amounts below.

curry2 

Grape, Pear and Curry Cashew Salad

Ingredients:

  • 3/4-1 cup chopped raw unsalted cashews
  • 5 slices bacon (41/2 for salad, 1/2 for dog)
  • 1 tbsp butter, melted
  • 1 tsp rosemary
  • 1 tsp curry powder (madras or yellow curry)
  • 1 tbsp brown sugar
  • 1/2 tsp kosher salt
  • 1/2 tsp cayenne pepper
  • 3 tbsp white wine vinegar
  • 2 tbsp dijon mustard
  • 2 tbsp honey
  • 1/2 cup olive oil
  • salt and freshly ground pepper to taste
  • Romaine hearts washed and dried
  • Bosc pear sliced very thin
  • Red grapes

Instructions:

  1. In a skillet set over medium heat toast the cashews until golden brown, about 5 minutes. Set aside to cool.
  2. Cook bacon in desired vessel (microwave, oven, stovetop) to desired done-ness, set on paper towels to drain then chop. Give 1/2 slice to dog.
  3. In a medium bowl mix the butter, rosemary, cury, brown sugar, salt, cayenne pepper and toasted cashews. Mix until everything is evenly distributed.
  4. In a small bowl whisk together the vinegar, mustard and honey. Then add the olive oil while whisking to combine.
  5. When you’re ready to serve it place the lettuce in a bowl, add some cashews and grapes and drizzle with dressing. Gently stir to combine. Top with bacon and pear slices.  Or forget that whole bit and just put everything together in a bowl with dressing and mix it around.

Adapted from a recipe I printed 5 years ago from allrecipes.com.

Easy Quinoa with Roasted Mini-Bell Peppers

Sometimes it’s surprising how tasty something that is so easy and that has just a few ingredients is, isn’t it?   The title of this recipe doesn’t lie. It’s easy. But it’s also fab!!

For a recipe swap for ‘Summer Salads’ with some fellow food bloggers I was given this recipe from Jenni’s blog www.doughseedough.net and I’m so glad! As the recipe title suggests it is truly easy so it’s a snap to just put together in a flash.  I adjusted her recipe a bit (I roasted the peppers in the oven instead of in a pan on the stove to cut down on the oil) and I halved her original recipe as it’s just me eating it.

quinoa

Easy Quinoa with Roasted Mini-Bell Peppers

Ingredients:

  • 2 cups low sodium chicken broth
  • 1 cup quinoa, rinced well if needed
  • 2 garlic cloves, chopped small
  • 1 tbsp olive oil
  • 1  bag of mini-bell peppers (mine had 6), sliced into 1/2 inch strips, seeds removed
  • 4 ozs feta cheese, crumbled
  • kosher salt and white pepper, to taste
  • 1 tbsp parsley, chopped small

Instructions:

  1. In a medium sauce pan over medium/high heat add the broth and quinoa and simmer until cooked to desired consistancy (for me that’s about 14 minutes-I like it al dente), drain remaining broth if necessary. Set aside and keep warm.
  2. While the quinoa is cooking pre-heat oven to 375.
  3. On a baking pan lined with foil arrange the peppers in one layer, sprinkle with garlic and drizzle with the olive oil. Sprinkle with salt and pepper to taste and roast for about 15 minutes.
  4. In a large bowl combine the quinoa and peppers/garlic and stir. Top with feta and parsley and serve.

Check out the other great salads in the swap here!!

Caprese Chicken

Recently I came across a recipe that I had printed for Balsamic Chicken which was cooked in the slow cooker.  It sounded delicious and very easy-but why stop there? If the chicken would cook for hours in delicious balsamic vinegar why not make it into a caprese chicken dish? In my head I imagined a piece of chicken topped with a slice of melted fresh mozzarella cheese, some toasted breadcrumbs, some tomatoes, fresh basil and drizzled with olive oil and balsamic glaze.  And that’s exactly what happened-although the picture in my head was this neat little package all perfectly balanced on the plate and the plate that I ended up with wasn’t quite so neat.

The flavor. WOW! Delicious!  Drizzling the balsamic glaze and olive oil over the dish at the end really made all of the other flavors pop.

The other fab part of this dish is that the chicken cooks in the slow cooker and you can make that in advance (mine was cooked on Sunday and I made the completed dish on a Tuesday night). The completed dish took no  more than 15 minutes start to finish-so it’s great for a weeknight as well.

I had cherry tomatoes on hand but you can certainly use other larger tomatoes and just cut a few slices-just make sure they’re nice and ripe.

caprese1

Caprese Chicken

Ingredients for slow cooker portion:

  • 1 tbsp olive oil
  • 3 boneless, skinless chicken breasts, about 2-2.5 lbs, seasoned with salt and pepper
  • 1 medium yellow onion, sliced to 1/2 inch rounds and then halved
  • 4 large garlic cloves, chopped into a few pieces
  • 1/2 cup high-quality balsamic vinegar
  • 1 tsp dried basil
  • 1 tsp dried rosemary
  • 1 tsp dried thyme
  • 1 14.5 oz can diced tomatoes (do not drain)

Ingredients for oven portion:

  • 3 tsp butter
  • 6 tbsp fresh seasoned breadcrumbs
  • 3-6 slices fresh mozzarella (1-2 slices each-as per your taste)
  • 1/2  pint cherry tomatoes, sliced in half or larger tomatoes sliced.
  • fresh basil leaves, sliced thin
  • drizzles of balsamic glaze 
  • drizzles of olive oil 

Instructions for the slow cooker:

  1. Trim any fat from the chicken, season with salt and pepper and set aside.
  2. Coat the bottom of the slow cooker insert with the olive oil, snuggle the chicken breasts into the cooker in an even layer, top with the onion and, garlic and herbs.  Pour the vinegar and tomatoes into the cooker.
  3. Cook on low for 6 hours.
  4. If you plan on completing the dish another day allow the chicken and onion/tomato mixture to cool and then store in the refrigerator for a few days—otherwise continue below.

Instructions for oven:

  1. Preheat broiler to low setting.
  2. Place the butter in a small pan on the stove over medium heat. When hot and bubbling add the breadcrumbs.  Stir and cook until toasty brown then set aside.
  3. Reheat chicken and some of the onions/tomato mixture (however you’d like–I used the microwave).
  4. In a dish suitable for the broiler place the chicken and some of the onions/tomato mixture, top with slices of cheese then breadcrumbs and put in the oven until the cheese is melted and bubbly.  Remove from the oven, place chicken and some of the onions/tomatoes on a plate, arrange tomatoes around it, sprinkle with basil and drizzle with the olive oil and balsamic glaze. Serve immediately.

caprese2


Chicken with Mushrooms & Shallots

I’m always on the look out for new, fast, delicious chicken recipes and this one filled that bill perfectly. Very little prep, cooks quickly and the end result is a wonderfully flavorful, moist piece of chicken with earthy mushrooms and savory shallots-and plenty of them as you can see in the photo below. Clearly I haven’t mastered the art of food photography but trust me on this-the chicken is way better than my crappy photo makes it look.

chicken

Chicken with Mushrooms & Shallots

Ingredients:

  • 4 6oz skinless boneless chicken breast  (halves) 1/3 inch thick
  • 1/4 tsp salt
  • 1/4 tsp freshly ground black pepper
  • 3 large shallots
  • 8ozs presliced mushrmoom blend (I used baby bella, shiitake and oyster)
  • 1/3 cup dry sherry
  • 1 tsp dried marjoram
  • Cooking spray

Instructions:

  1. Season chicken pieces with salt and pepper, coat with cooking spray. Heat a large non-stick skillet over medium-high heat. Add chicken to the pan and cook until browned on each side about 5-6 minutes.
  2. While chicken is cooking slice the shallots into thin rounds. Remove the chicken from the pan and set it aside. Spray the pan with cooking spray, add the mushrooms and shallots and cook 1 minute, stirring constantly. Stir in sherry and marjoram.  Put the chicken back into the pan, cover and cook for 3 to 4 minutes or until the chicken is cooked thoroughly and the mushrooms are tender. Serve chicken with mushrooms and shallot mixture poured over the top.

Makes 4 servings.

Adapted from Cooking Light Fresh Food Fast cookbook.

Grilled Chilean Sea Bass Sandwich with Homemade Tartar Sauce

Recently I’ve had it in my head that I need to eat more fish at home. Seeing as though I live on an island with an abundance of fantastic fresh fish available it shouldn’t be too much of a challenge.  I used Chilean Sea Bass for this sandwich but you could also use cod, grouper or any other white flaky fish.

Keeping with that thought I decided to make this sandwich and it was so fantastic!! Light, flaky fish and tangy, zesty tartar sauce. It wasn’t too big or too small-just right. These sandwiches came together in no time. While the fish is cooking you prepare the sauce. 

fish1

Grilled Chilean Sea Bass Sandwich with Homemade Tartar Sauce

Ingredients:

  • 1 5-6oz fresh Chilean Sea Bass filet, skin and any bones removed
  • 1 tsp olive oil
  • salt & pepper for seasoning
  • 1 sandwich roll or hamburger bun (I used one Arnold whole wheat Sandwich Thin)
  • lettuce leaves

Instructions:

  1. Pre-heat a stove top grill pan to medium heat  (you can also use an outdoor grill).
  2. Drizzle fish with olive oil on all sides and then season with salt and pepper.
  3. Place fish on the grill and cook for about 3 minutes on each side (depending on the size of the fish) until fish flakes easily with a fork.
  4. Place fish, lettuce and tartar sauce (recipe below) on a bun and enjoy.

Makes 1 sandwich.


Homemade Tartar Sauce

Ingredients:

  • 1/4 cup light mayonnaise
  • 2 tbsp chopped scallions
  • 1&1/2 tbsp finely chopped cornichons
  • 1&1/2 tsp capers, drained
  • 1 tsp fresh lemon juice
  • 1 tsp Worcestershire sauce

Instructions:

  1. Mix all ingredients in a bowl and set aside to use right away or refrigerate until later.

Makes just over 1/4 cup of sauce.


Both recipies adapted from Cooking Light Fresh Food Fast cookbook.


Baked French Toast

I  haven’t posted anything new (aside of the 1 year blogiversary) because I had a lovely vacation and birthday in New Hampshire with family.  The hotel where we stayed has full kitchens in the units so we do some cooking while we’re there.  I made a taco dinner one night  with this delicious slow cooker taco beef, along with cilantro lime rice, zingy corn salsa and yummy cookies

I chose to make this Baked French Toast one morning for breakfast. There were 6 of us there and we only had one small piece left over.

It was easy to make-I just brought the ingredients and a baking dish with me. It was a fast assembly and easy cooking-perfect for a crowd and not a lot of work.

break1

Baked French Toast

Ingredients:

  • 1/2 cup granulated sugar
  • 1 tbsp ground cinnamon
  • 16 slices white bread (1lb or 650gram loaf such as Pepperidge Farm)
  • 1 stick unsalted butter, softened
  • 3 cups whole milk
  • 6 large eggs
  • 1/4 tsp table salt

Instructions:

  1. Pre-heat oven to 450. In a small bowl whisk the cinnamon and sugar together and set aside. On 1 or 2 baking sheets (you’ll have to lay the bread slices flat. If you have 2 baking sheets use them, if not you’ll just use 1 twice) with foil. Spread about 1tsp of butter onto one side of each slice of bread.  Place non-buttered side down on the baking sheet until all are buttered. Sprinkle each with 1tsp of the cinnamon sugar.  Put the tray(s) into the oven and bake until the bread is golden and the cinnamon sugar is a bit crusty–about 8-11 minutes. Watch the bread carefully.  When the bread is finished cooking reduce the oven temp to 375 and set the bread aside to cool a bit. Set the extra cinnamon sugar aside for later.
  2. Butter a 9×13 baking dish well. Cut 2 slices of bread in half horizontally and set aside. Lay half of the bread in one row and half in another row the length of the dish, overlapping each other.  Finish the last piece in each with one of the halves and snuggle the other 2 halves under the bread on the other end of the row.  They will look like those rows of cards that fall onto each other (see photo above).
  3. In a bowl whisk the milk, salt and eggs together and pour evenly over the bread. Let it sit for 15 minutes minimum (or overnight).
  4. Use the remaining cinnamon sugar from step 1 and sprinkle it over the bread before you put the dish in the oven. Bake for about 30 minutes until slightly puffy and golden. Press gently from one side to the other to make sure that no liquid will press out of the bread.
  5. Serve immediately with syrup or powdered sugar or anything else you’d like.

break2

Adapted from Smitten Kitchen.

Note: the next time I make this I will use less custard to keep the bottom layer more crispy.

Happy First Blogiversary to SFTK!!!

WOW! I can’t believe it’s been a year since I started this blog. Looking back I’ve made some really great dishes (and some not great that will never be posted here), made a lot of great blogiverse friends, learned a ton and had a great time!!

I hope year 2 for Sparks From the Kitchen will be just as great, if not better Thanks to everyone who has liked, posted, commented, tasted, shared and visited this blog.  That’s part of the fun!!