Best Tasty Shredded Chicken BBQ-slow cooker

Real BBQ people will be rolling their eyes at this name won’t they? It’s not REAL BBQ since 1) I don’t own a smoker (and you really need that for it to be real BBQ right?) and  2) I cooked it in my slow cooker and 3) I used jarred (GASP!!) BBQ sauce.

I will assume though that I will be quickly forgiven for this naming faux pas once those eye-rollers taste this chicken. I didn’t name it what I did because it’s only mediocre.  It’s delicious. It’s also so easy to make it nearly makes itself.

I used a BBQ sauce from my local Fairway Market-it’s their own bbq sauce and was in the middle of the line-not sweet, not hot, just smokey with a fair balance of sweet and spice-but nowhere near hot. In fact, it’s called ‘Schmokey’ which I think is cute. So get yourself a great tasting sauce for this and tuck in for a few hours.  Look at that beauty!!

bbq11

Best Tasty Shredded Chicken BBQ

Ingredients:

  • 1 large yellow onion, cut in half then sliced to 1/4 inch pieces
  • 1/2 lemon, sliced, seeds removed
  • 2.5 lbs boneless, skinless, chicken breasts (about 8 breast halves)
  • 1 18oz jar BBQ sauce
  • 1/2 cup cola (not diet)
  • 3 (+/-) tbsp arrowroot
  • fresh bread that can hold up to the chicken (I used fresh French bread cut thickly), thinly sliced extra sharp cheddar cheese etc.. to assemble sandwiches.

Instructions:

  1. Place onion and lemon in the bottom of the slow cooker pot. Place the chicken on top of that and pour the BBQ sauce and cola over it.
  2. Cover and cook on high for 1 hour and then cook for 4 hours on low or until chicken is cooked through.
  3. Using a slotted spoon or a spider remove the chicken pieces and put them on a platter to cool slightly.  Remove the lemon pieces and discard. Leave the onions and the sauce in the pot and add the arrow-root 1 tbsp at a time, stirring to combine, allowing it to rest for a few minutes and thicken. It might take another tbsp or 2 but be patient-it will thicken eventually.
  4. While you’re dealing with the sauce resting/thickening shred the chicken.  Forget the 2 forks. If it’s cool enough just use your hands and pull it apart. 
  5. When sauce has become thick add the chicken back into it, stir, and let it cook for another few minutes to make sure every little piece has a nice coating of sauce.

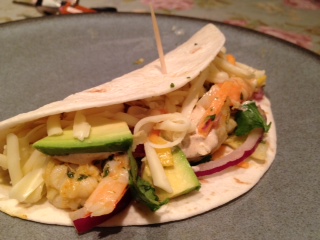
As far as serving I made an outstanding, but very simple, sandwich. I also think that this would be great on nachos, baked potatoes or hell just tasty with a fork.

This made 5 sandwiches like you see in the photo and I froze about 4 cups as well.

This was an interesting adaptation. I started off originally with the Chicken Barbecue recipe from the Cooking Light Slow Cooker book.  Everything is the same until the chicken is finished cooking.  The original recipe instructions were to mix flour and water and then add that to the sauce. Disaster. It rolled up into these disgusting globs as soon as it hit the sauce. I had to pick every one of them out of the sauce. Yuck. I’m glad I was able to salvage the recipe at all-even happier that it came out so amazingly delicious.  The original recipe also didn’t shred the chicken or make a sandwich-just served the breast with sauce on it. So I guess this is highly adapted from that recipe.

Advertisement

Brown Sugar & Maple Steel Cut Oats

Like many people I found myself toting along those small envelopes of instant maple and brown sugar oatmeal to work.  We all know that oatmeal is so good for you and keeps you full and gives you lots of energy for the morning so it’s good to eat but…… I don’t know about you but my initial reaction when eating the stuff from the envelope wasn’t ever ‘wow yummy!’ it was more along the lines of ‘wow it’s glue’.  Yuck.  For a while I was measuring out 1/4 cups of rolled oats and bringing them to the office too which was somewhat better but still pasty.

I say no more!!!!

Recently I was inspired by one of the America’s Test Kitchen episodes that featured steel cut oats and how to cook them overnight to avoid the 45 minutes of cooking in the morning that they normally take. So I bought a can (how retro) to see what I could do.  I was thinking if I can cook them overnight then reheat in the AM why can’t I cook them normally and then reheat?  And I can!! And how easy it is!!! There’s literally 2 minutes of attention that you have to pay to the pot during the whole 40 minutes that it’s cooking (aside of a few stirs). I let it cook while I vacuumed yesterday.

Do you know that steel cut oatmeal reheats amazingly well? The texture is still al dente (for lack of a better way to say it) and the flavor is the same as when it was first made. Below you will find instructions for a week’s worth (plus a pretty good sized bowl right away) of small containers of steel cut oatmeal. I prepare it on Sunday and pack it into small 1/2 cup containers to bring to the office all week. So give it a try! I’m sure that you won’t want to go back to the paste after this.

oat2

Brown Sugar & Maple Steel Cut Oats

Ingredients:

  • 3.5 cups water
  • Pinch of salt
  • 1 cup steel cut oats (I used John McCann’s Irish Oatmeal)
  • 1.5 tbsp vanilla extract
  • 1.5 tbsp maple syrup (try to use the real stuff) plus more for drizzling
  • 1/2 cup milk (use whatever kind you like-skim, whole, etc..)
  • brown sugar for topping

Instructions:

  1. In a small nonstick stockpot bring the water to a boil and add salt.
  2. Stir in oatmeal and reduce heat to low.
  3. Cook for 25 minutes, stirring occasionally.
  4. Add the vanilla, syrup and milk and stir until thoroughly combined.
  5. Cook for another 10 minutes, stirring occasionally.

At this point you’re ready to eat it. Enjoy!!!

If you’re going to store it to eat later allow the oatmeal to cool in the pan, stirring from time to time. When it’s cool spoon it into containers with lids and keep it in the fridge. I used 1/2 cup containers. To eat I put the oatmeal in a small bowl, break it up with a spoon and microwave for a minute or so until it’s hot.  Then I sprinkle with brown sugar and drizzle the syrup on it. YUMMY!!

This recipe is all mine. I’m interesting in exploring other toppings, mixing ins etc… I saw one the other day that had toasted hazelnuts on top and that sounded declicious. Perhaps I’ll bake an apple and mix that in……hmmmm

Homemade Chicken Stock (from left over roast chicken) slow cooker

I have always bought chicken stock at the store. (If you read my roast chicken post you know that this is only about the 4th chicken I’ve ever roasted.) But this time is different.  We picked most of the meat off of the bones and I put the carcass in the fridge in a container for 2 days until I had time to make the stock.  Here it is in the morning before it started cooking. Excuse the green tinge-my flourescent lights do that-but in there you can see celery, carrots, onions, parsley, thyme, peppercorns and just little flashes of what’s left of the chicken.

stock1

Homemade Chicken Stock

Ingredients:

  • 1 carcass (hopefully with a litte meat still on it) from roast chicken
  • 1 large yellow onion, quartered
  • 1 celery stalk cut into one inch pieces
  • 1 carrot cut into one inch pieces
  • some peppercorns (i used about 15 or so)
  • a few sprigs of fresh thyme
  • a few sprigs of fresh parsley
  • many cups of water

Instructions:

  1. Place the carcass into the bottom of the cooker–you may have to cut it into a few pieces for it to fit.
  2. Add the rest of the ingredients through the parsley. Stick the larger pieces down into the chicken if possible.
  3. Add enough water to cover the carcass by an inch or 2.
  4. Cook on low for 10 hours.
  5. When finished cooking taste and add salt if desired. Let it cool in the cooker until it’s cool enough to handle then strain out everything, just leaving the liquid. Refrigerate until cold, skim off the fat and then freeze in portions to use later.

A tool like this is perfect for skimming the fat off of the top of the stock.

stock3

I carefully ladeled stock into 2 ziplock bags and poured the remaining stock throguh the strainer above into a small container and put everyone in the freezer until I’m ready to make soup or use the stock for cooking.  I opted to NOT add any salt before I froze the stock. I will add it when I use it.

stock2

Adapted from thekitchn.com recipe.

Chicken Tacos (left over roast chicken)

The night after I made this roast chicken I made some of the left overs into filling for some tacos.  They were delicious!  You have total creative control here-I just used what I had on hand.

leftovers1

Chicken Tacos

Ingredients:

  • 1 cup left over chicken, shredded or chopped into small bits (I used white meat only)
  • 3 tbsp low sodium chicken broth
  • a pinch to a dash of cayenne pepper, ancho chili powder, ground cumin and chiotle chili powder
  • 2 small soft taco shells
  • toppings like avodaco, fat free sour cream, salsita hot sauce, lettuce, grated monterey jack or cheddar cheese etc..

Instructions:

  1. In a small sauce pan set over medium heat add the broth and chicken. Add the spices and cook until the broth is evaporated, the chicken is still moist and is hot. It will take maybe 10 minutes.  Stir it occasionally.
  2. Warm the tacos in the microwave the top with the chicken and any other toppings you may like.
  3. Enjoy!

This made 2 pretty stuffed tacos.

Roast Chicken

What can you say about roast chicken? It’s delicious, it smells amazing, you have leftovers that you can do a ton of things with (see subsequent posts) and it’s generally pretty easy.

I roasted what I believe is my 4th chicken ever this past weekend (I have to do this more often). It was certainly the largest weighing in at about 7.5 lbs. My local grocery store had them on sale for $.99/lb last week so I bought one and invited my Mom and Grandmother over for a Sunday evening roast chicken supper and Scrabble game. We’re all cut-throat scrabble players and get together often and play. It’s so much fun.  We use all of the words we’re not supposed to-proper names, abbreviations, foreign words-whatever we can as long as it’s able to be identified by someone else playing. It’s way more fun that way.

So while we had some appys of cheese and crackers, olives, hummus and some wine we played and laughed and argued over words. And the chicken roasted. And it gave off that gorgeous smell that only a roast chicken can. And then before we knew it the chicken was ready and it was delicious. Crispy skin, tender moist meat.  Just the way we all hope that they will be. I didn’t bother putting it on a pretty plate for a photo. We just cut right into it and served ourselves. Here’s how to do it:

roast1

Roast Chicken

Ingredients:

  • 1 7lb roasting chicken (I used a Perdue Oven Stuffer Roaster)
  • 2 tbsp unsalted butter
  • kosher salt and freshly ground black pepper
  • 2 medium onions, sliced into 1/2 inch rounds
  • 1 large lemon
  • 3 cloves garlic, peeled and crushed
  • 4 sprigs fresh thyme

Instructions:

  1. Preheat oven to 425. Let chicken and butter stand at room temperature for 30 minutes. Remove the gizzards and the popup timer if there is one. Rinse under cold water, inside and out, and pat dry with paper towels.
  2. In a roasting pan place the onions in 2 rows touching each other. 
  3. Rub butter all over the chicken. Season inside and out with salt and pepper. Put the lemon, thyme and garlic into the cavity, tie the legs with kitchen twine. Place on top of the onions.
  4. Roast for about 30 minutes-you’ll notice the skin start to get nice and brown–this is what you want to happen–then reduce heat to 340 and cook until a thermometer reaches 180 in the breast and/or 190 in the thigh.  When poked with a fork the juices should run clear. It took about 2 hours for mine.
  5. Remove the chicken from the oven and tent with foil in the roasting pan (not touching the skin or it will get soggy). Allow the chicken to rest for at least 15 minutes. Carve and serve, discarding the lemon, thyme and garlic.

You  may serve the onions along with the chicken or use them to make a gravy as outlined in the original recipe from Martha Stewart which I’ve changed up quite a bit. Perfect Roast Chicken from Martha Stewart Living, September 1997.

chix5

Tangy Spicy Shrimp Tacos

A few weeks ago I ate some shrimp tacos that I enjoyed immensely at a local restaurant. A pub. A pub that has some really darn good pub food that’s a little above the usual.  The tacos stood out to me on the menu because I wanted something a little lighter. And I admit-I was intrigued that they were even on the  menu-stuck in there between the fish and chips and the (really amazing sounding I’ll have one next time) cheeseburgers.  And the tacos were just right-a bit hot, a bit cool, a bit tangy, a bit warm and cold and they were the perfect size.  I thought about them for days. It’s funny where you find your favorite version of something isn’t it?

taco1

So after that I was on a mission. A mission to make them at home for a fast weeknight meal that is as delicious as it is easy to make. And here you have it. I know that the list of ingredients SEEMS long but it’s really not and I’d bet you have most of the ingredients on hand already. I broke the list up into which components they belong with so it’s a snap to put this together.  No kidding-30 minutes or less start to finish. Plus eating time of course 🙂

 taco2

Tangy Spicy Shrimp Tacos

Ingredients:

*Spicy Cream Sauce:

  • 1/4 cup fat-free sour cream
  • 1/8 tsp chipotle chili powder
  • 1/4 tsp ancho chili powder
  • 1/2 tsp cumin
  • 1/4 tsp salt
  • juice from 1/2 lime

*Dressing for Shrimp and Slaw:

  • 3 tbsp light mayonnaise
  • 1&1/2 tsp sriracha
  • juice of 1 lime
  • 1/2 tsp sugar
  • 1/4 cup fresh cilantro

*Shrimp:

  • 1/2 lb large shrimp, peeled and deveined.

*Slaw:

  • 1&1/2 cups packaged cole slaw mix (veggies only)
  • 2 tbsp diced red onion
  • 3 tbsp diced fresh mango
  • kosher salt

*Remaining Ingredients:

  • 4-5 small soft flour taco shells
  • 2 tsp vegetable oil
  • sliced avocado
  • thinly sliced red onion
  • freshly grated monterey jack cheese
  • fresh cilantro

Instructions:

  1. Put all ingredients for the Spicy Cream Sauce in a small bowl and stir until evenly combined. Set aside.
  2. Put all ingredients for the Dressing in the bowl of a small food processor and pulse until smooth.
  3. Place the shrimp in a bowl and add 2 tbsp of the Dressing. Stir to coat and set aside.
  4. In a medium bowl toss the cole slaw mix, mango, red onion and the remainder of the Dressing. Set aside.
  5. Heat the vegetable oil in a medium-sized pan over medium-high heat. Add the shrimp and cook, stirring frequently, until opaque-about 3 to 4 minutes. Transfer shrimp to a plate, chop into small bite-sized pieces.
  6. Microwave the soft tacos for about 15 seconds.  Put a bit of the Spicy Cream Sauce down the middle of the taco, then cheese, then shrimp, slaw and top with the avocado, onion and cilantro.  Fold the sides up and secure with a tooth pick. Repeat for each taco.
  7. Serve immediately.

Makes 4-5 small soft tacos.  Dressing for shrimp and slaw courtesy of foodnetwork. The rest and assembly is all mine.

Southwest Chicken Salad

I love discovering new salads. The flavors in this salad really come together nicely-the slight heat from the chicken, the tangy dressing and creamyness of the avocado make for delicious bite after delicious bite.

When the chicken is cooking is a great time to prep the veggies and cheese and make the dressing and then it’s just a matter of chopping the chicken and putting it all together on a plate.

You can serve this as a lunch, a light dinner or a side salad.  The original recipe included fried tortilla strips but I omitted them and replaced with the crispy noodles.

salad1

Southwest Chicken Salad

Ingredients:

  • 1/4 tsp dried oregano
  • 1/4 tsp cayenne pepper
  • 1/2 tsp ground cumin
  • 1 tsp olive oil
  • 6 ozs boneless skinless chicken breast halves
  • kernels from one ear of corn cooked (or 1/2 cup frozen or canned kernels)
  • 1/2 pint cherry tomatoes
  • 1 avocado sliced
  • 1 head romaine lettuce, chopped
  • 2 tbsp freshly graded Colby Jack cheese
  • 1/2 cup crispy lo mein noodles

Instructions:

  1. Pre-heat oven to 425. In a small bowl combine the first 4 ingredients above and mix to form a paste. Place the chicken in a small baking dish and coat the chicken with the spice paste. Bake for 30-35 minutes or until chicken is cooked completely.
  2. While the chicken is cooking prep the veggies and cheese and set aside. Then make the dressing (recipe below) and set aside.
  3. When chicken is cooked remove it from the oven and set aside for  a few minutes until it’s cool enough to touch. Then cut it into small cubes.
  4. Toss the lettuce, tomato, and corn with most of the vinaigrette (set a little aside to drizzle over the chicken).  Put the veggies on a plate, top with the avocado, crispy noodles, cheese and chicken. Drizzle with remaining vinaigrette and serve.

Cilantro Lime Vinaigrette

Ingredients:

  • 1/4 cup fresh cilantro, chopped
  • 2 tbsp freshly squeezed lime juice (1 lime)
  • 1 tbsp cider vinegar
  • kosher salt and freshly ground black pepper to taste
  • 1 clove garlic, smashed
  • 1/2 tsp ground cumin
  • 1/8 red onion, sliced
  • 3 tbsp olive oil

Instructions:

  1. Place all ingredients into a small food processor and pulse until it becomes a fine paste.  Add the olive oil and turn on until emulsified.

Slightly adapted from www.sotastysoyummy.blogspot.com for this month’s swap of lunch foods graciously hosted by Sarah from http://tasteofhomecooking.blogspot.com/.  See the rest of the recipes in the swap here:

Enchilada Stuffed Shells

Enchiladas are one of my favorite things to make so I was intrigued when I read the title of this recipe–it sounds so good–and something a little different.  And they turned out delicious!! One thing I really like about this recipe is that you can really adjust the flavor of the filling to exactly what you want-spicy or mild, beef or turkey or vegetarian even. I opted for ground turkey as I had some on hand.

shell1

Enchilada Stuffed Shells

Ingredients:

  • 1 12 oz box jumbo pasta shells
  • 1 lb ground lean turkey
  • 2 10 oz cans enchilada sauce
  • 1 tsp dried minced onion
  • 1/2 tsp dried oregano
  • 1/2 tsp dried basil
  • 1 tsp cumin
  • 1/2 shallot
  • 1 clove garlic, smashed  to a pulp
  • chili powder to taste
  • coriander to taste
  • salsita sauce to taste
  • 1 16oz can fat-free refried beans
  • 2 cup freshly grated colby jack cheese

Instructions:

  1. Pre-heat the oven to 350.  Spray an 11×7 baking dish with non-stick spray and spread half of one of the cans of enchilada sauce on the bottom of the pan. Set aside. 
  2. Cook pasta shells as per box instructions. Rinse with cold water to stop cooking and set aside.
  3. In a large skillet over medium-high heat cook turkey. Drain excess fat, reduce heat to medium-low and stir in the onion, shallot and all of the spices.  When combined add one can of the enchilada sauce and the refried beans. Stir until thoroughly combined. Set aside.
  4. Using a tea or tablespoon fill each cooked pasta shell with the turkey mixture.  Place the filled shells filling side up next to each other in the baking dish until the dish is filled. It’s ok to smush them in a bit-they should be tightly set in the pan. You may have a few shells left over. Pour the remaining enchilada sauce over the top of the shells.
  5. Cover the pan with a sheet of foil and bake for 20 minutes. remove the foil, sprinkle with cheese, and return to oven for 10 more minutes.
  6. Serve either plain or with any toppings you’d like-sour cream, scallions etc..

This made about 20 shells but that # will depend on how much you fill the shells and how many you can stick into the pan.

I printed this recipe out years ago.  I don’t know who’s it is.

Butternut Squash Soup

This soup is a hug in a bowl.  It’s one of those warm comforting soups that make you feel better when you have a cold or just warm you up on a chilly evening. It’s nothing crazy or a new spin on what’s always been a great soup-it’s just a really really darn good soup. It’s so easy to make and took about 1 hour start to finish-including prep.  Since 30 minutes of that time is the soup just simmering unattended it’s certainly week-night friendly. I have a feeling that this will be put into regular rotation at my house.  It stores and reheats beautifully. 

butternut1

Butternut Squash Soup

Ingredients:

  • 2 tbsp unsalted butter
  • 1 1&1/2lb  butternut squash, peeled and cut into 1/2 inch cubes
  • 1/2 cup grated carrot
  • 3/4 cup chopped Vidalia or other sweet onion
  • 2&1/2 cups fat-free, less sodium chicken broth
  • 1/4 cup heavy whipping cream plus a little extra for the pretty swirls
  • 1/4 tsp salt
  • sliced scallions or crumbled bacon or anything else you’d like for a bit on top

Instructions:

  1. In a large pot melt the butter over medium-high heat. Add the squash and onion and saute for about 10 minutes, then add the carrot and continue to saute for another 2-3 minutes. Add the broth and bring to a boil. Reduce heat to simmer, cover and leave for 30 minutes. Remove the pot from the heat, stir in the cream and salt.
  2. Place the contents into a blender (work in batches if you need to). Be sure to remove the center of the lid and just use a kitchen cloth to allow the steam out of the blender.  Blend until smooth.
  3. Serve with a little extra cream swirled in and some sliced scallions.

Adapted from Cooking Light, Sept 2009 issue.