Baileys Cupcakes

St. Patrick’s Day has come and gone again.  For so many years I went to the parade in the city and it was always cold and rainy.   I haven’t been to the parade in ages now and I guess that’s ok-you can’t drink on the street anymore. Where’s the fun in that?

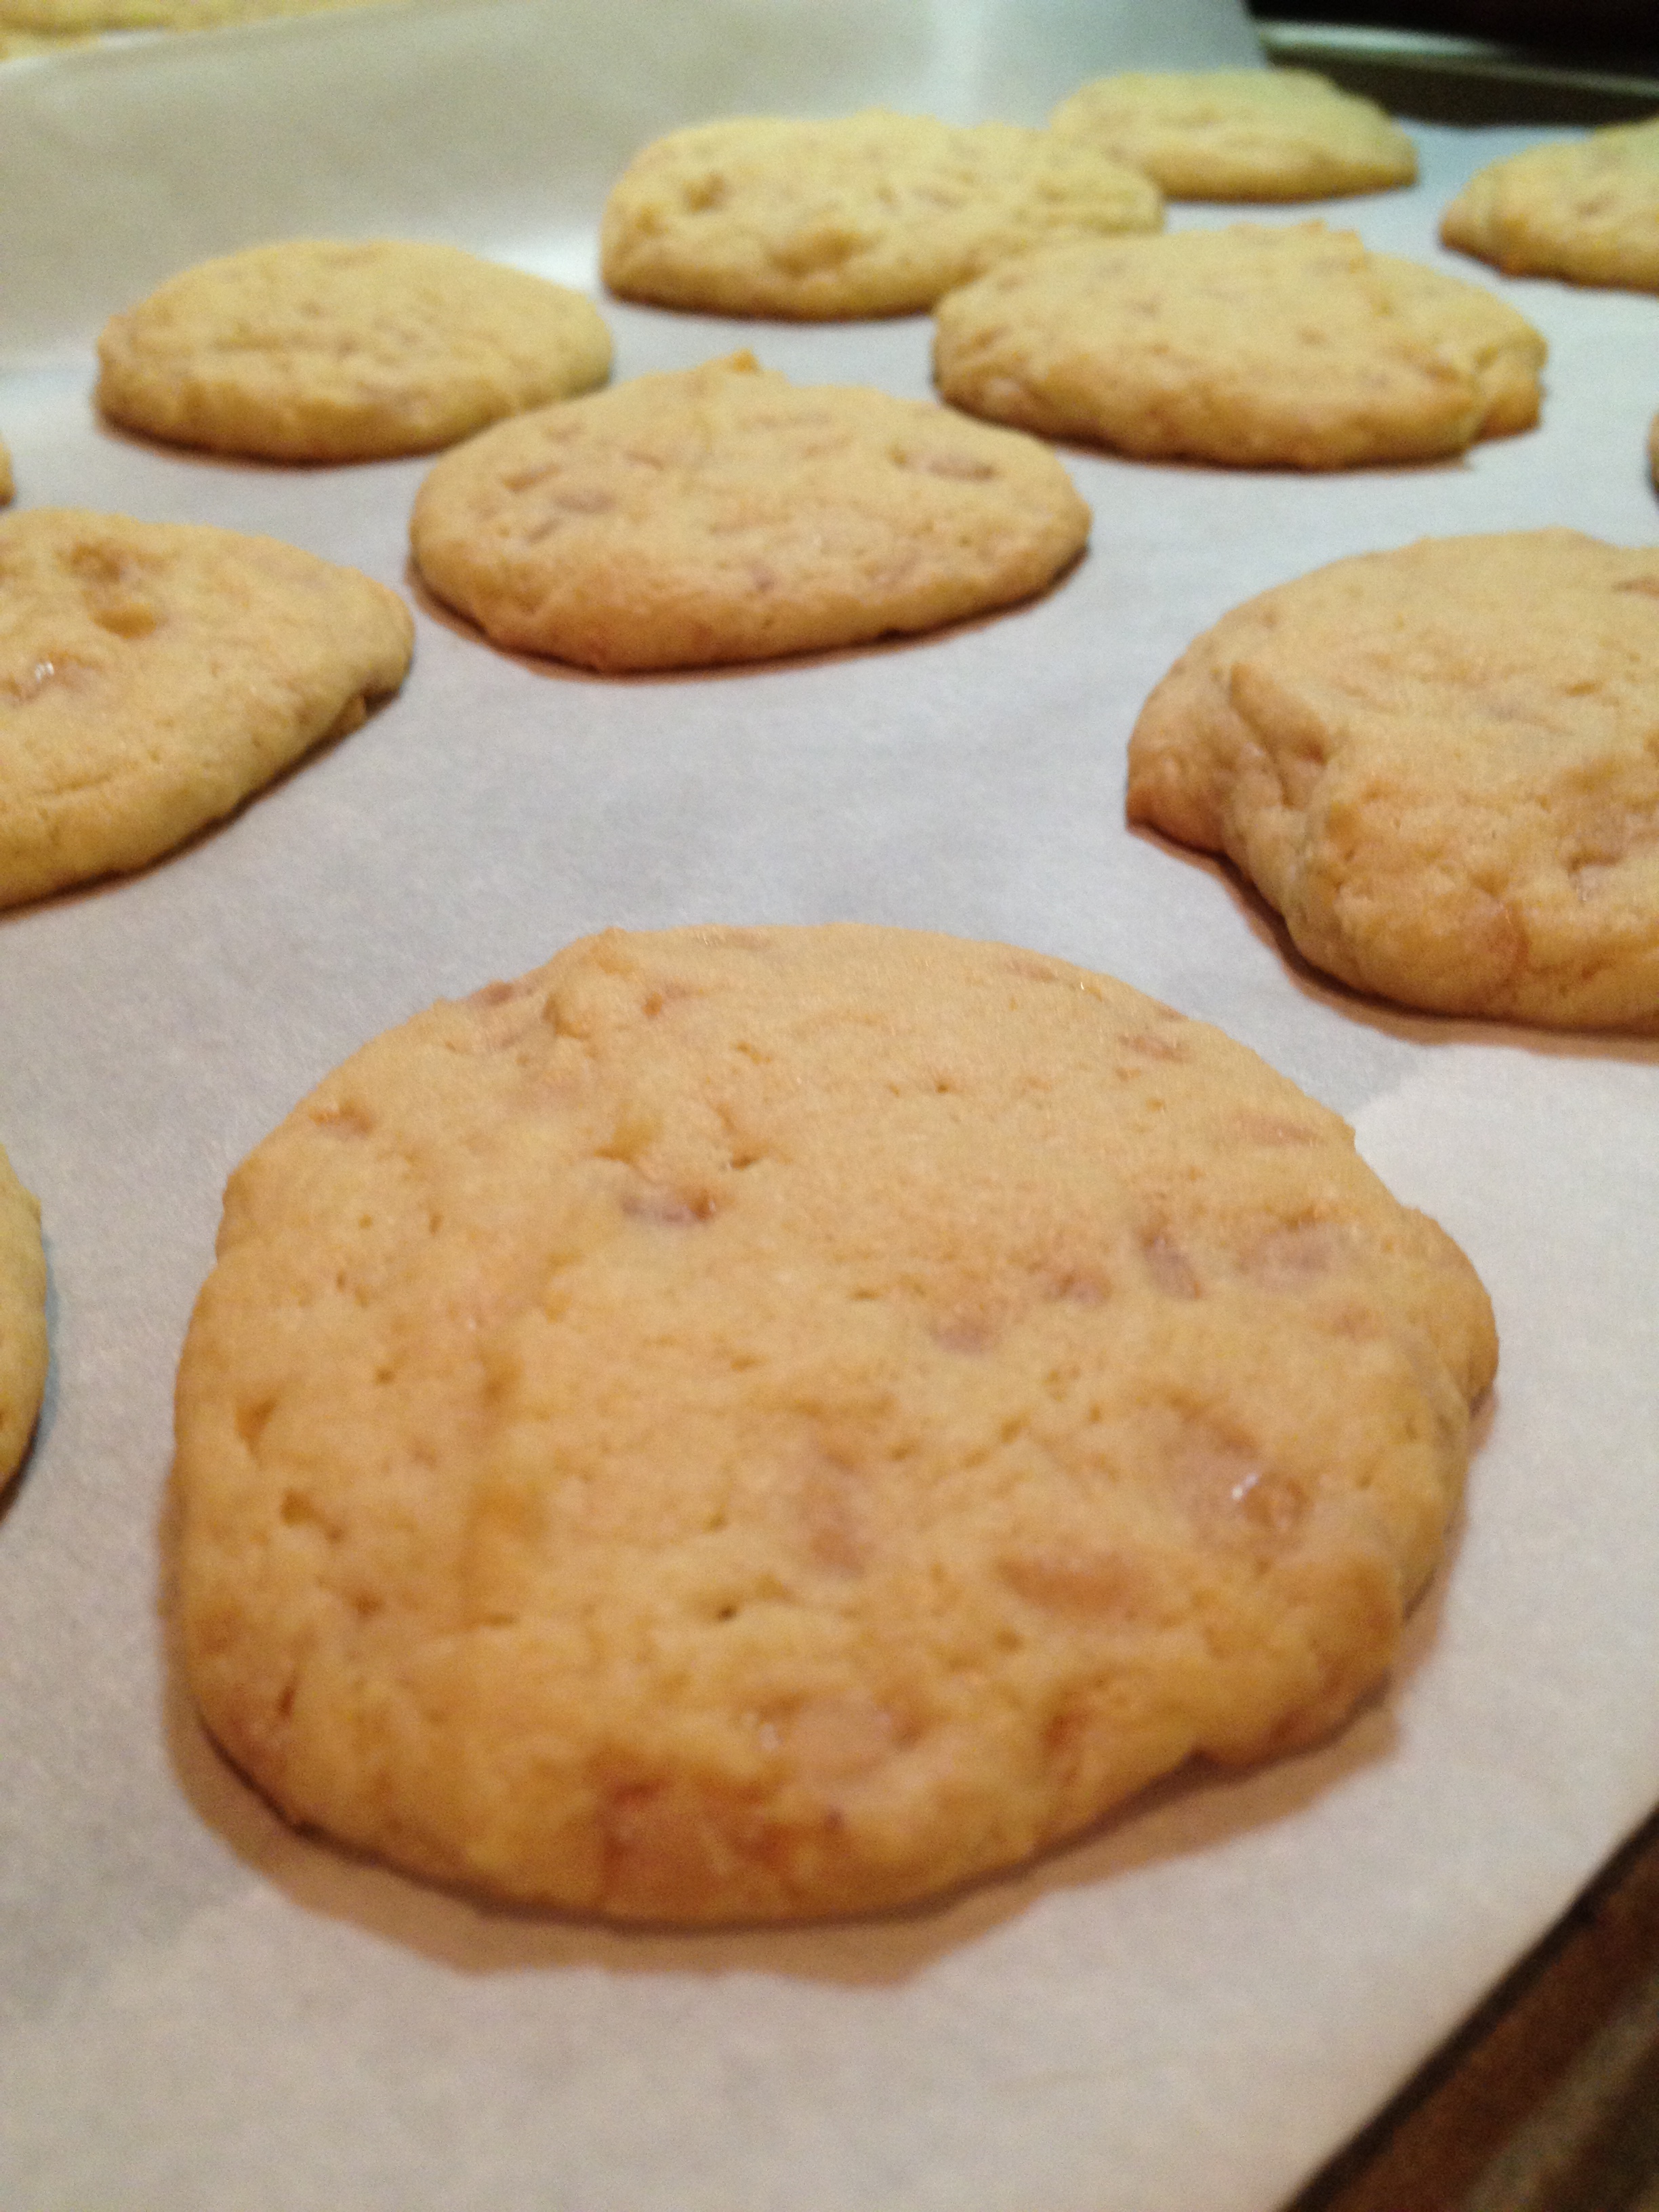
I’d tried to make Bailey’s cupcakes a few times and they always came out awful-either runny, not tasty, never set, hard as a rock or just flat gross. These were the opposite. While the cake is dense (almost like pound cake) the flavor’s there.  These are pretty sweet hence the small schmear of frosting.  Too much frosting irritates me anyway.

cupcake1

Bailey’s Cupcakes

Makes 24 cupcakes

Ingredients:

  • 2/3 cup unsalted butter at room temperature
  • 2 cups granulated sugar
  • 2 large eggs at room temp
  • 2 teaspoons vanilla extract
  • 1 1/3 cups Bailey’s Irish Cream
  • 2/3 cup water
  • 2 tablespoons milk
  • 4 cups all-purpose flour
  • 2 teaspoons baking powder
  • 2 teaspoons salt

Directions:

  1. Preheat the oven to 325 degrees. Insert 24 liners into tin(s).
  2. In a the bowl of a stand mixer cream the butter and sugar together until fluffy, about 2-3 minutes.
  3. Add eggs and vanilla to the sugar mixture and beat well.
  4. In a separate smaller bowl combine the Baileys water and milk. Mix well.
  5. In third bowl combine flour, baking powder and salt.
  6. Add the flour and Baileys mixture (alternating as you add) to the sugar mixture. Beat on medium speed for approximately 2 minutes.
  7. Fill cupcake liners ¾ full and bake for about 25 minutes or until tops spring back when lightly touched.

Frosting:

Makes about 1 cup of frosting.

Ingredients:

  • 2/3 stick unsalted butter, at room temperature
  • 3 cups powdered sugar
  • 3 tbsp Baileys
  • 10 drops green food coloring
  • white or clear finishing sugar

Directions:

  1. Put butter in bowl of stand mixer and, with beater on low, slowly add the powdered sugar until combined.
  2. Add Baileys until desired taste/texture is achieved
  3. Add food coloring until desired shade is reached.
  4. Frost cupcakes. Finish with sugar if desired.

Note: if you put foil under the cupcakes while sprinkling the sugar you won’t lose any that falls off. Just resprinkle. See below.

cupcake2

Cake recipe from cupcakerehab.com

Roasted Rhubarb with Vanilla Frozen Yogurt and Meyer Lemon Sugar

Who knew that roasting rhubarb would result in such a fantastic flavor? I certainly didn’t.  It was tart. It was sweet. It was perfect. It was  a low fat dessert that is ready in 30 minutes that you can feel good about. And it couldn’t be easier.

When I saw a package of rhubarb in my store last week this recipe immediately came to mind. I knew it had ice cream with it but I wanted something more waist line friendly so I bought some of those new little 100 calorie frozen greek yogurt containers to go with it.

 Rhu1

Roasted Rhubarb with Vanilla Frozen Yogurt and Meyer Lemon Sugar

Ingredients:

  • 20 ozs fresh rhubarb
  • 2 ozs super-fine sugar

For topping:

  • Frozen yogurt, gelato or ice cream
  • Meyer lemon sugar (recipe here )

Instructions:

  1. Pre-heat oven to 400. Wash rhubarb, dry and cut off ends. Cut stalks into halves the long way.
  2. Put the rhubarb in a shallow baking dish large enough to hold it all in one layer.  Add the sugar, toss together, then shuffle the rhubarb so it’s in a single layer.
  3. Cover with foil and roast for 15 mins. Remove the foil. The sugar should have dissolved, so give everything a little shake and roast for another 5 minutes until soft. Test softness with the back of a fork.
  4. Carefully move the stalks to a plate with a long spatula so that they keep their shape. Top with a dollop of frozen yogurt, a bit of the liquid from the pan and, if you have it, some of this meyer lemon sugar.

Rhu2

Here it is finished cooking. Notice the yummy sugary tarty liquid in the bottom of the pan. YUM!

Note: super-fine sugar is NOT confectioners sugar. To make your own put the required amount of sugar into a food processor and process until very fine, but not powder.

Adapted from recipe at bbcgoodfood.com

Chocolate Lava Cakes

So a few of us with these blogs swap recipies. This swap’s theme was ‘special occasion’.  I was given this cake recipe from this blog. I’d had little lava cakes before and liked them. 

I have to admit I’m not really a fan of cake or of chocolate so chocolate cake ranks pretty low with me-I’m more of a pie and vanilla fan really but these were really tasty and I enjoyed them much more than my anti-cake self usually does.  They really are great for a special occasion and pretty easy to make.  I got out all of the ingredients and measured everything so that when I was ready I could just whip them up after dinner. There’s not much to them really.

lavacake3

lavacake2 

Chocolate Lava Cakes

Ingredients

  • 10 tbsp butter
  • 40z dark chocolate chips
  • 2/3 cup sugar
  • 1/2 cup all purpose flour
  • 4 eggs
  • non-stick cooking spray

Instructions

  1. Pre-heat oven to 400. In a double boiler melt the butter and chocolate chips and stir until smooth.  Set aside (off of hot water and stove) to cool for 15 minutes.
  2. In a large bowl beat the sugar and eggs until thick and pale yellow. Beat in the flour making sure it’s completely incorporated then beat in the chocolate.
  3. Spray ramekins with cooking spray.  Pour the batter into the ramekins until they’re 3/4 of the way full.
  4. Place the ramekins on a cookie sheet and bake for 13-17 minutes until the top of the cake sets. Remove them from the oven and let them stand for 10 minutes.
  5. Run the edge of a thin knife around the cake being very careful to not pull the cake-just to release the cake from the dish. Place a plate on top of the ramekin and slowly invert to place the cake on the dish.  Serve with marshmallows or ice cream or whatever else you like with liquid chocolate.

Notes: The original recipe called for parchment paper rounds on the bottom of the ramekin.  I discovered that you dont need those but if you still want to use them be my guest.  To make parchment circles take one of the ramekins, set it onto the parchment and trace the bottom iwth a pencil. Then take scissors and cut just inside of the pencil line. Make sure it fits into the bottom of the dish. Trim as necessary.  To  make 4 at a time take a square of parchment, fold it into 4 (be sure that the small folds are large enough to cut the circle out of) place the completed circle on it and cut around. 

This recipe makes 5-6 cakes. Unless you have that many people to eat them making that many at once is silly. I made 4 as a test and refrigerated the left over batter. 2 days later I fired up the oven, left the batter on the countertop for a while to warm up and made 2 more (it was at this point that I realized that the parchment paper rounds mentioned above were unnecessary as I didn’t use them).  It took a few more minutes to cook as the batter was cold but they were perfect.  Since it was the night before Valentine’s Day using my heart plate was appropriate.

cake

If you do not have a double boiler take a pot, put about 3 inches of water in it then place a glass bowl over the rim of the pot and then follow instructions above. It works the same way. IMPORTANT: the water must not touch the bottom of the bowl.

lavacake1

Source: http://www.aseasonedgreeting.blogspot.com/2012/08/molten-lava-cake.html

Thanks for hosting the swap Sarah from http://tasteofhomecooking.blogspot.com


Bacon Cashew Caramel Popcorn

On Saturday night I went to see some of my very favorite people in the world and the house that they bought recently.  In addition to bringing peperonata and crackers and fresh mozzarella I brought this popcorn with me as well to munch on after dinner. Wow was it great. I had never made caramel corn before so I was concerned about how it would come out but I worried needlessly-this was EXCELLENT and really easy to make.  Just enough salty and sweet and crunchy. It really could become addicting very quickly.

Before I started I googled the original recipe from Bon Appetit and there were so many complaints from people about how many pots and pans they used etc… I thought it was pretty funny considering if you read the recipe you’ll see that you need a few. I can’t say that there was all that many though. But not to worry-I made a few adjustments to the orignal recipe that save some pans and washing time.  Caramel is pretty sticky and it will be hot for a while.  Best to let it cool in the pan and then soak the pan in some hot water-it will wash right off (unless you burn it) or wait until it’s cool enough then eat it with a spoon right from the pan :).

Caramel corn

Bacon Cashew Caramel Popcorn

Ingredients

  • 4-4.5ozs organic, unsalted air-popped popcorn*
  • 6-12 ozs bacon, cooked and chopped into various sized pieces
  • 1/2 cup cashews, raw and unsalted, chopped into various sized pieces
  • Kosher salt
  • 1 cup butter
  • 2 cups packed brown sugar
  • 1 tsp table salt
  • 1/2 cup light corn syrup
  • 1 tsp baking soda
  • non-stick cooking spray

Directions:

  1. Preheat oven to 200 degrees.
  2. Line 2 rimmed baking sheets with foil and spray with non-stick spray. Set aside.
  3. In a very large metal bowl (large enough to fit all of the popcorn and ingredients and be stirred) combine the popcorn, bacon, cashews and salt and stir until evenly distributed. Set aside. Spray 2 metal spatulas or spoons (or 1 of each) with non-stick spray. Set them aside.
  4. In a heavy-bottomed medium sized sauce pan over medium heat combine the butter, brown sugar, corn syrup and 1 tsp salt.  Using a candy thermometer bring to the soft ball stage (if you’re not using a candy thermometer bring to a boil and allow to simmer for 5 minutes). Remove from heat and stir in baking soda.  The caramel will get poufy. Stir it well to make sure that everything is evenly combined.  Pour it over the popcorn in the large bowl and using 2 spoons or spatulas, stir and fold everything together until evenly distributed (don’t forget the little bits at the bottom of the bowl).
  5. Spoon the popcorn onto the baking sheets making an even layer on each.
  6. Bake for about 45 minutes until caramel is shiny and coats the popcorn, giving the baking sheets a turn halfway through and stirring if needed.  If any large clumps appear break them up with a spatula.
  7. Remove from oven and place the baking sheets onto cooling racks until popcorn has cooled.

Note: For cooling the popcorn I removed the popcorn from the baking trays when it was cool enough to touch-about 15 minutes, and transferred it to a large colander and placed it outside in the 20degree shade to cool.  Since the baking sheets had non-stick spray residue on it I did not want that absorbed into the popcorn to make it mushy.

*You can also use 1/2 cup popcorn kernels and pop them as per the manufacturer instructions.  To save time and pans though I bought a bag from Fairway that was popped fresh and unsalted.  Saved me having to clean a pot and a lid and possibly burning it  (which I tend to do).  Besides-a 6oz bag was on sale for $1.99 that day-so I saved money too.

Makes enough to fill 1 gallon-sized Ziplock bag.

Adapted quite a bit from Bon Appetit.

Tim goes crazy for it too!! 2 of his favorites-bacon and caramel-in one place.

popcorn timmy

Meyer Lemon Pound Cake

Mmmmmmmmmmmmmm Meyer Lemons. The part tangerine tasting lemon that is the shape of an average lemon but a different color and different taste and smell.  See? Here they are below next to some navel oranges and below that you can see the contrast in color next to the yellow border of my dish. They’re closer in color to an orange than a lemon. Here’s a good article about them but, at the risk of sounding like a snob, they’re hardly undiscovered 🙂 And conveniently I have a pound cake pan with a lemon pattern on top. Cute no?

Note: this recipe calls for a few different additions of the lemons-juice, zest etc…get 3 large ones and that will be just enough.

Lemon1

Lemon2

Meyer Lemon Pound Cake

For the cake:

  • 1 3/4 cups AP flour
  • 1/2 tsp baking powder
  • 1/2 tsp salt
  • 1/4 cup sour cream
  • 1 1/2 tbsp Meyer Lemon juice
  • 1 1/2 tbsp Meter Lemon zest
  • 1 cup granulated sugar plus 2 additional tbsp
  • 1 cup (2 sticks) unsalted butter, at room temperature
  • 5 large eggs, at room temperature, beaten

For the syrup:

  • 1/4 cup granulated sugar
  • 1/4 cup Meyer Lemon juice

For the glaze:

  • 1/2 cup confectioners sugar, sifted
  • 1 tbsp Meyer Lemon juice

Instructions:.

  1. Preheat oven to 315F. Spray a 9×5 loaf pan with non-stick cooking spray. Set aside.
  2. In a medium bowl combine the flour, baking powder and salt and whisk to combine.  
  3. In a small bowl whisk the sour cream and lemon juice together.
  4. In the bowl of a stand mixture fitted with the paddle attachment combine the lemon zest and sugar. Using your fingers rub them together until the sugar is moist and fragrant and evenly mixed together.  Add the butter to the bowl and beat on medium speed until very pale and fluffy (about 3-4 minutes).  Scrape down the sides of the bowl. Mix in th eggs in 3 additions, beating well after each addition until the mixture is smooth (stop to scrape down the bowl as needed). With the mixer on low alternately add the dry ingredients in 3 additions and the sour cream mixture in 2, starting and ending with the dry.  Once all of the ingredients have been added scrape down the bowl then beat on low for another 30 seconds to combine.  Use a rubber spatula to make sure the batter in the bottom of the bowl is uniform.
  5. Pour the batter into the prepared pan. Smooth the top then tap the pan on a hard flat surface to release any air bubbles.
  6. Place a piece of aluminum foil under the cooling rack.
  7. Bake the cake for 55-65 minutes or until a toothpick in the center comes out with just a few moist crumbs. Place the pan on a wire cooling rack, let it cool for 10 minutes then turn it out onto the rack.
  8. While the cake is in the oven make the syrup.  Combine the sugar and lemon juice in a small saucepan cook over medium-high heat. Cook, stirring frequently, until the sugar has dissolved.  Bring to a simmer, cook for 2 minutes and then remove from heat and set aside.
  9. Once you’ve turned the cake out of the pan onto the rack brush the top and sides with the syrup.  Reuse any that falls below onto the foil below. Be sure to use all of the syrup. Then let the cake cool completely–about 2 hours.
  10. When the cake is cooled make the glaze by combining the confectioners sugar with the juice in a small bowl and stir to combine.  Drizzle it carefully over the cake covering it completely. Let the glaze set for 15 minutes before serving.

Source: Cook’s Country April/May 2006

I printed this from someone’s blog but didn’t write down who’s it was. If it’s yours please let me know.

 I drizzled a little extra juice that I had left over all over the cake after I poured on the glaze.

And don’t waste the left over pieces that you’ve squeezed-there’s still a ton of flavor in there-it would be a shame to throw out that deliciousness!!

Lemon

Note: this cake will keep for 5 days wrapped tightly at room temp for upto 5 days or freeze (unglazed) for up to 1 month.

Here is a photo of the cooling rack with foil underneath-the syrup will drip so it’s nice to catch all of it.

Lemon3

Brickle Drop Cookies

Over the holidays I had a surpise appendectomy while on vacation in Mexico so I can’t cook anything that requires lifting etc…and I need to lay around on the couch to recover. I’ve also been craving cookies since the surgery. One of my favorite candy of all time is the Heath Bar.  While I was grocery shopping on Saturday I saw a bag of the bits in the baking aisle and decided to make the recipe for the Brickle Drop Cookies on the back of the bag. And the cookies are absolutely delicious!!!

Cookie 

My dog was happy too-he got to lick the beaters as there’s no chocolate in the cookies. Happy Tim 🙂

cookie2

Brickle Drop Cookies

1  cup (2 sticks) unsalted butter, softened

1 cup granulated sugar

1 cup packed light brown sugar

1 tsp vanilla extract

1/2 tsp salt

3 eggs

3 1/2 cups all purpose flour

2 tsp baking soda

2 tsp cream of tartar

1 8oz package Heath Bits-O-Brickle Toffee Bits (one bag)

Pre-heat oven to 350.   Line a cookie sheet with parchment paper.

In a large bowl beat butter, sugar, brown sugar, vanilla and salt until blended. Add eggs and beat well.

Stir together flour, baking soda and cream of tartar.  Add gradually to the butter mixture, beating until blended. Stir in the toffee bits.

Scoop heaping teaspoons of batter onto the cookie sheet, leaving about 1 inch between cookies. Bake for 8-10 minutes or until slightly browned.  Allow to cook slightly on the cookie sheet then eat them. 

Store cookies in an airtight container.

Makes about 6 dozen cookies.

I froze half of the batter for these cookies so that I only made about 30. I wrapped the dough twice in plastic wrap, taped the recipe to the top and put into a ziplock bag.

Slightly adapted from Heath Brickle Bag recipe.

Cranberry & Lemon Squares

I love cranberries! I remember years ago my Mom and I took a trip to Nantucket during harvest season and saw the bogs and ate everything cranberry. We even grabbed a few from the bog and ate them.  Not only are they delicious they’re good for you!

For Thanksgiving (in addition to the Caprese Platter,  Potato Bites and Kalamata olive crostini) I brought this as a dessert. Wow-what a taste!! Slightly tart from the cranberry and lemon, slightly sweet from the sugar-but just right all around. I added a bit more cranberries and lemon zest than the original recipe from http://www.southernpinklemonade.com/.

I didn’t take a photo of the dish. It was late on Thanksgiving and it looked so good that I totally forgot all about the photo. But let me explain: they’re nice squares with crust on the bottom, a layer of cranberries and then crust dotted on top.

Cranberry & Lemon Squares

Ingredients for the crust:

  • 3 cups AP flour
  • 1 tsp baking powder
  • 1 cup white sugar
  • 1/4 tsp salt
  • zest of one lemon
  • 8 ozs (2 stick) very cold unsalted butter, cubed
  • 1 egg
  • 1 tsp vanilla extract
  • 2 tbsp-1/4 cup very cold water

Ingredients for the filling:

  • 1 12-14 oz package frozen cranberries
  • 3/4 cup white sugar
  • 2 tbsp corn starch
  • juice and zest of one lemon

Directions:

Preheat oven to 375.  Line a 9×13 baking dish with parchment paper (i put little pieces of tape on all 4 sides to keep it in place-but don’t forget to remove them before you put it in the oven!!) leaving a bit of an overhang to grab and remove the contents out of the pan after baking.

In the bowl of a food processor add the flour, baking powder, sugar, salt and lemon zest. Pulse to combine. Add the butter and pulse until dough is crumbled into small pieces.

Move the dough into the bowl of a stand mixer and mix in the egg and vanilla extract. Add water 1 tbsp at a time until dough comes together.

Press half of the dough into the bottom of the baking dish.   Keep the remainder handy to use for the topping.

In a medium bowl combine the sugar and cornstarch then add the cranberries and lemon juice and stir to coat cranberries evenly. Port the contents of the bowl evenly over the crust in the baking dish and sprinkle with the zest.

Crumble the remaining dough over the top of the cranberries.

Bake for 30-35 minutes until the top and sides are brown.

Remove from the oven and allow to cool completely (I put the baking dish outside on a cooling rack as it was chilly and it cooled quickly). Once cooled lift the entire contents out of the dish using the parchment paper ends, cut into squares and serve.

Cinnamon Sugar Doughnut Muffins

Delicious little goodies!! These muffins have the consistancy of a doughnut inside but look like a muffin on the outside. They were SO easy to make and came out great. The original recipe was for mini-muffins but since I didn’t have a mini-muffin pan I made them regular sized. I also lightened up the topping a bit by using less butter and brushing it on rather than dipping them in the butter. 

When I was little my Mom always used to make me toast with cinnamon sugar on top and the cinnamon sugar was always in this cute white with orange polka dots shaker.  I have that shaker now and since I was born in 1975 it’s got to be over 30 years old. It was a nice memory. ***update: my Mom saw this and reminded me that my grandmother gave her this shaker so it’s at least 50 years old***

Enjoy 🙂 they’re yummy!!!


Cinnamon Sugar Doughnut Muffins

Ingredients: Muffins

  • 1&1/2 cups all purpose flour
  • 1 tsp baking powder
  • 1/2 tsp salt
  • 1/2 tsp ground nutmeg
  • 1/4 tsp baking soda
  • 2/3 cup milk or buttermilk
  • 1/4 cup sour cream
  • 6 tbsp butter, softened
  • 1/4 cup granulated sugar
  • 3 tbsp brown sugar
  • 1 large egg

Ingredients: topping

  • 1 tablespoon butter, melted
  • 1/4 cup sugar combined with 1 teaspoon cinnamon (or adjust to your taste)

Instructions:

  1. Preheat oven to 350 degrees.  Put muffin papers in the pan (15 or so).
  2. In a small bowl, combine flour, baking powder, salt, nutmeg, and baking soda. In another bowl, combine milk and sour cream; stir to combine.
  3. In a mixer bowl, cream the butter, sugar, and brown sugar until light and fluffy. Beat in the egg. Add the flour mixture alternatively with the milk mixture, beginning and ending with the flour mixture. Mix until all of the ingredients are incorporated, but don’t overmix.
  4. Fill each muffin cup 3/4 full of batter. Bake muffins until they are golden and a toothpick inserted in the center comes out clean, about 14-17 minutes. Cool in the pan for 5 minutes and then turn them out of the pans. Apply topping while warm.
  5. To apply the topping brush on the melted butter with a silicone brush and then sprinkle with cinnamon sugar.

Makes 15 muffins.

Adapted from Cookies on Friday.


Velvet Pumpkin Bread

The weather has gotten so nice and cool this week-high 70s during the day, low 60s at night-a great change from the super-humid hot weather we had for the past few weeks. So the air conditioning is off, the windows are open and it feels great-in other words the fall bug has bitten me. I was looking through some of the cookbooks that I’ve picked up for my Kindle and came across the Gooseberry Pumpkin Cookbook that I’d purchased last year- link.

This recipe made 2 gorgeous delicious loaves of super-moist, amazingly tasty pumpkin bread and they were really easy to make. Wow did my house smell amazing while they were cooking too!! I left one loaf at home and brought one to work for my co-workers to enjoy today.

(Next fall when I make this I’d like to try using greek yogurt instead of the oil. I’m not sure of the conversion amounts though-I will have to find out and put an alternate ingredient on this recipe.)

Velvet Pumpkin Bread

Ingredients:

  • 3 cups all-purpose flour
  • 1 tsp salt
  • 2 tsp baking soda
  • 2 tsp baking powder
  • 2 tsp cinnamon
  • 1&1/2 cup vegetable oil
  • 2 cups sugar
  • 4 eggs, beaten
  • 2 cups canned pumpkin (one 16 oz can)

Instructions:

  1. Preheat oven to 350 and spray 2 9″x5″ loaf pans with non-stick baking spray.
  2. Sift together flour, salt, baking soda, baking powder and cinnamon 3 times and set aside.  In a large bowl combine oil and sugar and mix well then blend in flour mixture. Add the eggs and pumpkin and mix well.  Pour batter into the 2 prepared pans and bake for 1 hour.

Makes 2 loaves.

Hummingbird Cupcakes

A few years ago I made a Hummingbird Cake and it was delicious so I knew these cupcakes would be great. They’re a bit fruity and a bit crunchy, sweet and delicious. The original recipe called for a TON of frosting so I halved that recipe as I couldn’t fathom an entire box of cream cheese and a whole box of sugar-it would be way too much.  I have a pet peeve about over frosted cupcakes and half of the frosting recipe made enough for a good schmear on top of each cake-the perfect amount.  They’re also pretty simple to make-just a few mixing bowls and spoons-no mixer needed (aside of the frosting). Make them 🙂

Hummingbird Cupcakes

Ingredients: For the cake:

  • 3 cups all-purpose flour
  • 1 tsp baking soda
  • 1 tsp baking powder
  • 1 tps salt
  • 1&1/2 cups granulated sugar
  • 1 tsp ground cinnamon
  • 2 large eggs, beaten
  • 1/2 cup vegetable oil
  • 1 tsp vanilla extract
  • 1/2 cup cinnamon applesauce
  • 1 8oz can crushed pineapple, with juice
  • 1 cup chopped pecans
  • 2 ripe bananas, chopped
  • 24 pecans (to top each cupcake)

Ingredients: Cream Cheese Frosting

  • 4ozs 1/3 less fat cream cheese
  • 1/4 cup butter, softened
  • 1/2 lb powdered sugar
  • 1/2 tsp cinnamon
  • 1/2 tsp. vanilla

Instructions: for the cupcakes

1. Preheat the oven to 350 degrees. Line 24 muffin tin cups with paper liners.

2. Combine the flour, baking soda, baking powder, salt, sugar, and cinnamon in a large bowl.

3. In a small bowl beat the three eggs. Add to the dry ingredients along with the oil and applesauce. Stir until the mixture is just moist. (Do not use a mixer). Stir in the vanilla, pineapple (with juice), pecans, and bananas until just mixed in.

4. Pour the batter into prepared muffin tins filling each cup ¾ of the way full. Bake for 22-24 minutes or until a toothpick comes out clean.

5. Cool in the muffin tins for 5 minutes then transfer to wire racks to cool completely.

Instructions: For the frosting

1. Beat cream cheese and butter at medium speed with a mixer. Add the powdered sugar 1 c. at a time until fully incorporated. Stir in vanilla and cinnamon.

2. Spread or pipe 1 ½ T. of icing on each cupcake. Top with a pecan. (Store extra icing in the refrigerator).

Adapted from Southern Living and Heather.


Previous Older Entries Next Newer Entries