Red Bell Pepper & Sweet Corn Saute

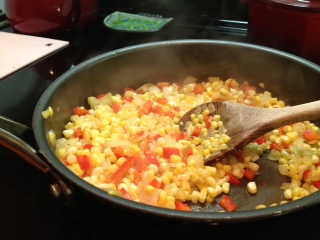
Sweet yellow summer corn, crunchy red bell pepper, tangy onion and savory garlic all sautéed in a touch of butter and rounded out with just the tiniest hint of soy sauce.   This might just be one of the tastiest sides I’ve ever eaten. It’s so easy that someone who’s never cooked before could master it on the first try. It’s tasty enough to serve alongside with anything at the fanciest of restaurants or the most casual of tables—and it’s just really pretty to boot.

Note: the original recipe called for frozen corn but since delicious sweet corn is still available at the market I used that instead. Feel free to sub the frozen corn when fresh is not available.

corn2

Red Bell Pepper & Sweet Corn Saute

Ingredients:

  • 1&1/2 tsp butter
  • 1/2 cup onion chopped small
  • 1 red bell pepper chopped small
  • 2 garlic cloves, smashed to a pulp
  • 3 ears fresh sweet corn, husked and kernels removed from cob
  • 1/4 tsp freshly ground black pepper
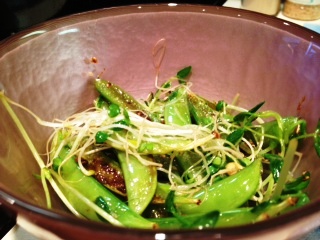
  • 1 tsp low-sodium soy sauce

Instructions:

  1. In a large non-stick skillet over medium-high heat melt the butter. Add the onion, red bell pepper and garlic and saute about 4 minutes. Add the corn and pepper and saute until the corn is cooked through and starting to soften.
  2. Remove from heat, add the soy sauce and stir to incorporate. Serve immediately.

corn1

Adapted from Bell Pepper and Corn Saute Cooking Light October 2013.

Sugar Snap Peas & Sprouts

Sometimes the most difficult part of a meal is choosing the side dish. Often I know that I want something tasty but not too involved and perhaps something versatile that can be changed up every now and again while using the same basic recipe.  I give you Sugar Snap Peas & Sprouts-which is exactly that. A tasty, fast-cooking, minimal prep, delicious side that is easy to put different spins on. Perhaps silvered almonds, perhaps hoisin sauce, perhaps add cooked brown rice for more of a fried rice feeling without the guilt. Either way it’s a winner.

swap2

Sugar Snap Peas & Sprouts

Ingredients:

  • 1 tbsp dark sesame oil
  • 1 tbsp freshly grated ginger
  • 2 garlic cloves, minced
  • 1/2 lb sugar snap peas
  • 1 tbsp sesame seeds
  • 1/3 cup sprouts (I used a combo of chick pea, lentil and bean sprouts)
  • 2 tbsp low sodium soy sauce

Instructions:

  1. Heat sesame oil in a large pan over medium-high heat
  2. Add ginger and garlic and saute about 2 minutes until fragrant
  3. Add the sesame seeds and cook for another minute
  4. Add the sugar snap peas and saute for about 3 minutes then add the sprouts and soy sauce and continue to cook another minute or 2 until the peas are crisp-tender.
  5. Serve immediately.

Recipe adapted from Mary Ellen at http://mecookingcreations.blogspot.com/

Thanks again to Sarah @ http://tasteofhomecooking.blogspot.com/ for hosting this month’s swap.

Taco Casserole Bake

It seems that over the last week that the weather has turned more towards fall even though it’s still summer until the 22nd. And with fall comes cozy Sundays watching football. And with Sunday football comes yummy food. And that yummy food category just got a new additon. This casserole is as easy to make as it is tasty. I found the original recipe on BettyCrocker.com and lightened it up a ton by using fat-free refried beans, super-lean ground beef, reduced fat cheese and fat-free sour cream.  Even better-I had all of the ingredients I needed in my pantry already.

taco3

Taco Casserole Bake

Ingredients:

  • 1lb lean ground beef
  • 1 16oz can fat free Refried Beans (Old El Paso)
  • 8 ozs medium spicy salsa (I used Fairway brand)
  • 1 8oz can tomato sauce
  • 1 Taco Seasoning Packet or homemade taco seasoning
  • 2&1/2 cups smashed tortilla chips
  • 1 red bell pepper, chopped small
  • 4 scallions, chopped
  • 2 vine-ripened tomatoes, chopped, seeds and cores removed
  • 1 cup freshly-grated reduced fat cheddar cheese
  • fat free sour cream, salsa, shredded lettuce, olives, other toppings of choice

Instructions:

  1. Pre-heat oven to 350.
  2. In a large skillet brown the beef over medium-high heat and drain. Stir in the beans, salsa, tomato sauce and taco seasoning. Reduce heat to medium and cook for a few minutes, stirring constantly, to combine.
  3. On the bottom of a 2 quart baking dish place 2 cups of the smashed toritlla chips then pread the beef mixure evenly over the chips then sprinkle the pepper, onion, 1 cup of the chopped tomato and the cheese.
  4. Bake uncovered 25-30 minutes until bubbling and cheese has melted.
  5. Serve with the remaining tomatoes and chips on the side topped with anything else you’d like.

Note: this also reheats beautifully for left overs.

Taco1

Crispy Baked Cod with Tangy Dill & Pickle Sauce

I’m a sucker for a good piece of fish. When I received my latest issue of Cooking Light and saw Crispy Fish with Lemon-Dill Sauce I knew that I had to make it right away. I changed a few things about it–especially the sauce. That’s why I changed it’s name.

The title didn’t lie. It’s crispy. Really crispy. And that’s a good thing. I chose to make this dish with Cod but you could also use flounder, bass, tilapia etc… It cooks fast and is a really simple dish to put together-great for a fast weeknight meal or, in my case, a great dinner after a busy Saturday of running around.

cod1

Crispy Baked Cod with Tangy Dill & Pickle Sauce

Ingredients:

  • 1 large egg white, beaten
  • 1 cup panko
  • 1/4 tsp hot paprika
  • 1/2 tsp granulated onion
  • 1/2 tsp garlic powder
  • 2 4oz skin-less fresh cod filets
  • 1/2 tsp freshly ground black pepper
  • 1/4 tsp kosher salt
  • Cooking spray
  • 2 tbsp – mayonnaise (Hellmann’s)
  • 1-2 tbsp finely chopped dill pickle (to taste)
  • 1/2 tsp fresh lemon juice
  • 1/4 tsp dried dill

Instructions:

  1. Pre-heat broiler to high.
  2. Place egg white in a shallow dish.  In a 2nd dish combine panko and next 3 ingredients and mix to combine.
  3. Spray a broiler pan with cooking spray.
  4. Sprinkle salt and pepper onto both sides of fish then dip each fillet in the egg and then roll in panko to coat evenly.  Place fillets on the prepared broiler pan and broil 4 minutes on each side or until cooked through. Time will depend on fillet size.
  5. While fish is cooking prepare the sauce. Combine the last 4 ingredients in the list above in a small bow, stir and serve on the side with the fish.

Swiss Smashed Baked Potato

I’ve been on a baked potato kick lately and created a really super tasty one last night that I wanted to share with you. I’m always trying different toppings-salsa with sour cream, chives etc.. If you’re looking for something a bit different but amazingly tasty look no further. The swiss cheese makes it tangy yet incredibly smooth.

You can see in the photo below how light and creamy the potato is. It couldn’t be simpler to make.

swiss potatos

Swiss Smashed Baked Potato

Ingredients:

  • 1 Yukon gold potato
  • 1 wedge Laughing Cow Light Creamy Swiss Cheese
  • Sprinkle of butter powder or pat of butter (I used the butter powder that we put on fresh home-made popcorn).
  • Salt & pepper to taste

Instructions:

  1. Poke holes in the potato with a fork then wrap it in a paper towel. Microwave the potato for about 6 minutes (depending on microwave).
  2. Remove the potato from the microwave, discard the paper towel and put the potato into a small bowl. Cut into the potato crossways then the long ways going all the way through. Push the pieces apart to make room for the butter and cheese.
  3. Sprinkle butter over the potato then mash in the swiss cheese evenly. Taste and add salt and pepper to taste. Mash it all around again.
  4. Serve immediately.

I didn’t have any but I would imagine that sliced green onions would be fabulous on top of this potato.

SFTK original.

Turkey Taco Soup-slow cooker

I realize that since it’s only September 9th that there are still 2 weeks of summer left. You’d never know that it’s still summer. Everyone apparently times the beginning of fall by when their kids go back to school. Well since my dog doesn’t go to school I go by the real seasonal calendar.

That’s not to say that  I won’t embrace everything fall early. I’m looking forward to making soups and apple this and that and pumpkin this and that. And I did have my first Pumpkin Spice Latte from Starbucks yesterday: non-fat, no foam, 140 degrees, half syrup-and it was perfect.  It’s the PSL’s 10 year anniversary this year. Happy birthday you delicious wonder!!!

So on that note my first soup of the time surrounding the beginning of fall is here. It’s a delicious concoction of ingredients you probably have all of (or most of)in your pantry.fridge.freezer already. If you read my other slow cooker recipes you know that I became quickly enamored with that little machine.  Here’s another recipe to feed that obsession. 

It’s hearty but not heavy, it’s well spiced but not hot, it’s not too thick or too thin.  In other words-it’s just right.  I just served this plain in the bowl but you could always put a dollop of sour cream or green onions or cheese.

taco soup

Turkey Taco Soup-slow cooker

Ingredients:

  • 1 lb lean ground turkey
  • 1 medium yellow onion, chopped small
  • 1 16 oz can kidney beans
  • 1 16 oz can pinto beans
  • 1 15 oz can sweet corn
  • 1 8 oz can tomato sauce
  • 2 14.5 oz can diced tomatoes
  • 1 4 oz can diced green chiles
  • 1 package taco seasoning or 2-3 tbsp home-made taco seasoning

Instructions:

  1. In a pan over medium heat brown the turkey, drain it and set it aside.
  2. Place the turkey and onions in the slow cooker, pour everything else in and stir.
  3. Cook on low for 6&1/2 hours.

Adapted from allrecipes.com. The original recipe called for adding 2 cups of water but I didn’t add any and the liquid amount was fine.  The original recipe also called for using ground beef but I changed it to turkey to cut calories and fat and to use up some ground turkey that I had in my freezer. I’m sure you could also omit the meat all together and add tofu to make it vegetarian.

French Dip Sandwich

Labor Day weekend already? It seems like it was just Memorial Day weekend!! Well there’s only 3 weeks of summer left. Soon the leaves will change colors and it will be chillly again. I can’t say I’m sad about that. This summer seemed to not be our typical Long Island summer. Too rainy. Too humid. Not many nice days at all. So while I’m usually summer’s biggest fan this year I say ‘bring on the fall’. I’m ready for boots and scarves and sweaters (yay!! get the cashmere out!!). 

Husband and I finally did some painting in our house that we should’ve done probably 3 years ago-but alas-we put things off like that. It felt really good to get it done and, as always is the case, it looks fabulous.  I knew it was going to be an active busy day so I planned ahead and had everything I needed for these sandwiches on hand. They were a HUGE hit! They were so tasty. They’re so tangy from the broth and the sweet onions were deeeeeelicious! And they came together really fast to boot.  A perfect sandwich for a day of doing things around the house or for a nice lunch at home. 

By the way-the color in the background of the photo below is Benjamin Moore’s Wood Ash the color we painted the room. It’s very nice if you’re looking for a warm neutral to go with dark furniture/and wood floors like we were.

French Dip

French Dip Sandwiches

Ingredients:

  • 1 large Vidalia or other sweet onion, cut in half and sliced to 1/4 inch slices
  • Cooking spray
  • 2 tsp salt-free Mrs. Dash Garlic and Herb Seasoning Blend, divided
  • 1/2 cup plus 2 tbsp water
  • 2 cups fat-free, low-sodium beef broth or stock made from Better than Bullion Beef
  • 12 ozs thinly sliced Boars Head roast beef from the deli counter
  • 4 kaiser rolls, cut in half horizontally
  • 4-8 slices reduced-fat Swiss Cheese (or meunster)

Instructions:

  1. Heat a medium non-stick skillet over med-high heat and add the onion. Spray with cooking spray and sprinkle in 1/2 tsp of the Mrs. Dash. Stir to distribute evenly and sautee about 13 minutes until onion is tender and golden brown. While the onion is cooking add the water 2 tbsp at a time until it evaporates, scraping the bits off of the bottom of the pan with a wooden spoon. Remove from heat and set aside.
  2. While the onion is cooking combine the broth and remaining Mrs. Dash in a sauce pan large enough to hold the liquid and the roast beef and stir it. Cook the broth until hot. Remove the pan from the heat and add the roast beef, pushing it down into the broth and let it stand while you prepare the rolls.
  3. Place the bread cut side up in the toaster oven, top one side (or each if you prefer) with a slice of cheese. Toast to desired crispy/meltyness.
  4. Using tongs pick up some of the beef and let the broth drip back into the pan. Place the beef on the bottom of the prepared roll and top with onions.  Serve immediately with a side of broth if desired.

I opted to just drizzle a little broth over the onion/beef on my sandwich and then put the top of the roll on top.

Adapted from Cooking Light’s Fresh Food Fast cookbook.


Pomodori Gratinati (gratineed tomatoes)

I hemmed and hawed over how to write this little blurb about this recipe. I thought of talking about how the perfect summer tomatoes are so delicious and how the filling is a bit crunchy and so so tasty from the different herbs and 2 cheeses. I must have written 10 drafts and deleted them all. They seemed too wordy for a dish so simple it’s almost silly.

But in the end, what came to mind the most, were my visits to Florence/Tuscany over the last few years. I mean-that makes sense since I found the recipe in my book, Twelve, which is a month by month Tuscan cookbook. But if you’ve been there you’ll understand what I mean when you taste these. If you haven’t been there you need to change that immediately.

It’s amazing how a bite of something can instantly mentally take you out of your kitchen and zip you into a chair at a table on the perimiter of a piazza with a gorgeous plate of cheese and veggies like these and a glass of chianti.

tomato1

Pomodori Gratinati

Ingredients:

  • 6 plum tomatoes, vine ripiened, washed and dried
  • 3 tbsp chopped parsley
  • 1 garlic clove, chopped small
  • 10 basil leaves, chopped
  • 1 tbsp frehsly grated parmesan cheese, plus sprinkle for topping
  • 1 tbsp freshly grated pecorino romano cheese, plus sprinkle for topping
  • 1/4-1/3 cup fine breadcrumbs
  • 8 tbsp olive oil

Instructions:

  1. Preheat oven to 350.
  2. Slice the tomato in half from stem to stem and, very gently, using a spoon remove the flesh and seeds-reserving them. Put the tomato halves into a baking dish, cut side up. Chop up some of the reserved insides and set aside.
  3. In a bowl mix the parsley, garlic, basil, cheeses, breadcrumbs and 4 tbsp olive oil. Season with kosher salt and freshly ground pepper if desired. If desired you can also add some of the chopped tomato insides (I added just a bit). Spoon the mixture into the tomato halves.
  4. Drizzle with the remaining olive oil and bake int he oven for 20-30 minutes until they are lightly golden and cooked through.
  5. Sprinkle with extra topping cheese and serve.

Note: since it was only I eating I only made one tomato. It was very easy to scale the recipe down so don’t feel that you have to make all 6 tomatoes.

Adapted from Twelve, A Tuscan Cookbook

This simple and very delicious recipe fit in perfectly with this month’s What’s Baking challenge theme of ‘Italian’. For the other recipes in the swap click here here

WB

tomato2

Artichoke & Parmesan Tilapia

This fish is very light but incredibly flavorful.  Tilapia is so mild and the slight nutty tang from the cheese really does perk it up a bit.  Paired with the artichoke hearts, breadcrumbs and lemon it’s a perfect combination of flavors for the fish. 

This recipe comes together so fast and the prep time is a short-only about 5 minutes. The fish will be on the table 20 minutes later. Conveniently you can also roast vegetables at the same time and have everything finish cooking at the same time.

tilapia1

Artichoke & Parmesan Tilapia

Ingredients:

  • 2 4oz fresh tilapia filets
  • 6 oz artichoke hearts, drained and chopped
  • 1/4 cup breadcrumbs
  • 1/4 cup freshly grated parmesan cheese
  • 1 tsp fresh lemon juice
  • kosher salt and freshly ground black pepper to taste

Instructions:

  1. Pre-heat oven to 375.  Line a baking dish just large enough to hold the fish with parchment paper and give it a bit of non-stick spray or olive oil.
  2. Wash the fish, pat them dry and sprinkle salt and pepper on both sides then place them into the baking dish.
  3. Combine the artichoke hearts, breadcrumbs, parmesan and lemon juice in a small bowl and stir to combine.
  4. Spoon half of the artichoke mixture over each piece of fish. Bake in the oven for 15-20 minutes or until fish is cooked thoroughly.

Adapted from laloosh.com

Grape, Pear and Curry Cashew Salad

I have loved this salad for years. I think I first made it about 5 years ago. I love salads that have different components and flavors and this fits that profile perfetly. It’s sweet, it’s slightly spicy, it’s tangy, and it’s just delicious. The dressing is a perfect honey mustard balance and compliments the other flavors perfectly. Genius. 

The amount of pear and grapes and lettuce is up to you so I didn’t put amounts below.

curry2 

Grape, Pear and Curry Cashew Salad

Ingredients:

  • 3/4-1 cup chopped raw unsalted cashews
  • 5 slices bacon (41/2 for salad, 1/2 for dog)
  • 1 tbsp butter, melted
  • 1 tsp rosemary
  • 1 tsp curry powder (madras or yellow curry)
  • 1 tbsp brown sugar
  • 1/2 tsp kosher salt
  • 1/2 tsp cayenne pepper
  • 3 tbsp white wine vinegar
  • 2 tbsp dijon mustard
  • 2 tbsp honey
  • 1/2 cup olive oil
  • salt and freshly ground pepper to taste
  • Romaine hearts washed and dried
  • Bosc pear sliced very thin
  • Red grapes

Instructions:

  1. In a skillet set over medium heat toast the cashews until golden brown, about 5 minutes. Set aside to cool.
  2. Cook bacon in desired vessel (microwave, oven, stovetop) to desired done-ness, set on paper towels to drain then chop. Give 1/2 slice to dog.
  3. In a medium bowl mix the butter, rosemary, cury, brown sugar, salt, cayenne pepper and toasted cashews. Mix until everything is evenly distributed.
  4. In a small bowl whisk together the vinegar, mustard and honey. Then add the olive oil while whisking to combine.
  5. When you’re ready to serve it place the lettuce in a bowl, add some cashews and grapes and drizzle with dressing. Gently stir to combine. Top with bacon and pear slices.  Or forget that whole bit and just put everything together in a bowl with dressing and mix it around.

Adapted from a recipe I printed 5 years ago from allrecipes.com.

Previous Older Entries Next Newer Entries