Chili Chili Bobili in the Slow Cooker

This is a good, thick, hearty, not spicy (but could be), chunky, not soupy chili.  You could easily make it spicier by adding some heat or if you have some bell peppers laying around or another can of beans you can put those in as well.  Feel free to make it just as it is or to adjust to your taste.

Also please excuse the photo. I forgot to take a photo the night I made it so I had to take one at work with the left overs (which were really good by the way).

Chili

Chili Chili Bobili in the Slow Cooker

Ingredients

  • 1lb lean ground beef
  • 4 garlic cloves, diced
  • 2 tbsp chili powder
  • 1 tbsp ground cumin
  • 1 28oz can crushed tomatoes
  • 1 15oz can tomato sauce
  • 1 15oz can kidney beans, rinsed and drained
  • 1 15 oz can great northern beans, rinsed and drained
  • 1 medium yellow onion, chopped small
  • 1 4oz can green chilis (not drained)
  • 1 15oz can yellow/white corn just drained

Instructions

  1. In a large non-stick skillet brown the beef over medium heat. Add the garlic, chili powder and cumin and cook until garlic is fragrant.
  2. Add everything into the slow cooker along with the meat, mix thoroughly, and cook for 6-6.5 hours on low.

Serve with ideas: rice, egg noodles, tortilla chips, freshly shredded cheese, sliced scallions, hot sauce or cornbread.

Sauerkraut Soup

This soup is really easy to make and very delicious!! I’d never had anything like it!!  Tart sauerkraut, yummy kielbasa, potatoes and onions-how can you go wrong?!  This is the time to go to your local Polish shop and get the best kielbasa you can. While you can use the regular supermarket ones using a great kielbasa really makes such a huge difference. Don’t forget they freeze well so you can buy a lot and keep them for later too.

Since we got a big snow storm on Friday night/Saturday I made this for lunch on Saturday and it was perfect. What a delicious meal on a snowy day.

1/13/14 Note: I made this soup this past Saturday morning.  The tomatoes at the store didn’t look very nice and I knew that I had a can of tomatoes in the cabinet at home.  The result is a variation that I think I like more than the original.  It makes more of a tomatoey broth.

  • 7 cups water/sauerkraut liquid instead of the 8 cups below
  • 15oz can crushed tomatoes and their liquid—omit both the plum tomatoes and tomato sauce below.

saursoup

Sauerkraut Soup

Ingredients

  • 1lb bag sauerkraut drained, liquid reserved
  • 8 cups water/sauerkraut liquid
  • 1lb kielbasa-the best quality you can find, cut into 1/4 inch rounds, then in quarters.
  • 1/4 tbsp caraway seeds
  • 1 tsp black peppercorns
  • 1 bay leaf
  • 2 plum tomatoes, seeds removed, chopped
  • 1 80z can tomato sauce
  • 1 small yellow onion, diced
  • 2 cloves garlic, minced
  • 1 lb red potatoes, peeled, cut into bite-sized pieces

Instructions

  1. Add enough water to the reserved sauerkraut liquid to equal 8 cups.
  2. Place the sauerkraut, water, kielbasa, caraway seeds, black peppercorns, bay leaf, tomatoes and tomato sauce into a large stock pot over medium-high heat. Bring to a boil then reduce to a simmer.
  3. In a small pan saute the onion and garlic until soft then add it to the soup pot.
  4. Place potato cubes in a pot and cover with water. Bring to a boil then, when just before cooked fully, drain and add to the soup pot.
  5. Return the soup to a boil then reduce to simmer for an hour.

kielbasa

Here’s the kielbasa I used-just over 1lb.  If you have a little more or little less it’s fine.

Note: This soup freezes well so feel free to make extra and put it away for a later lunch or dinner.

My friend Michelle gave me her recipe and I’ve adapted it to this-enjoy!!

Marinara Sauce

This is my go-to marinara sauce. I make it in large batches at a time and freeze a few ziplock bags and/or containers with about 3 cups or 1 quart capacity. It’s a great base sauce in which to add meat, veggies, herbs etc.. to make it different each time or it’s great on it’s own with pasta, in dishes like lasagna or my eggplant parmesan.

Many people put carrots in their marinara but I don’t. If you prefer to add it by all means do so.  I also only use San Marzano tomatoes. Some argue that the taste is no better than other tomatoes but hey, it’s my sauce and I do taste a difference so I use them:)  If you don’t want to you don’t have to but I ask you to try it at least once-and make sure you get the San Marzanos from Italy. Those famous cans with the white backgrounds and purple and/or red tomatoes on the outside aren’t from Italy-they’re from Jersey. Read the labels.  Spend a little extra for the best quality that you can get.

      marinara 

Marinara Sauce

Ingredients

  • 1/2 cup extra virgin olive oil
  • 4 small yellow onions, finely chopped
  • 6 medium sized garlic cloves
  • 2 celery stalks, finely chopped
  • 1 tbsp kosher salt
  • 1 tsp freshly ground black pepper
  • 4 28-32oz cans crushed San Marzano tomatoes (or peeled and crush with a potato masher)
  • 4 bay leaves

Instructions

  1. In a large stock pot over medium heat add the olive oil. When it’s hot add the onion and garlic and saute until they’re translucent, about 10 minutes.
  2. Add the celery and saute until they’re soft, about another 10 minutes.
  3. Add the tomatoes, bay leaves and salt and pepper and stir to combine.
  4. Bring to a boil and then reduce to a simmer and cook, uncovered for between 1 and 3 hours.

If you’re going to package up the sauce for use at another time leave it out to cool. 

Note: if you’re using peeled plum tomatoes you can crush them with the potato masher after you’ve added them to the pot.  Crush as much or as little as you like.

marinara2

Chocolate Lava Cakes

So a few of us with these blogs swap recipies. This swap’s theme was ‘special occasion’.  I was given this cake recipe from this blog. I’d had little lava cakes before and liked them. 

I have to admit I’m not really a fan of cake or of chocolate so chocolate cake ranks pretty low with me-I’m more of a pie and vanilla fan really but these were really tasty and I enjoyed them much more than my anti-cake self usually does.  They really are great for a special occasion and pretty easy to make.  I got out all of the ingredients and measured everything so that when I was ready I could just whip them up after dinner. There’s not much to them really.

lavacake3

lavacake2 

Chocolate Lava Cakes

Ingredients

  • 10 tbsp butter
  • 40z dark chocolate chips
  • 2/3 cup sugar
  • 1/2 cup all purpose flour
  • 4 eggs
  • non-stick cooking spray

Instructions

  1. Pre-heat oven to 400. In a double boiler melt the butter and chocolate chips and stir until smooth.  Set aside (off of hot water and stove) to cool for 15 minutes.
  2. In a large bowl beat the sugar and eggs until thick and pale yellow. Beat in the flour making sure it’s completely incorporated then beat in the chocolate.
  3. Spray ramekins with cooking spray.  Pour the batter into the ramekins until they’re 3/4 of the way full.
  4. Place the ramekins on a cookie sheet and bake for 13-17 minutes until the top of the cake sets. Remove them from the oven and let them stand for 10 minutes.
  5. Run the edge of a thin knife around the cake being very careful to not pull the cake-just to release the cake from the dish. Place a plate on top of the ramekin and slowly invert to place the cake on the dish.  Serve with marshmallows or ice cream or whatever else you like with liquid chocolate.

Notes: The original recipe called for parchment paper rounds on the bottom of the ramekin.  I discovered that you dont need those but if you still want to use them be my guest.  To make parchment circles take one of the ramekins, set it onto the parchment and trace the bottom iwth a pencil. Then take scissors and cut just inside of the pencil line. Make sure it fits into the bottom of the dish. Trim as necessary.  To  make 4 at a time take a square of parchment, fold it into 4 (be sure that the small folds are large enough to cut the circle out of) place the completed circle on it and cut around. 

This recipe makes 5-6 cakes. Unless you have that many people to eat them making that many at once is silly. I made 4 as a test and refrigerated the left over batter. 2 days later I fired up the oven, left the batter on the countertop for a while to warm up and made 2 more (it was at this point that I realized that the parchment paper rounds mentioned above were unnecessary as I didn’t use them).  It took a few more minutes to cook as the batter was cold but they were perfect.  Since it was the night before Valentine’s Day using my heart plate was appropriate.

cake

If you do not have a double boiler take a pot, put about 3 inches of water in it then place a glass bowl over the rim of the pot and then follow instructions above. It works the same way. IMPORTANT: the water must not touch the bottom of the bowl.

lavacake1

Source: http://www.aseasonedgreeting.blogspot.com/2012/08/molten-lava-cake.html

Thanks for hosting the swap Sarah from http://tasteofhomecooking.blogspot.com


Bacon Cashew Caramel Popcorn

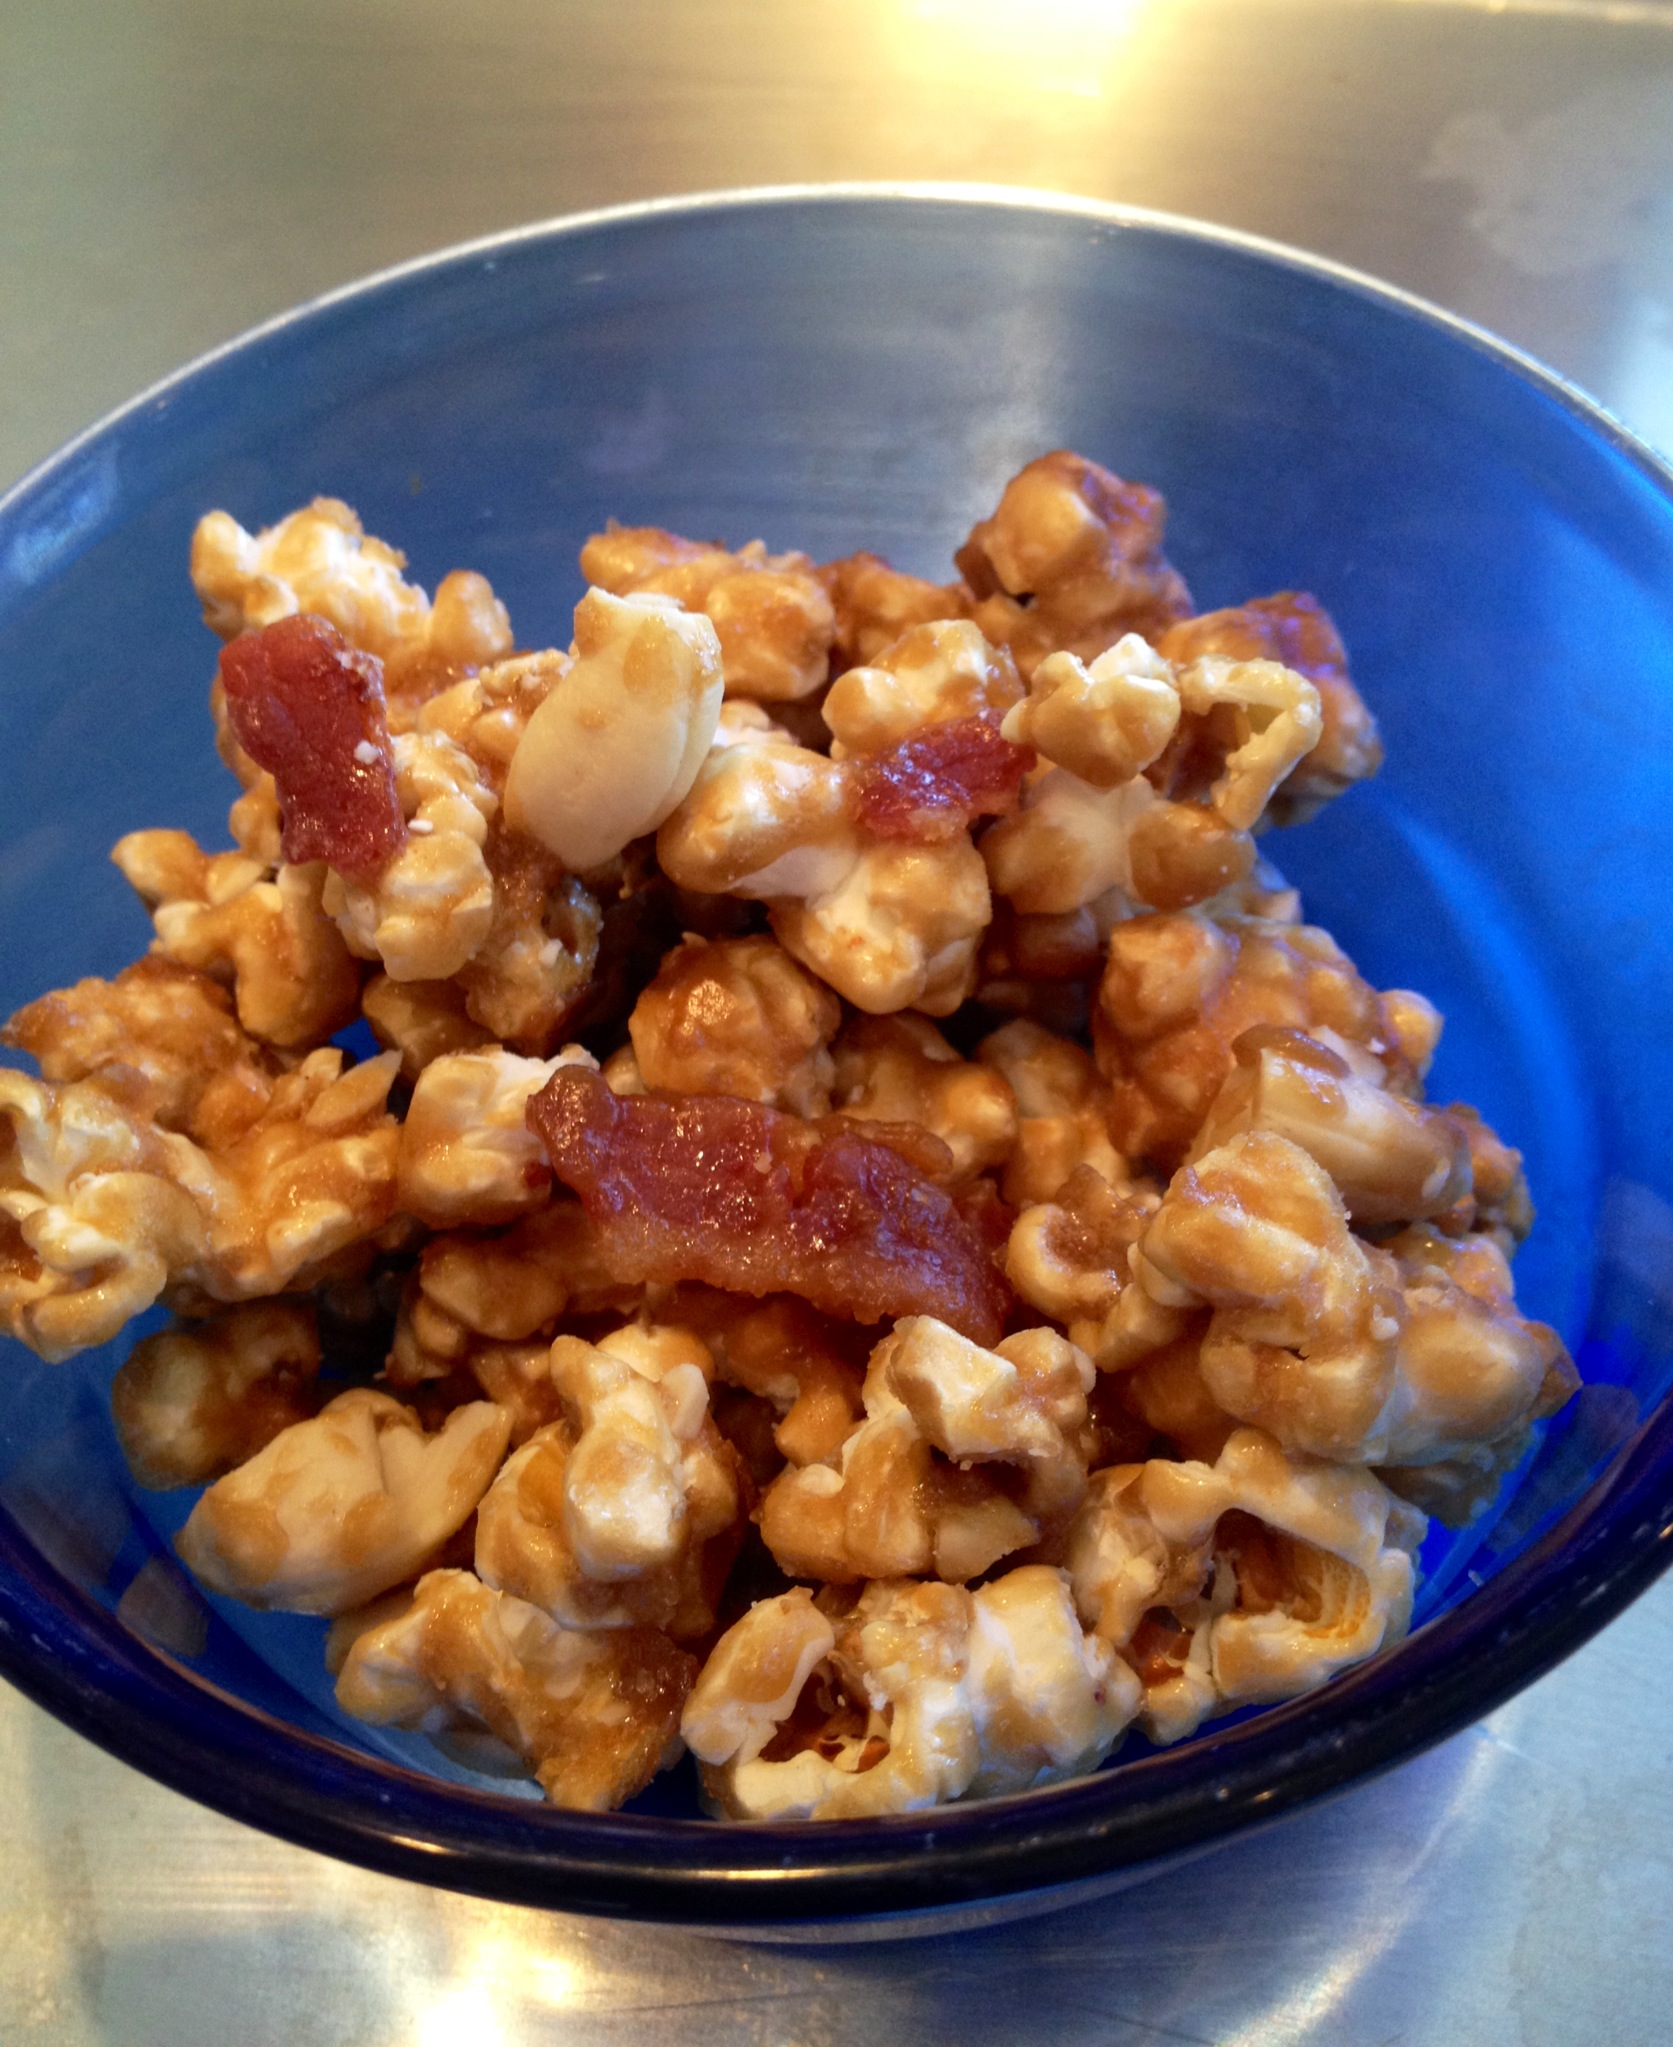
On Saturday night I went to see some of my very favorite people in the world and the house that they bought recently.  In addition to bringing peperonata and crackers and fresh mozzarella I brought this popcorn with me as well to munch on after dinner. Wow was it great. I had never made caramel corn before so I was concerned about how it would come out but I worried needlessly-this was EXCELLENT and really easy to make.  Just enough salty and sweet and crunchy. It really could become addicting very quickly.

Before I started I googled the original recipe from Bon Appetit and there were so many complaints from people about how many pots and pans they used etc… I thought it was pretty funny considering if you read the recipe you’ll see that you need a few. I can’t say that there was all that many though. But not to worry-I made a few adjustments to the orignal recipe that save some pans and washing time.  Caramel is pretty sticky and it will be hot for a while.  Best to let it cool in the pan and then soak the pan in some hot water-it will wash right off (unless you burn it) or wait until it’s cool enough then eat it with a spoon right from the pan :).

Caramel corn

Bacon Cashew Caramel Popcorn

Ingredients

  • 4-4.5ozs organic, unsalted air-popped popcorn*
  • 6-12 ozs bacon, cooked and chopped into various sized pieces
  • 1/2 cup cashews, raw and unsalted, chopped into various sized pieces
  • Kosher salt
  • 1 cup butter
  • 2 cups packed brown sugar
  • 1 tsp table salt
  • 1/2 cup light corn syrup
  • 1 tsp baking soda
  • non-stick cooking spray

Directions:

  1. Preheat oven to 200 degrees.
  2. Line 2 rimmed baking sheets with foil and spray with non-stick spray. Set aside.
  3. In a very large metal bowl (large enough to fit all of the popcorn and ingredients and be stirred) combine the popcorn, bacon, cashews and salt and stir until evenly distributed. Set aside. Spray 2 metal spatulas or spoons (or 1 of each) with non-stick spray. Set them aside.
  4. In a heavy-bottomed medium sized sauce pan over medium heat combine the butter, brown sugar, corn syrup and 1 tsp salt.  Using a candy thermometer bring to the soft ball stage (if you’re not using a candy thermometer bring to a boil and allow to simmer for 5 minutes). Remove from heat and stir in baking soda.  The caramel will get poufy. Stir it well to make sure that everything is evenly combined.  Pour it over the popcorn in the large bowl and using 2 spoons or spatulas, stir and fold everything together until evenly distributed (don’t forget the little bits at the bottom of the bowl).
  5. Spoon the popcorn onto the baking sheets making an even layer on each.
  6. Bake for about 45 minutes until caramel is shiny and coats the popcorn, giving the baking sheets a turn halfway through and stirring if needed.  If any large clumps appear break them up with a spatula.
  7. Remove from oven and place the baking sheets onto cooling racks until popcorn has cooled.

Note: For cooling the popcorn I removed the popcorn from the baking trays when it was cool enough to touch-about 15 minutes, and transferred it to a large colander and placed it outside in the 20degree shade to cool.  Since the baking sheets had non-stick spray residue on it I did not want that absorbed into the popcorn to make it mushy.

*You can also use 1/2 cup popcorn kernels and pop them as per the manufacturer instructions.  To save time and pans though I bought a bag from Fairway that was popped fresh and unsalted.  Saved me having to clean a pot and a lid and possibly burning it  (which I tend to do).  Besides-a 6oz bag was on sale for $1.99 that day-so I saved money too.

Makes enough to fill 1 gallon-sized Ziplock bag.

Adapted quite a bit from Bon Appetit.

Tim goes crazy for it too!! 2 of his favorites-bacon and caramel-in one place.

popcorn timmy

Spicy Bean and Rice Burrito

For the Blogger’s Choice Swap (thanks for organizing the swap Sarah at http://www.tasteofhomecooking.blogspot.com )was given Christine’s Blog to look through and choose a recipie to make.  I chose the burritos.  While her recipe reminded me more of a soft taco (wrapped in a flatbread, not pressed or heated etc….) the premise was there for a good burrito that’s easy to make. I adapted the recipe a bit to my taste. I think the next time I make these I will add something for crunch as the texture inside was pretty uniform-perhaps red pepper strips. Burrito

Spicy Bean and Rice Burrito

  • 1 tbsp vegetable or canola oil
  • 2 cloves garlic, minced
  • 1 tsp chili powder
  • 1 tsp chipotle chili powder
  • 1 tsp cumin
  • 1/2 tsp cayenne pepper
  • 1/3 cup water
  • 1 15 oz can black beans, drained and rinsed
  • 1 15 oz can pinto beans, drained and rinsed
  • 1 8oz canned corn, drained and rinsed (or 3 ears fresh corn, cooked and kernels cut from cob)
  • 2 cups cooked white rice
  • 1/4 cup salsa
  • 6 burritos
  • 4-8 ozs freshly grated cheddar, monterey jack and/or colby jack cheese (or any cheese you prefer)
  • Fat free sour cream
  • Avocado, sliced

Instructions:

  1. Heat the oil in a large skillet over medium-high heat. Add the next 5 ingredients through cayenne pepper. Cook them for 30-60 seconds until fragrant, stirring to combine with a spatula.  Add drained and rinsed beans  (shake off excess water to avoid adding to hot oil in pan).  Stir and combine with spices. Add the water, bring to a simmer then cook for about 10 minutes, mashing slightly with the spatula. Add the corn and just heat through.  Add the rice and salsa and stir to combine. Remove from heat.
  2. Microwave burritos for about 15 seconds to warm them up.
  3. Spoon a few tsp of bean/rice mixture onto the edge of one of the burritos, spoon in a bit of sour cream and spread across the burrito, then sprinkle desired amount of cheese.
  4. Starting at the end with the bean/rice mix carefully and gently fold the edge over the bean/rice mixture. Continue rolling carefully, tucking all of the filling in tightly as you go and folding the edges in.
  5. Heat on a grill pan or panini press to melt cheese. If you use the grill pan turn once.
  6. Serve with sliced avocado, additional sour cream or any other condiment you’d like.

This recipe makes enough filling for far more than 6 burritos. I suggest buying a 12 pack of large burritos and freezing some for a later date.


Simple Syrup Infused with Meyer Lemon for Cocktails

 This recipe is for the Lemony and the Whiskey Sour cocktails.

Syrup

Simple Syrup Infused with Meyer Lemon Flavor for Cocktails

Ingredients:

  • 1 cup granulated sugar
  • 1 cup water
  • a few strips of Meyer Lemon zest (optional for basic simple syrup but necessary for both of the drink recipies on this post)

Instructions:

  1. In a small saucepan over medium heat combine the ingredients, stir and cook until sugar dissolves.
  2. Remove from heat and add the zests. Allow to cool and steep.

Note: you may keep the simple syrup in the fridge in a glass container for many weeks.

Meyer Lemony Sugar for Cocktail Glass Rims

sugar

Meyer Lemony Sugar

Ingredients

  • 1/2 cup granulated sugar
  • 3 tbsp (or more or less depending on personal preference) lemon zest

Instructions

  1. Place sugar and zest into a bowl large enough to fit the rim of the glass you’ll be using. Rub it together with your fingertips.

‘Lemony’ a Meyer Lemon Cocktail

After making the Meyer Lemon Pound Cake I had 2 lemons left over that I just had to use.  So why not make cocktails?!!?  I googled and looked and looked some more and I came across a Meyer Lemon Whiskey Sour (here) which sounded perfect. After quite a few sips I realized that I really didn’t like Whiskey so I opted to sub the Whiskey for Vodka instead. That was much more me. Both really are delicious I just wasn’t a fan of the Whiskey flavor. If you are then you’ll love it.  

I don’t make cocktails often, I usually just open a bottle of wine (I prefer reds) or a beer  (we usually have Peroni and/or Corona in the fridge).   I read and reread the directions and then poof-I had a cocktail. Since I’m a girl I wanted a pretty glass too but since I don’t really have pretty cocktail glasses I used an ice cream bowl that Husband’s Grandmother had for many years. Cute huh?

I don’t know what to call the cocktail that I made with the Vodka so I’ll just call it Lemony.

Ali

Lemony

Ingredients:

  • 1 oz Vokda
  • 1 oz flavored simple syrup (recipe here)
  • 1 oz freshly squeezed  Meyer Lemon juice
  • flavored sugar for rimming the glass (recipe here)

Instructions:

  • Rub the lemon that you squeezed and zested around the rim of the glass.
  • Dip and roll rim of glass into prepared sugar.
  • Add the first 3 ingredients together in a cocktail shaker over ice, shake vigorously and pour into the prepared glass.
  • Enjoy 🙂

Meyer Lemon Whiskey Sour

After making the Meyer Lemon Pound Cake I had 2 lemons left over that I just had to use.  So why not make cocktails?!!?  I googled and looked and looked some more and I came across a Meyer Lemon Whiskey Sour which sounded perfect. After quite a few sips I realized that I really didn’t like Whiskey so I opted to sub the Whiskey for Vodka instead. That was much more me. Both really are delicious I just wasn’t a fan of the Whiskey flavor. If you are then you’ll love it.   Here’s the Vodka Lemony recipe.

whisk

Meyer Lemon Whiskey Sour
makes one cocktail

1 1/2 ounces whiskey (rye or bourbon)
1 ounce freshly squeezed Meyer lemon juice
1/4 to 1/2 ounce simple syrup, according to taste (recipe here )

Sugar for rimming the glass (optional but recipe here)

Place all ingredients in a cocktail shaker with ice. Shake vigorously and strain into a cocktail glass.

Adapted From www.thekitchn.com Nora Maynard is a longtime home mixologist and an occasional instructor at NYC’s Astor Center. She is a contributor to The Business of Food: Encyclopedia of the Food and Drink Industries and is the recipient of the American Egg Board Fellowship in culinary writing at the Writers’ Colony at Dairy Hollow. She previously covered food and drink in film at The Kitchn in her weekly column, The Celluloid Pantry.

Previous Older Entries Next Newer Entries