19 Jun 2013
by sparksfromthekitchen
in Lunch, Main Dish
Tags: coconut, curry, rice, shrimp
Let me start by saying that, if given the chance, I’d eat panang chicken over coconut rice from my local Thai take out place every day for forever. It’s just something that I really love-creamy, spicy, over slightly sweet super fragrant rice. It’s fantastic.
That being said anything that has the red curry and coconut combo like the panang chicken gets a fast pass to the front of my ‘to make’ list. It’s just so tasty! This is a great weeknight dish. It’s very tasty, only dirties one pan and is fast to make-maybe 15 minutes start to finish. Up or lower the amount of the red curry you put in to your own taste. I also added a few squirts of sriracha too. I used 21/25 shrimp and they were just the right size. I found the original recipe on skinnytaste.com while trolling the net for some new recipes with shrimp. Here’s my adaptation. The rice is my recipe.

Thai Red Curry Coconut Shrimp (over coconut jasmine rice)
Ingredients for curry:
- 1 tsp vegetable or canola oil
- 4 scallions, chopped-whites and greens separated
- 3 tbsp Thai Red Curry paste
- 2 large garlic cloves, put through a press or finely diced
- 1lb shrimp (21/25) peeled and deveined
- coconut milk, light, 1 6oz can
- 2 tsp fish sauce
- sriracha if desired
- 1 tsp fresh cilantro, ripped into small pieces
- kosher salt to taste
Ingredients for rice:
- 1 cup uncooked jasmine rice
- 1.5 cups water
- 2 tbsp light coconut milk (take out of the can for the curry)
- unsweetened flaked coconut, cut into small pieces
Instructions for curry:
- In a large non-stick skillet heat the oil on medium/high heat. When hot add the white scallions and red curry paste and sautee for one minute or until the curry becomes very fragrant.
- Add the garlic and shrimp and cook about 3 minutes. Add salt if desired.
- Pour in the coconut milk amd fish sauce and stir to evenly combine and then simmer for about 3 minutes.
- Taste sauce and add more curry or sriracha if desired.
- Remove the pan from the heat and mix in the cilantro and remaining scallions.
- Serve immediately over rice or plain.
Instructions for rice:
- Prepare the rice with water as per the package instructions on the stove.
- When cooking time is up add the coconut flakes and milk and stir.
- Serve.
I used the last of the cilantro that I’ve been growing for this recipe. Do you know that when cilantro has hit it’s end it flowers? Well I didn’t. The flowers are very pretty and very delicate. I looked all of this up online and found out that this is normal and when the flowers go away the seeds left are the coriander seeds. I knew that cilantro and coriander were from the same plant but it’s amazing to see it all going on right in my own flower pot.

17 Jun 2013
by sparksfromthekitchen
in Dessert, Snack
Tags: caramel, fleur de sel, marshmallows, rice krispies
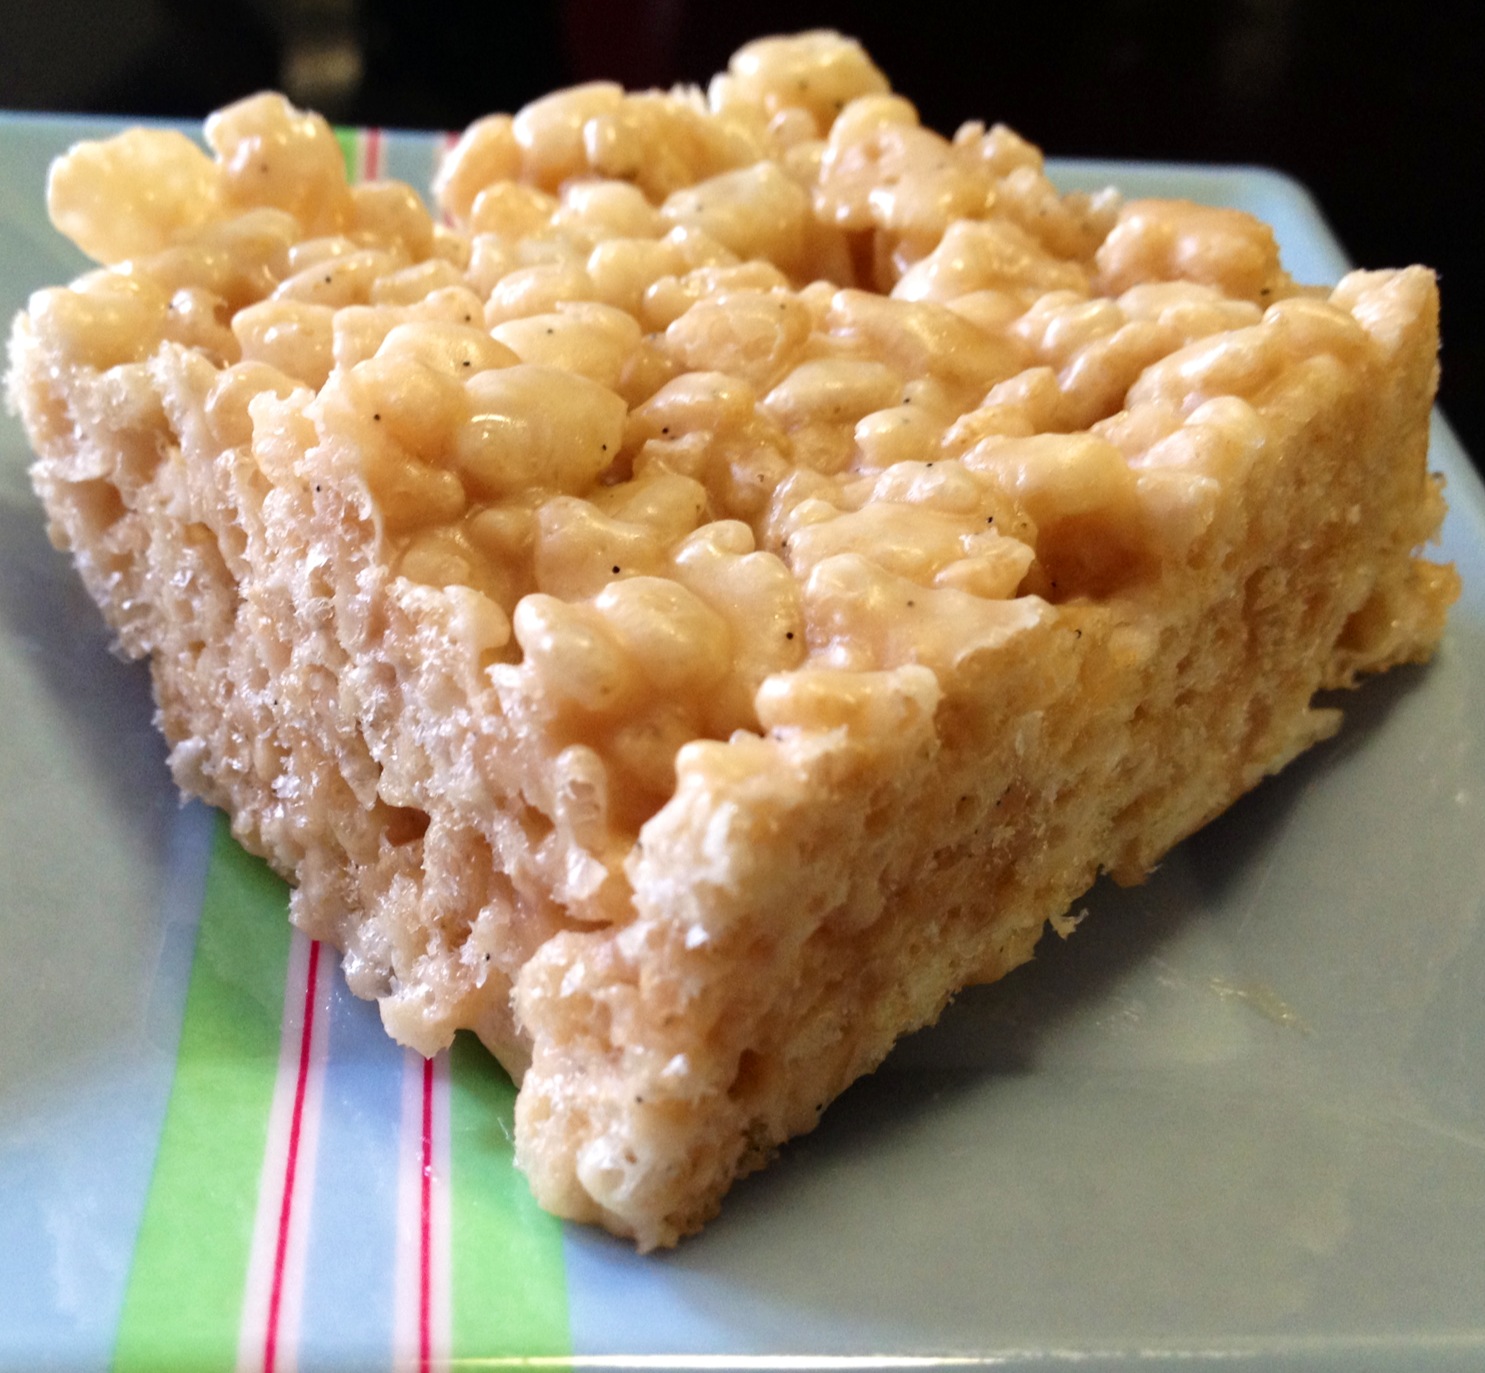
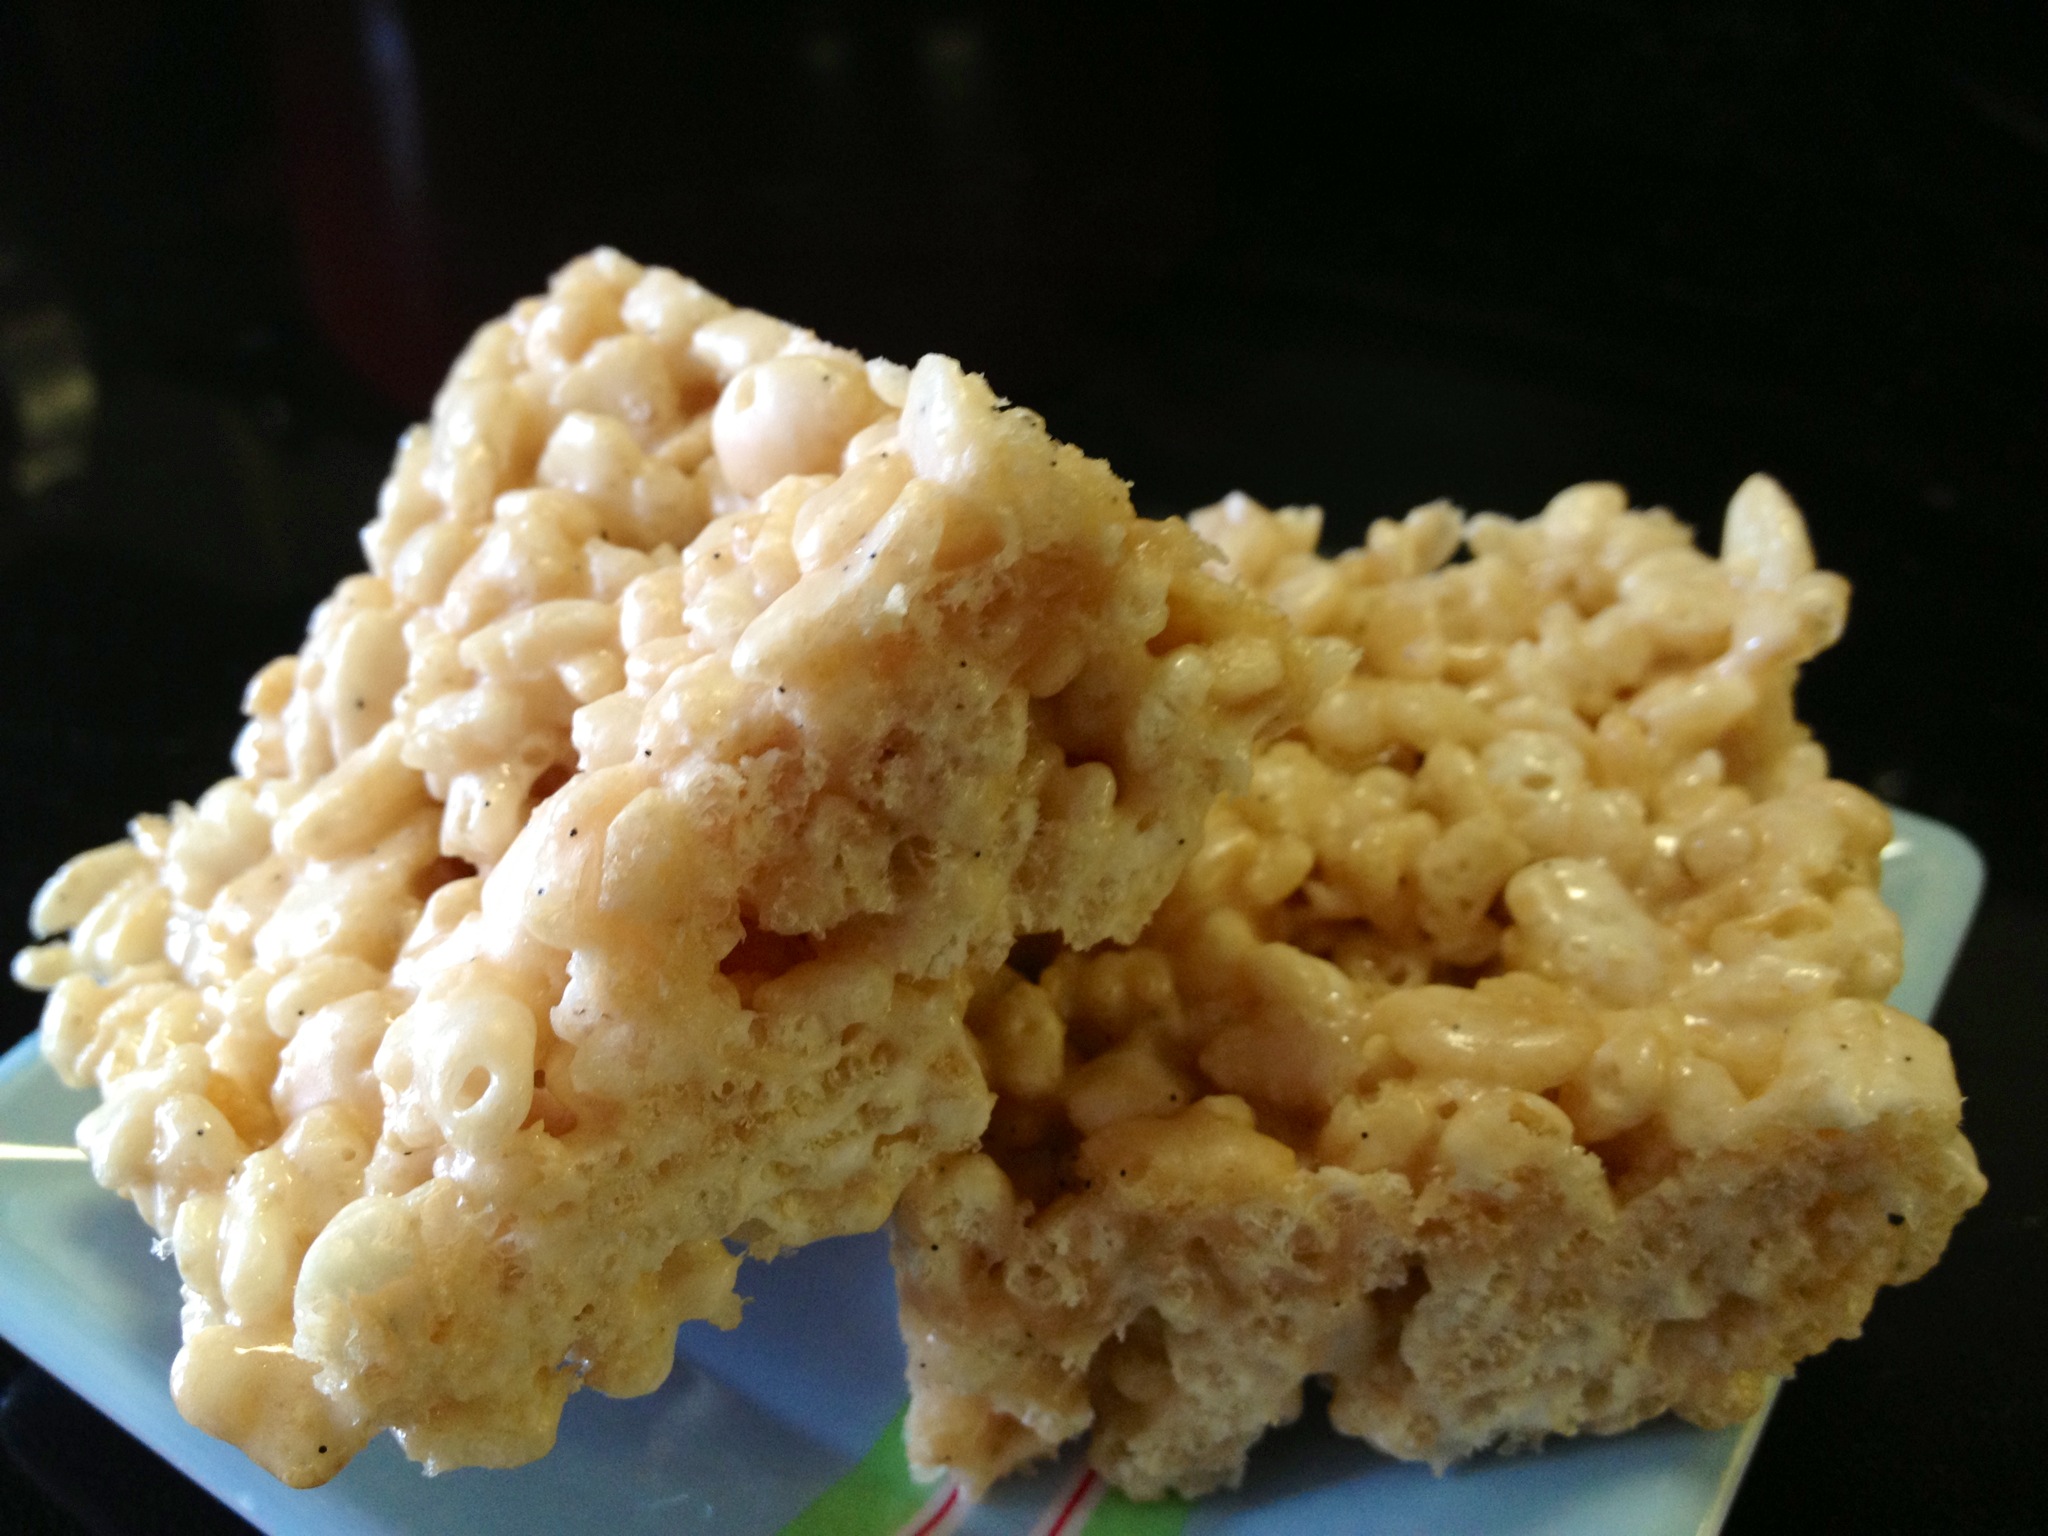
When I received the email from Heather letting me know the theme for this month’s What’s Baking challenge was ‘salty and sweet’ I immediately thought of the Vanilla Fleur de Sel Caramel that I make (recipe here). It’s so so so delicious. I thought about baking it into brownies (but I’m not all that much of a chocolate fan), I thought about making cupcakes and using that over the frosting and the list went on and on. Then bing!!!bing!!!bing!!! Rice Krispie treats came to mind. Yummy-sweet marshmallowy crispy goodies plus the gorgeous caramel? Yes, please. The only problem was that I’d never actually made RK treats even though as a kid I ate tons. So I looked at the recipe on the Rice Krispie website and saw that wow it’s easy. So here we go.
They’re very slightly salty, marshmallowy, crispy, a touch vanilla-ey and subtlety caramelly. These are sticky. They’re gooey. They’ll ruin your diet. And you’ll love every minute of it 🙂
I’d say these took about 45 minutes not including the cooling time. That includes making the caramel (so easy!) and the Krispie treats.

Dreamy Vanilla Sea Salt Caramel Krispies
Ingredients:
- 2 tbsp butter
- 1 10oz package of marshmallows
- 6 cups Rice Krispies
- 1/4-1/3 cup Vanilla Fleur de Sel Caramel
- non-stick cooking spray
- waxed paper
Instructions:
- Lightly spray a 9×13 inch baking dish with the non-stick spray and set it aside.
- Pull off a sheet of waxed paper about the size of the pan and set it aside.
- In a pan (large enough to hold all ingredients and stir them) over low heat melt the butter then add marshmallows and stir until they’re melted completely (I used a metal spoon).
- Add the Rice Krispies and stir until evenly combined with the marshmallows.
- Stir in the caramel and mix until evenly combined. Start with the 1/4 cup and add a little more if you want to.
- Pour the mixture into the pan and use the spoon and waxed paper to press it evenly into the pan.
- Set the pan aside for it to cool and set. Store in airtight containers.

Heather from www.hezzi-dsbooksandcooks.com was the host. Thanks Heather!

10 Jun 2013
by sparksfromthekitchen
in Lunch, Main Dish
Tags: chicken, hot sauce
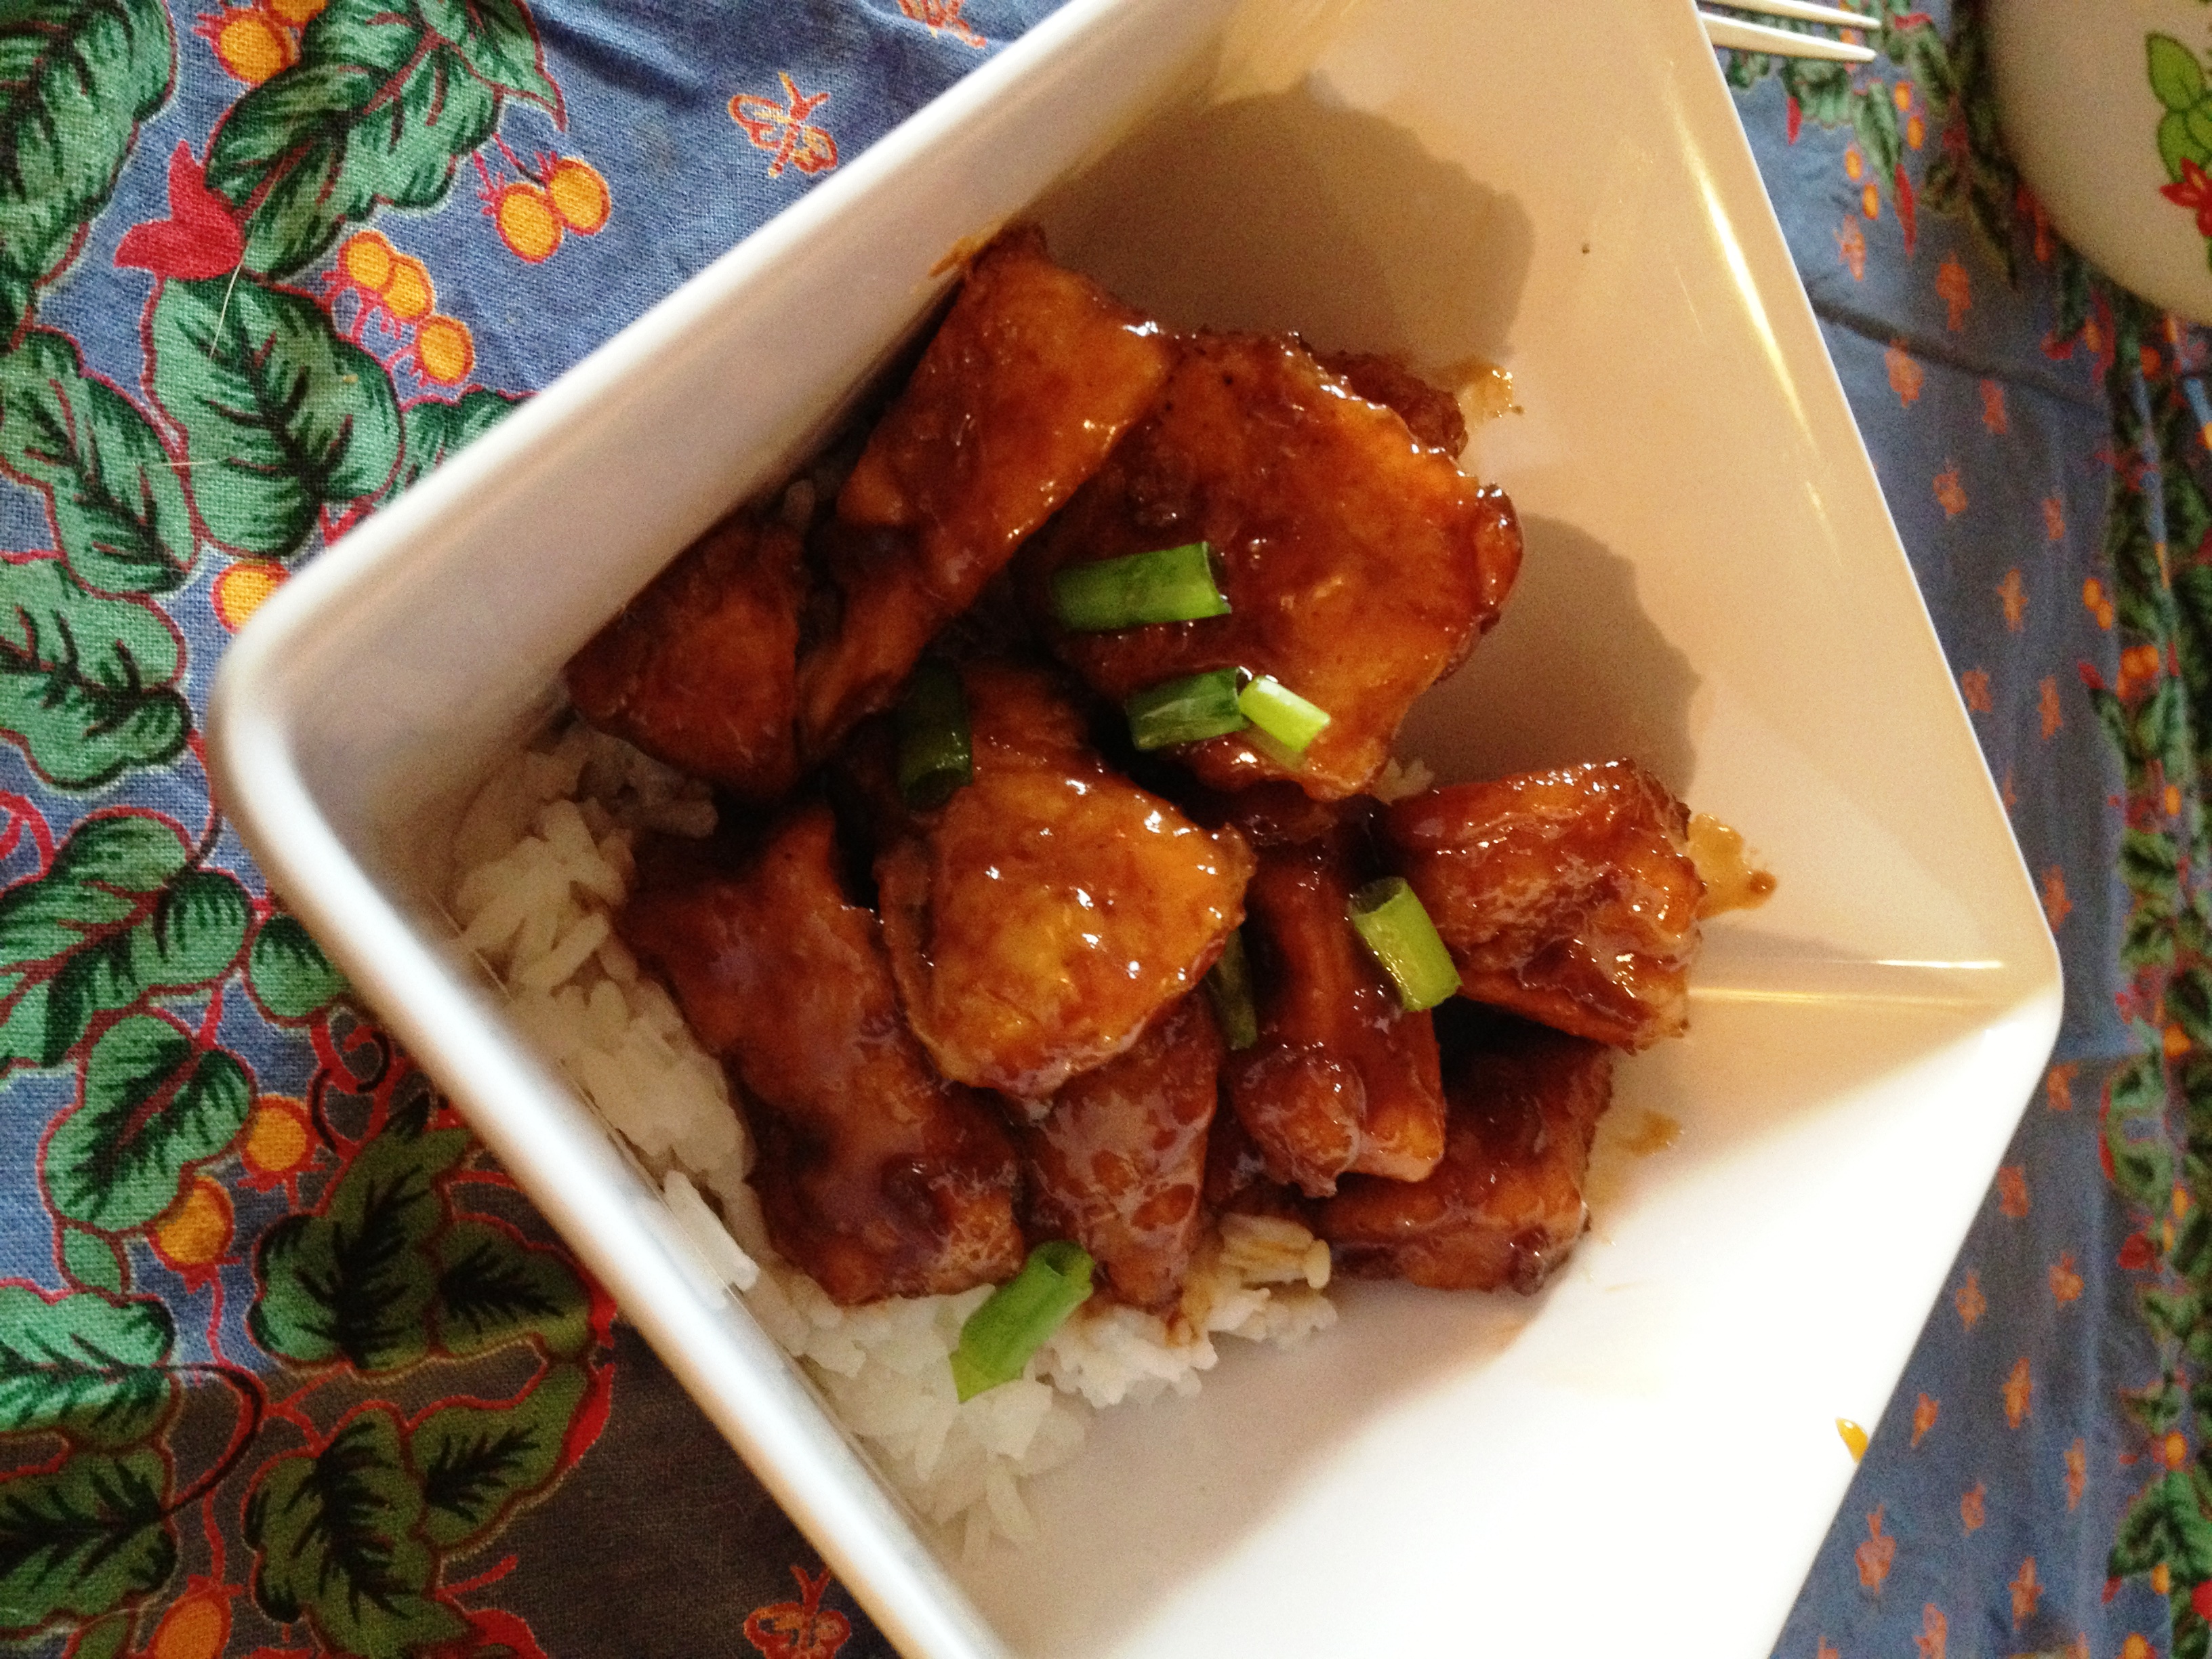
The name says it all. It’s a pow!pow! in the mouth. This chicken has some heat- but it also has a ton of flavor and a some sweet so everything’s balanced out nicely.
While this dish does have to cook in the oven for 1 hour the prep time and initial cooking take no more than 25 minutes-unless you’re really really really slow. Then allow a few minutes to reduce the sauce.

Pow! Pow! Chicken
Ingredients:
- 1.5lb boneless skinless chicken breast, trimmed of any fat and cut into 1 inch pieces
- 3 tsp canola oil
- 1/2 cup cornstarch
- kosher salt and freshly ground black pepper
- 2 large eggs, beaten
- Arrowroot (optional-for a sauce thickener if needed)
- Sliced scallions (optional-for garnish)
For the sauce:
- 1/3 cup Franks Hot Sauce
- 1 cup packed brown sugar (light or dark is fine)
- 1 tbsp water
- 3 tsp cider vinegar
Instructions:
- Season chicken with salt and pepper and place into a large ziplock bag. Add the cornstarch, smush around to coat, and set aside.
- Pre-heat the oven to 325 and find a baking dish who’s base is large enough to fit all of the chicken in one layer.
- Place the eggs in a shallow dish and set aside.
- Combine all ingredients for the sauce in a bowl and set aside.
- In a skillet over medium heat place 2 tsp of the oil and wait for it to get hot. When hot start to cook the chicken pieces in batches as follows until all are cooked: shake off excess corn starch, coat in egg, shake off excess and brown in pan one minute on each side then place in baking dish. Do a few pieces at a time being careful to not crowd the pan.
- When all chicken is in the baking dish pour the sauce over it and place in the oven. Cook for 30 minutes then turn the pieces over and cook for another 30 minutes.
- When the oven time is finished remove the dish from the oven. Place the chicken on a plate and pour the remaining sauce into a small sauce pan. Put the chicken back into the dish and back into the oven (which is now off) to keep warm. Cook the sauce over medium/low heat until thick and reduced, stirring continuously. Add arrowroot if you have it and if you need it.
- When the sauce has thickened enough to coat the back of a spoon remove the dish with the chicken from the oven, pour the thickened sauce over it and stir to combine.
- Garnish with sliced scallions if desired and serve over rice or plan.
This recipe falls into the category of ‘who knows where it came from’. If it’s yours or you know please email me through the contact information tab and I’ll give proper credit.
07 Jun 2013
by sparksfromthekitchen
in Lunch, Main Dish, Salad, Side Dish
Tags: burrito, mexican
I admit I’ve never had a burrito bowl. I hear a lot about them but never actually ate one. I mean I guess, essentially, it is just really a salad of sorts but with the contents of a burrito without the actual burrito. Ok.
So for this month’s swap with the Mexican theme hosted by Sarah at http://tasteofhomecooking.blogspot.com I was given the burrito bowl from Jenni’s blog doughseedough I was pretty excited. It looked delicious and I love burritos! It didn’t disappoint. What a great recipe. It came together pretty quickly (it took less than an hour including all prep and rice cooking from start to finish on a weeknight) and was just good all around. Jenni’s recipe called for brown rice but since I’m not really a fan I used white. I also added some green chilies and corn. That’s what was so nice about her recipe-the ability to add or remove something to taste easily. So go make one to your taste!!!

Burrito Bowl
Ingredients:
- 1 cup white rice, cooked
- 1/2 lime, zested and juiced
- 1/4 cup fresh cilantro, chopped small
- 1 boneless, skinless chicken breast trimmed of fat and cut into evenly sized strips about 1 inch thick
- 1/4 tsp chili powder
- 1/2 tsp granulated dried onion
- 1/2 tsp garlic powder
- 1/2 tsp ground cumin
- 1/2 tsp italian seasoning
- 1 tsp olive oil
- Goya Salsita Chipotle sauce (optional)
- 2 ripe tomatoes, chopped small, guts removed
- 1/4 red onion chopped very small
- kosher salt and freshly ground pepper to taste
- 1 can black beans, drained and rinsed
- 1 can yellow corn, drained and rinsed
- 1 small can green chiles, drained and rinsed
Topping ideas:
- Fat free sour cream
- Freshly grated cheddar or monterey jack cheese
- Sliced avocado
- Hot sauce (same as above or different)
- Jalapenos
Instructions:
- Cook rice according to package instructions. When cooked stir in half of the cilantro, half of the lime juice and half of the lime zest. Set aside.
- In a small bowl mix the chili powder and other spices through the italian seasoning and set aside.
- In a skillet set over medium/high heat warm the oil. When hot add the chicken and cook until cooked through. Place the chicken on a cutting board and chop into small pieces. Put it back into the same pan.
- Into that pan add the spices from step #2 and stir to combine for a minute until spices are fragrant. Into the same pan add the beans, corn and chiles and lower heat to medium/low to heat the new ingredients and stir to evenly distribute the spices. If desired add a few splashes of salsita for a kick.
- In another small bowl mix the tomatoes, the remaining cilantro, zest and juice of the lime and the onion and stir. Season with salt and pepper if desired.
- Assemble your bowl! Start with some rice on the bottom, some chicken and bean mixture, some of the tomato mixture and top with whatever you’d like!
I made mine this way: rice then chicken mixture then grated cheese (so it would melt-YUM), tomato mixture, sour cream. I sliced half of an avocado and put the pieces around the plate.
This recipe makes about 2 medium sized soup bowl’s worth.

Check out the other great swap recipes here:

06 Jun 2013
by sparksfromthekitchen
in Side Dish, Uncategorized
Tags: potatoes
In my opinion Yukon Gold potatoes are the best for baking because they’re so creamy and nutty tasting. It couldn’t be easier to bake them either. I love cheddar cheese on these too. Such a simple topping but it adds a nice extra bit of flavor.

Baked Yukon Gold Potatoes
Ingredients:
- 2 medium Yukon Gold potatoes, scrubbed and dried and poked with a fork all over
- vegetable oil
- a few small pats of butter
- 1/4 cup freshly grated sharp cheddar cheese (not pre-grated)
Instructions:
- Pre-heat oven to 400.
- Line a small baking dish large enough to hold both potatoes with foil.
- Rub the oil all over the potatoes and place them into the dish.
- Bake for about 1 hour or until fork tender.
- Remove, cut many times down into the potato and stick in the butter pieces and some cheddar cheese and then push it back together a bit so it melts in there. Oh hell, sprinkle a little extra cheese on top too if you want to.
- Plate and serve.
I served these with One Great Steak and Roasted Green Beans
04 Jun 2013
by sparksfromthekitchen
in Main Dish, Uncategorized
Tags: beef
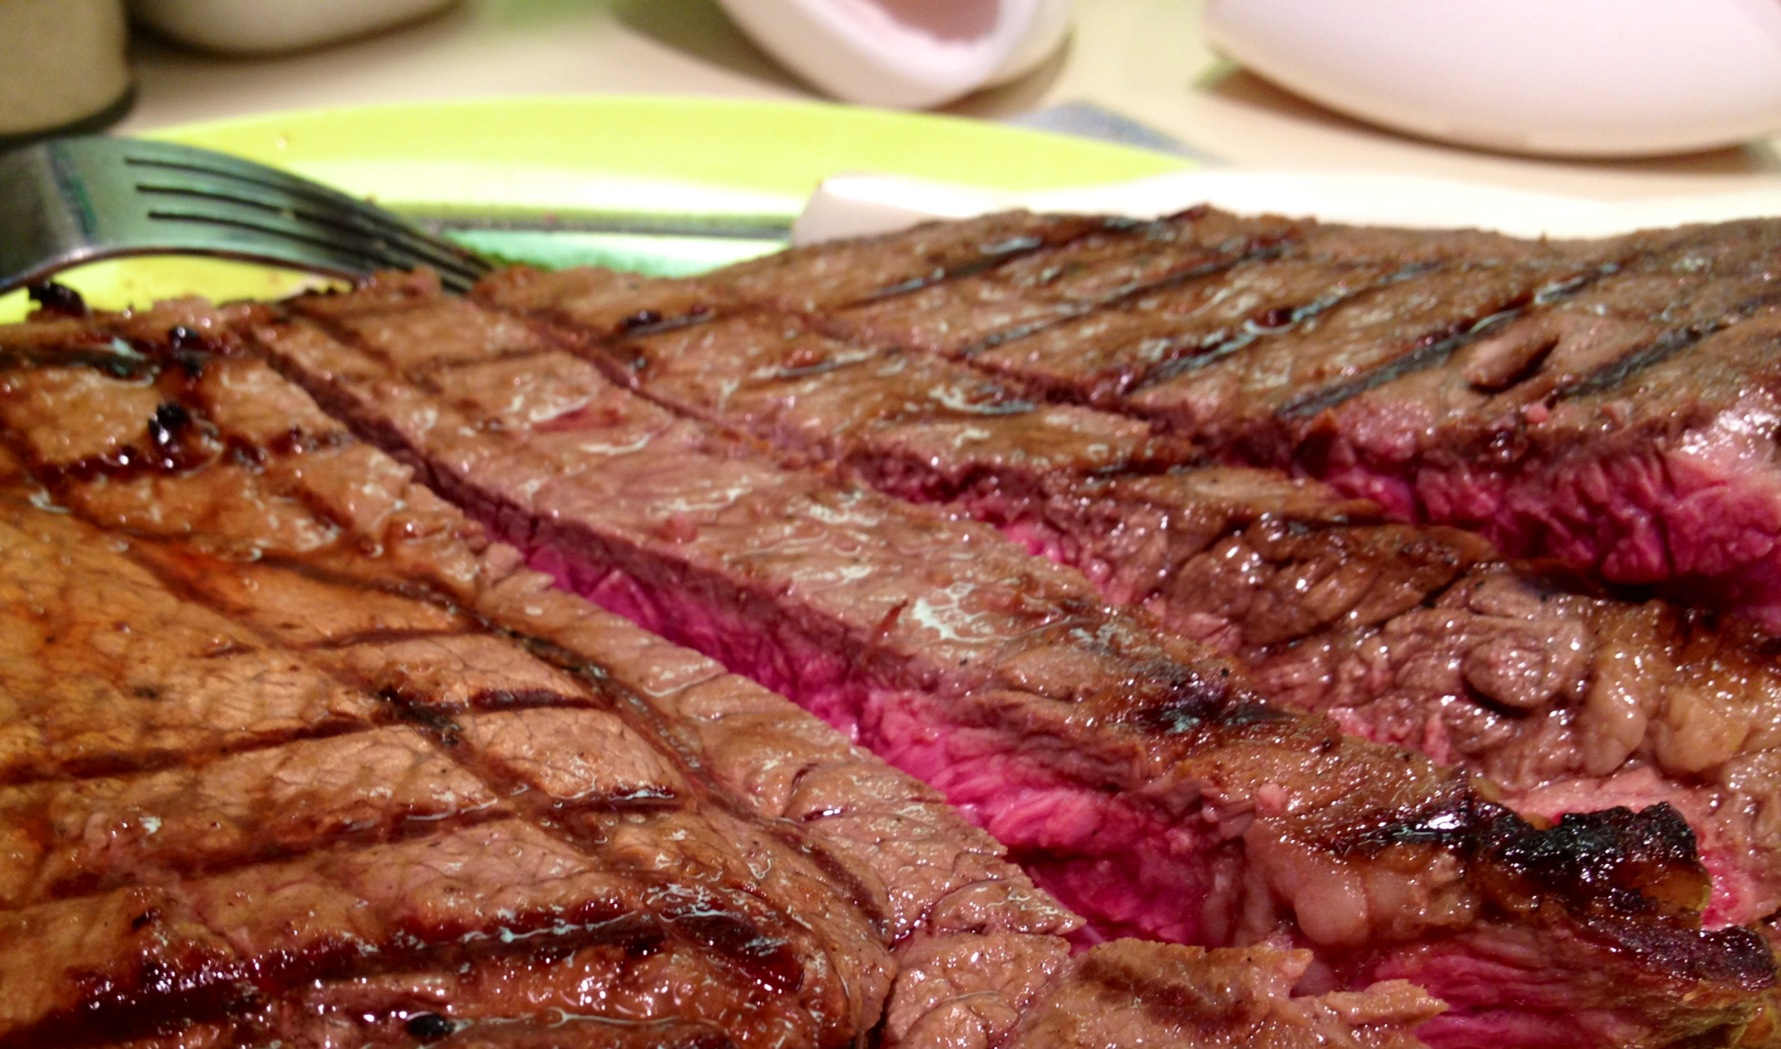
What a simple and delicious steak!! I made a super tasty quick throw-together marinade and then served with wonderful Yukon Gold Baked Potatoes and crisp roasted green beans. Easy peasy!
Note: I cooked this on my stove-top Le Creuset grill pan but you could also use an outdoor grill or press-just adjust the cooking time accordingly.

One Great Steak
Ingredients:
- 1.5 lb top sirloin about 1 inch thick
- 2-3 tbsp low-sodium soy sauce
- 1-1.5 tbsp olive oil
- 1 clove garlic put through a press or smashed to a paste
- 1.5-2 tsp freshly grated ginger
Instructions:
- Put meat and other ingredients into a zip-lock bag and marinate for 30 minutes to 24 hours in the refrigerator.
- When ready to cook pre-heat the grill pan to medium/medium-high. When sufficiently hot place steak on pan.
- Cook for approximately 8 minutes on each side for medium rare and leave it alone while it’s cooking. You can also use a meat thermometer.
- When the meat is cooked remove it from the grill pan and place it on a plate, cover it with foil, and let it rest 10 minutes.
- Slice across the grain and serve.
Note: you may want to season the steak with salt and pepper too but I left it out due to the saltyness of the soy sauce.
Serves 4 approx.

01 Jun 2013
by sparksfromthekitchen
in Lunch, Main Dish, Salad
Tags: chicken, salad
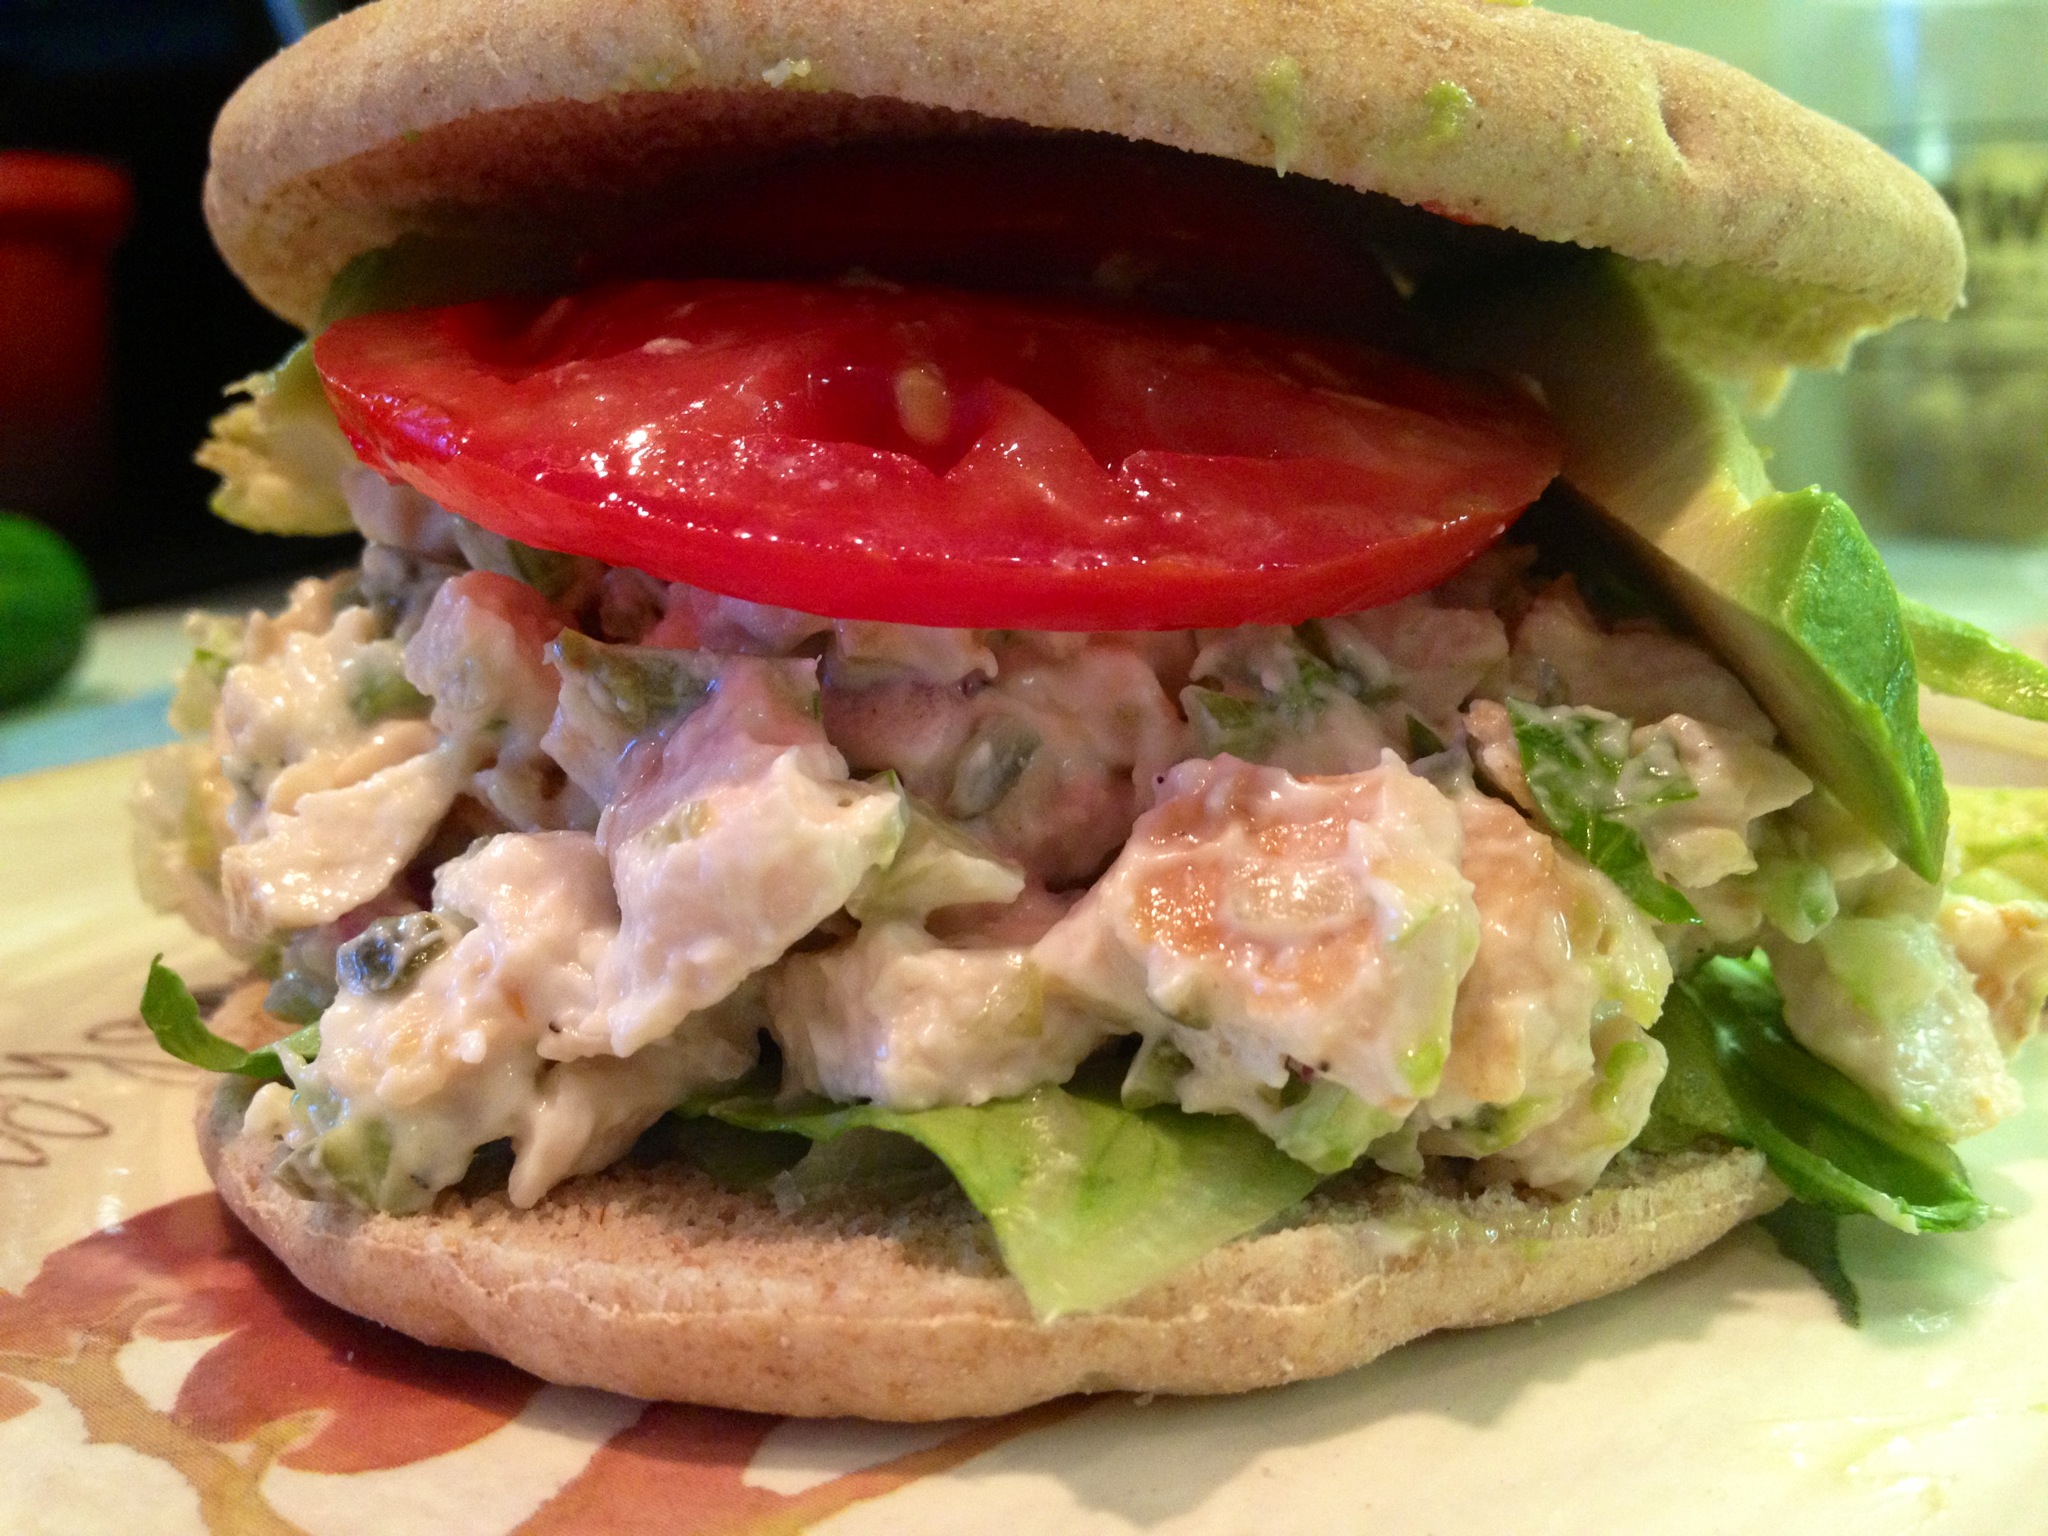
Every once in a while I get the urge to have a chicken salad sandwich. I’ve tried a few recipes over the years and wasn’t ever happy with any of them for one reason or another-too much mayo, didn’t like the curry etc… and I didn’t ever take the time to mess around with the recipes to get it just right. So I’d go to my local deli and get a chicken salad sandwich which is neither waist-line or budget friendly.
Well my friends-my search is over. Last night I made (in my opinion anyway) the perfect chicken salad. Not too much sauce, tang from the gherkins (or cornishons if you’re feeling saucy), crunch from the celery, onion and gherkins, and a ton of flavors from the Dijon, lemon juice and parsley. The best part is I don’t feel like I’m the size of a hippo after I’ve eaten it-and it’s just darn tasty to boot.
I ate my chicken salad sandwich on one of the Pepperidge Farm sandwich flats with sliced tomato, a few wedges of avocado and some romaine lettuce and it made a pretty tall sandwich.
I think this would also be great served on pieces of cucumber, rolled up in lettuce leaves or even crackers for an appetizer. This would also be amazing eaten from an avocado cup. I think I’ll try that next time.

Winner Winner Chicken Salad
Ingredients:
- 1 large boneless, skinless chicken breast (about .75lb) cooked and cut into small pieces (mine were about the size of my pinky nail)
- 1.tsp Dijon Mustard
- 1 tsp lemon juice-freshly squeezed
- 2 tsp fresh parsley, minced
- 1/3 cup light Hellman’s mayonnaise
- 2.5 tbsp fat free sour cream
- 1/2 cup celery, diced small
- 2 tbsp red onion, diced small
- 1/3 cup gherkins, diced small
- kosher salt and white pepper to taste
Instructions:
- Add everything into a bowl and stir to combine.
Notes:
- For the celery, onion and gherkins I used my little Kitchen Aid chopper to have all uniform sized pieces.
- I cut the chicken breast into about 7 equally sized strips and then cooked them on my panini press. I then cut them up into small nugget sized pieces and put them on a plate in the fridge to cool down so that I could make the salad. They only took only about 25 minutes to cool.
30 May 2013
by sparksfromthekitchen
in Appetizer, Lunch, Main Dish, Salad, Side Dish
Tags: feta, pasta, salad
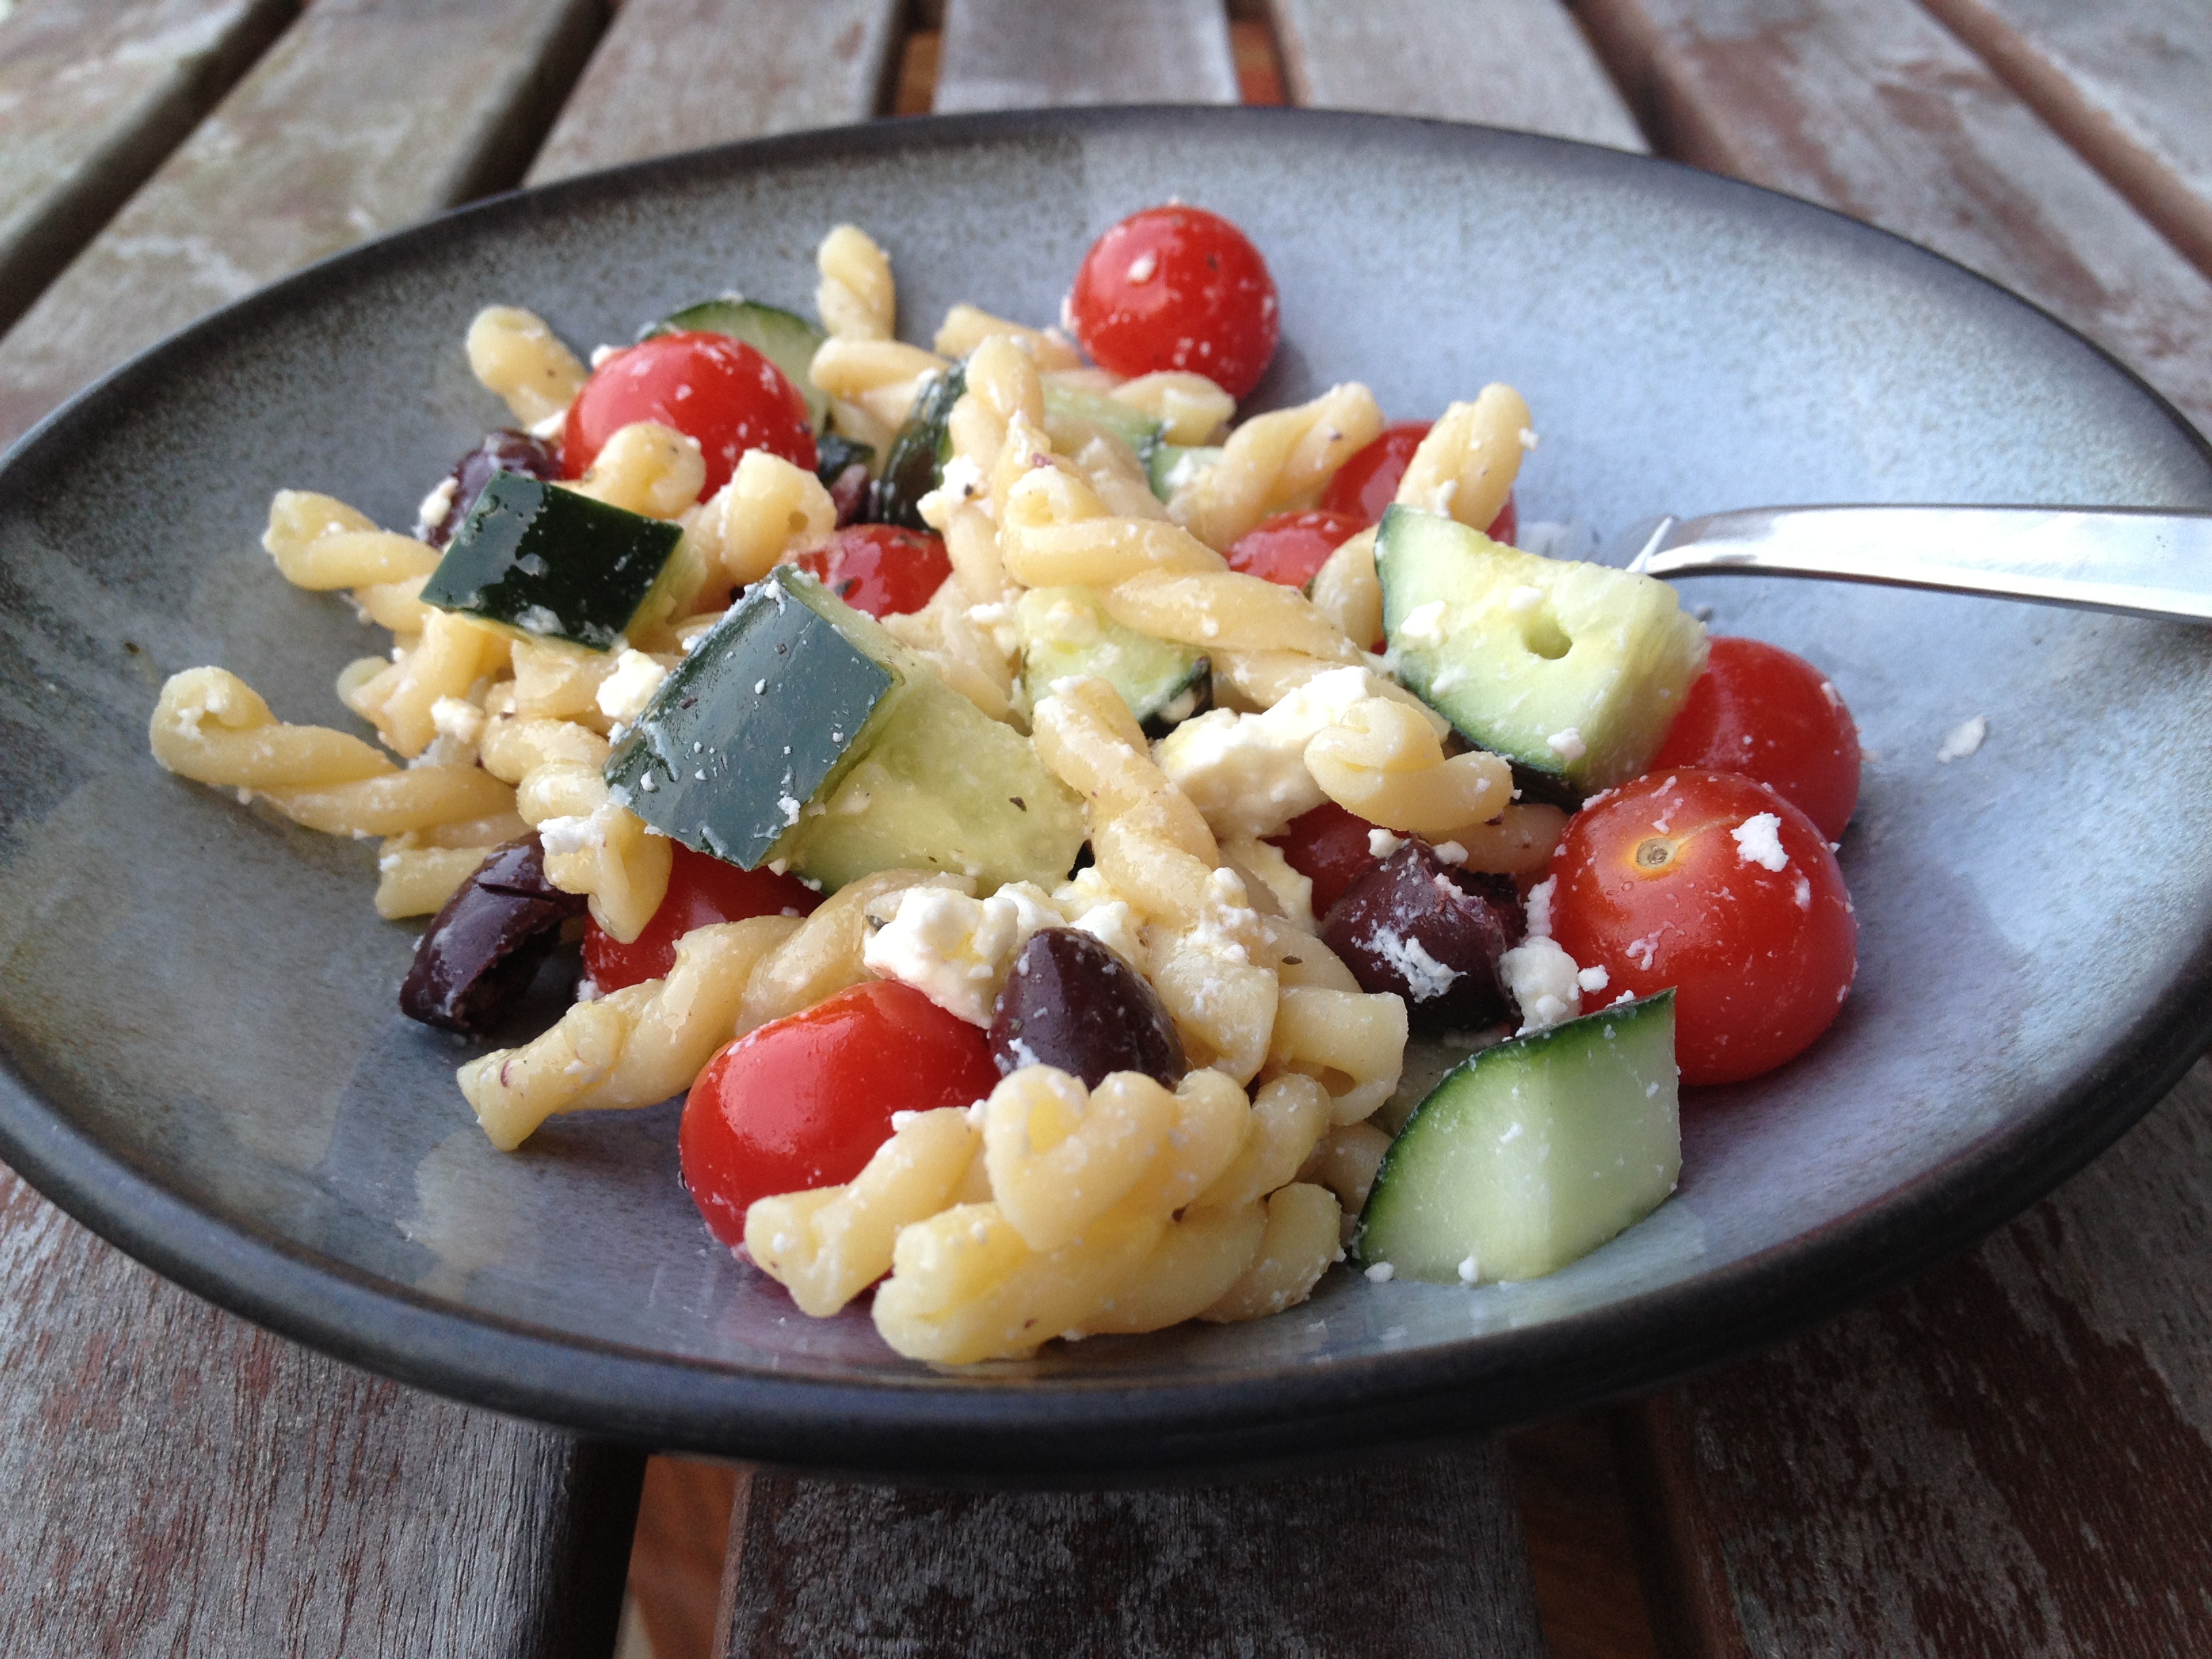
I cannot believe Memorial Day Weekend has come and gone. It’s almost time for summer fruits and veggies again.
That being said this pasta salad is perfect for the warm weather. There’s a ton of veggies, a bit of cheese and a great light vinaigrette. It can be made in advance and kept in the fridge too. You can feel free to add other veggies too-maybe some red or yellow peppers, onions etc….

Veggie & Feta Pasta Salad
Salad Ingredients:
- 1/2 lb gemelli pasta
- 1 pint cherry tomatoes
- 1 cup chopped kalamata olives (pitted obviously)
- 1 cucumber cut into 1/2 inch pieces
- 1/4 cup feta cheese
Dressing Ingredients:
- 1 tsp Dijon mustard
- 1 tsp Italian seasoning
- 1 large clove of garlic, put through press or mashed to a paste
- 1/4 tsp kosher salt
- 1/4 tsp white pepper
- 1/4 cup red wine vinegar
- 1/3-1/2 cup extra virgin olive oil
Instructions:
- Cook pasta in salted boiling water until al dente, drain and rinse with cold water. Shake out as much of the water as possible.
- In a large mixing bowl combine all of the salad ingredients above and mix well to combine.
- In a small bowl whisk together all ingredients except the olive oil until evenly combined. Then, while whisking, add the olive oil and continue to whisk until emulsified.
- Pour dressing over salad, mix to evenly distribute the dressing, and serve or refrigerate until ready to serve.
28 May 2013
by sparksfromthekitchen
in Lunch, Main Dish, Side Dish
Tags: bacon, tart, vidalia onion
It’s Vidalia season again!! I picked up two of those beauties at my grocery store a few days ago and have been wondering what to make. While I did find a roasted Vidalia onion salad that sounded promising I wanted to somehow incorporate this month’s What’s Baking theme of Puff Pastry into it too. So I searched and searched and found a delicious sounding Vidalia Onion Pie recipe from Paula Deen. I haven’t ever made anything of hers but it looked like exactly what I was hoping for. A nice pie with crumbly bacon topping, sweet browned onions and (my idea) a flaky crispy crust-not the pie crust that Paula’s recipe called for.
Truth be told I was secretly thinking that the crust wouldn’t ever work right and I’d have to throw everything out. I’ve never switched out a puff pastry for a pie dough before but I thought if I pre-bake it that it will be just fine. And it was. It was glorious!! And surprisingly easy to make too!
It’s not a deep pie-only about an inch since I used a tart pan. It’s a very light custard type of filling-surprisingly light and the onions–OH THE ONIONS!!-beautifully sweet just like they should be.

Vidalia Onion Pie
Ingredients:
- 3 cups thinly sliced Vidalia onions (I used about 1 & 1/2 onions)
- 3 tbsp butter
- 1 sheet puff pastry (thawed if frozen-I like Pepperidge Farm)
- 2 eggs
- 2 tbsp AP flour plus more for rolling out dough
- 1/2 cup milk
- 1 & 1/2 cups sour cream
- 1 tsp kosher salt
- 5 slices bacon, cooked to crispy and crumbled (4 for pie, 1 for dog 🙂
Instructions:
- Pre-heat oven to 350.
- Roll out the pastry until it’s thin enough to cover entire inside, sides and have a small amount hang over sides of tart pan.
- Lay pastry in pan and press all around to fill evenly. Using a fork poke holes in the dough on the base of the pan and in the edges around the outside. Cover the edges with 1 layer of foil and bake for about 15-20 minutes.
- While the pastry is baking prepare the onions. In a medium skillet over medium-high heat melt the butter and then add the onions. cook them until they’re lightly browned. Then remove from heat and set aside.
- In a small bowl beat the eggs and then add the flour and whisk to combine. Then add the milk sour cream, and salt. Whisk to combine.
- When the pastry is done spread the onions over the bottom of the pan and then pour the egg mixture over it. Sprinkle the bacon on top and bake for 30 minutes.
- Serve right away.
I only had about 1& 1/4 cups of sour cream. I subbed a new Greek Yogurt/Cream cheese mix that I had for the remaining 1/4 cup. It worked out fine.
It will help you a lot if you put the tart pan onto a cookie sheet for the duration of the recipe so you don’t run the risk of messing up the edges of the dough getting it in and out of the oven.

Cara from The Boys Made Me Do It was the host of this month’s challenge. Check out all of the other dishes made here!

24 May 2013
by sparksfromthekitchen
in Lunch, Main Dish
Tags: beef, cheese, sandwich
Yes I know I thought the same thing when I read the name of the dish–YUM!! Putting 2 classics together-that’s genius! I’ve seen a few different recipes for this floating around the internet and blog world for a while but never got around to making one. For this month’s blog swap I was given http://www.tasteofhomecooking.blogspot.com/ and it took me a while to decide to make this dish-Sarah’s got a ton of great sounding recipes on her blog.
I really did enjoy eating these yummy sandwiches. The recipe makes about 4-6 sloppy joes depending on how much you can load into the bun. I toasted the roll with a slice of provolone on each side and then put the beef mixture in the middle. I stuck to her recipe pretty closely with this one-the only changes being that I added a bit of worstershire sauce and used less onion and upped the steak sauce amount and then let it reduce for a while. I think the green pepper added a great depth of flavor too. Next time I make this I will use the leanest ground beef that I can find to cut down on the fat. The beef mixture also reheated extremely well.

Philly Cheese Steak Sloppy Joes
Ingredients:
- 1 tbsp olive oil
- 1 cup yellow onion, chopped small
- 1 green pepper, chopped
- 1 lb lean ground beef
- 4 tbsp A1 Steak Sauce (or similar)
- 3 tbsp Lea & Perrins Worstershire Sauce
- 1/2 cup beef stock
- Salt and Pepper
- 4-6 kaiser rolls
- Provolone cheese-sliced thin
Instructions:
- Add the olive oil to a large skillet set over medium-high heat. when the oil is hot add the onion and geen pepper and cook until starting to brown and slightly soft. Remove the onions and peppers from the pan and set aside for later.
- To the same hot pan add the ground beef and brown, cooking through thoroughly. Drian any fat, add the peppers, onions and stir to combine. Then add the steak sauce, worcestershire sauce, beef stock. Bring it to a boil and then reduce heat and let it simmer about 10 minutes until most of the liquid is gone. Add salt and pepper if necessary to season.
- Cut the rolls in half, place one piece of provolone on each side and toast.
- Mound up the beef onto the rolls and either eat open face or as a sandwich.
Check out the other May blog swap recipies here. Thanks for hosting Sarah!!

Previous Older Entries Next Newer Entries