15 Jul 2013
by sparksfromthekitchen
in Appetizer, Lunch, Main Dish, Side Dish
Tags: corn, edamame, Quick and easy, rice
So last week my Wednesday night went a bit like this: home from work at 5:40, walk dog, make a dinner in 20 minutes and get to a meeting by 6:30 that ended up lasting until 11:00. Yeah it was that kind of day. And night. I had to think of something that I couldn’t mess up, something that I could make in a flash (snicker snicker), and that had a bunch of good stuff in it and that was tasty too. Thankfully Husband made up 3 cups of rice for me the day before so it was all ready in the fridge. The rest of the recipe is a mish-mosh of stuff that I had in the fridge and freezer. And it was perfect! It was delicious, filling but not FILLING, and had a nice balance of tastes and textures. It’s more of a stir fry than a fried rice really-but who cares-it’s good and FAR better for you than stopping for take out.
Next time you’re going to run short on time give this recipe a try. It took me about 18 minutes from chopping the onion to when it was in the container ready to go.

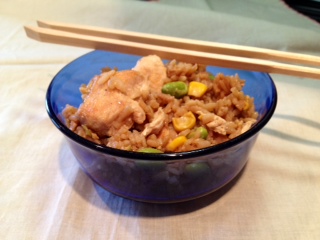
Flash Chicken Fried Rice
Ingredients:
- 3 cups cooked day-old rice (I used white-feel free to use any other kind you’d like)*
- 1 large chicken breast, trimmed of fat, boneless and skinless cut into small bite sized pieces
- 2 large eggs
- 1 small yellow onion, cut into very thin strips
- 2 cups frozen edamame
- 2 cups frozen corn
- 4 tbsp sesame oil
- splash of fish sauce
- a few tbsp low sodium soy sauce (to taste)
- splash of hoisin sauce
Instructions:
- In one skillet over medium high heat warm 1 tbsp sesame oil. When hot add the chicken and cook until nicely browned and cooked thoroughly. When cooked set aside.
- While the chicken is cooking and in another pan over medium-high heat put 1 tbsp sesame oil. When hot add the onions and stir for a minute or two and then add the edamame and corn and cook until no longer frozen. Add the fish sauce and stir for a minute or two.
- In a 3rd and large pan (that can hold everything and be stirred) over high heat put the remaining sesame oil and, when hot, add the rice and stir to heat through. Add the edamame mixture and cook until the rice and veggies are all mixed and the rice has a nice browned outside.
- In the same pan used to cook the edimame mixture, over medium heat, crack the eggs, add a spoonful of the rice mixture and mix quickly to cook completely. Add the egg mixture to the rice then add the chicken to the rice, stir to combine and remove from heat. Add the soy and hoisin sauces and stir to combine. Serve.
I admit I used a bunch of pans while throwing this together. I’m sure if I had more time I could’ve figured out how to use less–but my purpose was to make a great dish fast, not avoid dirtying dishes.
This recipe makes quite a bit. I took one container with me to the meeting, had some for lunch the next day and still had a bit left over. I’d say about 4.5-5 cups total.
I think that this would also be great with some bell pepper strips, some snow peas etc…add at will-veggies are good for you!
*if you don’t have pre-made rice it will take that much longer to make this dish.
12 Jul 2013
by sparksfromthekitchen
in Appetizer, Lunch, Main Dish, Snack
Tags: chicken, panko, sriracha
I really do like Sriracha and have used it for quite a few years. I came across this recipe over a year ago and it has sat, untouched, buried deep in my folder of ‘to make’ recipes——which is pretty thick.
As luck would have it Husband bought 2 large family packs of chicken breasts recently (on sale woot!! woot!!) so I’ve been looking for a few recipes to use them up and I came across this one. I wish I would have made these sooner-they’re delicious! The chicken is juicy and perfectly cooked, the coating is hot and crunchy and really tasty and there’s really nothing to them-just great flavor.

Crispy Sriracha Chicken Bites
Ingredients:
- 1/4 cup Sriracha
- 1 tbsp rice vinegar
- 1/2 tsp fresh grated ginger (or ground ginger powder)
- 1/2 tsp fish sauce
- 1/2 tsp soy sauce
- 2 chicken breasts, boneless and skinless, cut into equal strips (mine were about 1 inch wide) or about 1/2-3/4 lb
- 1&1/2 cups Panko bread crumbs
- 1 tsp white pepper
- 1 tsp garlic powder
Instructions:
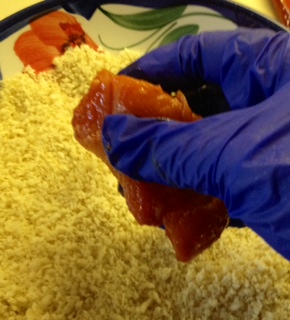
- In a large ziplock bag put the ingredients starting with Sriracha through and including the chicken. Squish the chicken around to evenly coat and allow to sit at room temp for 30 minutes.
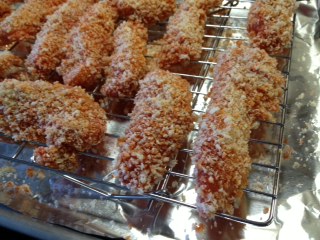
- Pre-heat oven to 425. Line a baking sheet with foil and then place a cooling rack on top of the foil. Set aside.
- When the 30 minutes is up use tongs or gloves (I love my surgical gloves for things like this) to roll each marinated piece of chicken in the Panko and set it on the baking sheet. Repeat with all chicken strips. Be sure the pieces aren’t touching each other on the rack.
- Bake for about 20 minutes (if you cut your strips larger or smaller it may take more or less time) or until they’re cooked thoroughly.
- Serve with assorted dipping sauces if desired.


Adapted from http://sotastysoyummy.blogspot.com/2012/04/sriracha-chicken-strips.html
10 Jul 2013
by sparksfromthekitchen
in Appetizer, Lunch, Main Dish, Salad
Tags: chicken, salad
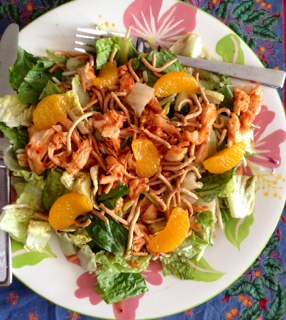
This is one gigantic delicious salad filled with great flavors and textures. The zingy chili sauce, the slightly sweet dressing, the crunchy noodles, the bright mandarins and the crispy veggies-everything just comes together.
I named it ‘Red Dragon’ chicken salad because of the zing, heat and red sauce on the chicken. Besides it sounds much better than plain old ‘chicken salad’, no? Yes.
Unfortunately I can’t take full credit for this salad. I based in on a salad that I enjoyed a few weeks ago at Buffalo Wild Wings with Husband. It was our first visit. I’m not a fan of chain restaurants but I liked it there more than I thought I would. The wings were delicious and they have a great variety of foods.

Red Dragon Chicken Salad
Ingredients:
- 4 cups salad (combination of shredded carrots, cabbage, lettuce and broccoli)
- 1/3 cup crispy chow mein noodles (I used La Choy)
- 3 tbsp Newmans Own Low Fat Sesame Ginger salad dressing
- 1-2 tbsp Asian Zing sauce (from Buffalo Wild Wings)*
- 1 boneless, skinless chicken breast grilled and sliced
- 6 mandarin orange segments
Instructions:
- Put salad and dressing together, toss to combine. Sprinkle noodles over the salad. Set aside.
- Mix the Asian Zing sauce with the chicken and spread over salad.
- Arrange mandarin slices around the outside.
This makes one large salad or 2 smaller salads.
*their Asian Zing sauce tastes to me like Sweet Thai Chili sauce and sriracha so if you don’t have the sauce or want to buy it you can mix those 2 ingredients together to the desired heat level and use that on the chicken instead.

27 Jun 2013
by sparksfromthekitchen
in Lunch, Main Dish
Tags: chicken, mozzarella, Quick and easy
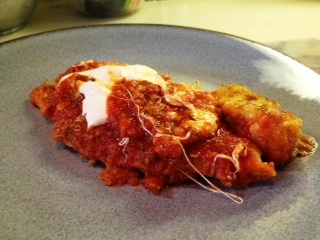
Here’s an easy and really tasty weeknight meal that you can have on the table in about 30 minutes. The chicken coating is crunchy and delicious, the cheese is deliciously stringy and melted and the sauce is whatever you want it to be-home made or jarred-it’s up to you. I prefer home-made but since I was out I used some jarred sauce. I like having them in the pantry to use in a pinch.
I opted to forego the pasta that’s usually served with this and just have some steamed veggies and a salad with it. I didn’t miss the pasta.
There’s no neat pretty picture of this with the cheese ‘just so’ and the sauce dribbling ever so seductively down the plate. I slapped this piece on my plate, took 2 pics, and then dug in. If you were as hungry as I was and smelled this delicious stuff you would’ve done the same 🙂

Skillet Chicken Parmesan
Ingredients:
- 1-1.5 lb boneless skinless chicken breasts, trimmed of fat and cut and/or pounded to equal thin pieces about 1/2 inch thick.
- 2 large eggs, lightly beaten
- 1/2 cup AP flour
- 2-3 cups Panko
- a few tbsp olive oil
- Italian seasoning
- kosher salt and freshly ground black pepper
- 1/2-3/4 cup thinly sliced fresh mozzarella
- 3-5 cups marinara sauce (your preference on amount and type of sauce)
Instructions:
- Place flour in one shallow bowl, the eggs in a 2nd and the panko in a 3rd and place the bowls next to each other. Season the flour and panko with salt, pepper and italian seasoning.
- Heat 2 tbsp olive oil in a non-stick skillet (large enough to hold the chicken in 1 layer or almost all in one layer-a little overlapping is ok) over medium/high heat.
- Take 1 piece of chicken, roll it around in the seasoned flour to coat it, shake off the excess, dredge through egg then roll in the panko to coat. Place in the pan and cook until first side is browned and crispy, then flip it over and do the same for the other side until it’s cooked through thoroughly. Set aside and keep warm.
- Repeat with each piece of chicken. You may place more than one piece in the pan but do not crowd it.
- Pour the sauce into the same pan and set over medium/low heat until thoroughly heated then place the pieces of chicken back in, ladle some of the sauce over the top of the chicken and then top the chicken with mozzarella and either cover with a lid and leave it on the stove until the cheese is melted or place in the oven (if you have an oven-safe pan) until cheese is melted.
- Serve immediately.
You may also serve over pasta or then put the chicken into a hero roll for a great sandwich.
19 Jun 2013
by sparksfromthekitchen
in Lunch, Main Dish
Tags: coconut, curry, rice, shrimp
Let me start by saying that, if given the chance, I’d eat panang chicken over coconut rice from my local Thai take out place every day for forever. It’s just something that I really love-creamy, spicy, over slightly sweet super fragrant rice. It’s fantastic.
That being said anything that has the red curry and coconut combo like the panang chicken gets a fast pass to the front of my ‘to make’ list. It’s just so tasty! This is a great weeknight dish. It’s very tasty, only dirties one pan and is fast to make-maybe 15 minutes start to finish. Up or lower the amount of the red curry you put in to your own taste. I also added a few squirts of sriracha too. I used 21/25 shrimp and they were just the right size. I found the original recipe on skinnytaste.com while trolling the net for some new recipes with shrimp. Here’s my adaptation. The rice is my recipe.

Thai Red Curry Coconut Shrimp (over coconut jasmine rice)
Ingredients for curry:
- 1 tsp vegetable or canola oil
- 4 scallions, chopped-whites and greens separated
- 3 tbsp Thai Red Curry paste
- 2 large garlic cloves, put through a press or finely diced
- 1lb shrimp (21/25) peeled and deveined
- coconut milk, light, 1 6oz can
- 2 tsp fish sauce
- sriracha if desired
- 1 tsp fresh cilantro, ripped into small pieces
- kosher salt to taste
Ingredients for rice:
- 1 cup uncooked jasmine rice
- 1.5 cups water
- 2 tbsp light coconut milk (take out of the can for the curry)
- unsweetened flaked coconut, cut into small pieces
Instructions for curry:
- In a large non-stick skillet heat the oil on medium/high heat. When hot add the white scallions and red curry paste and sautee for one minute or until the curry becomes very fragrant.
- Add the garlic and shrimp and cook about 3 minutes. Add salt if desired.
- Pour in the coconut milk amd fish sauce and stir to evenly combine and then simmer for about 3 minutes.
- Taste sauce and add more curry or sriracha if desired.
- Remove the pan from the heat and mix in the cilantro and remaining scallions.
- Serve immediately over rice or plain.
Instructions for rice:
- Prepare the rice with water as per the package instructions on the stove.
- When cooking time is up add the coconut flakes and milk and stir.
- Serve.
I used the last of the cilantro that I’ve been growing for this recipe. Do you know that when cilantro has hit it’s end it flowers? Well I didn’t. The flowers are very pretty and very delicate. I looked all of this up online and found out that this is normal and when the flowers go away the seeds left are the coriander seeds. I knew that cilantro and coriander were from the same plant but it’s amazing to see it all going on right in my own flower pot.

10 Jun 2013
by sparksfromthekitchen
in Lunch, Main Dish
Tags: chicken, hot sauce
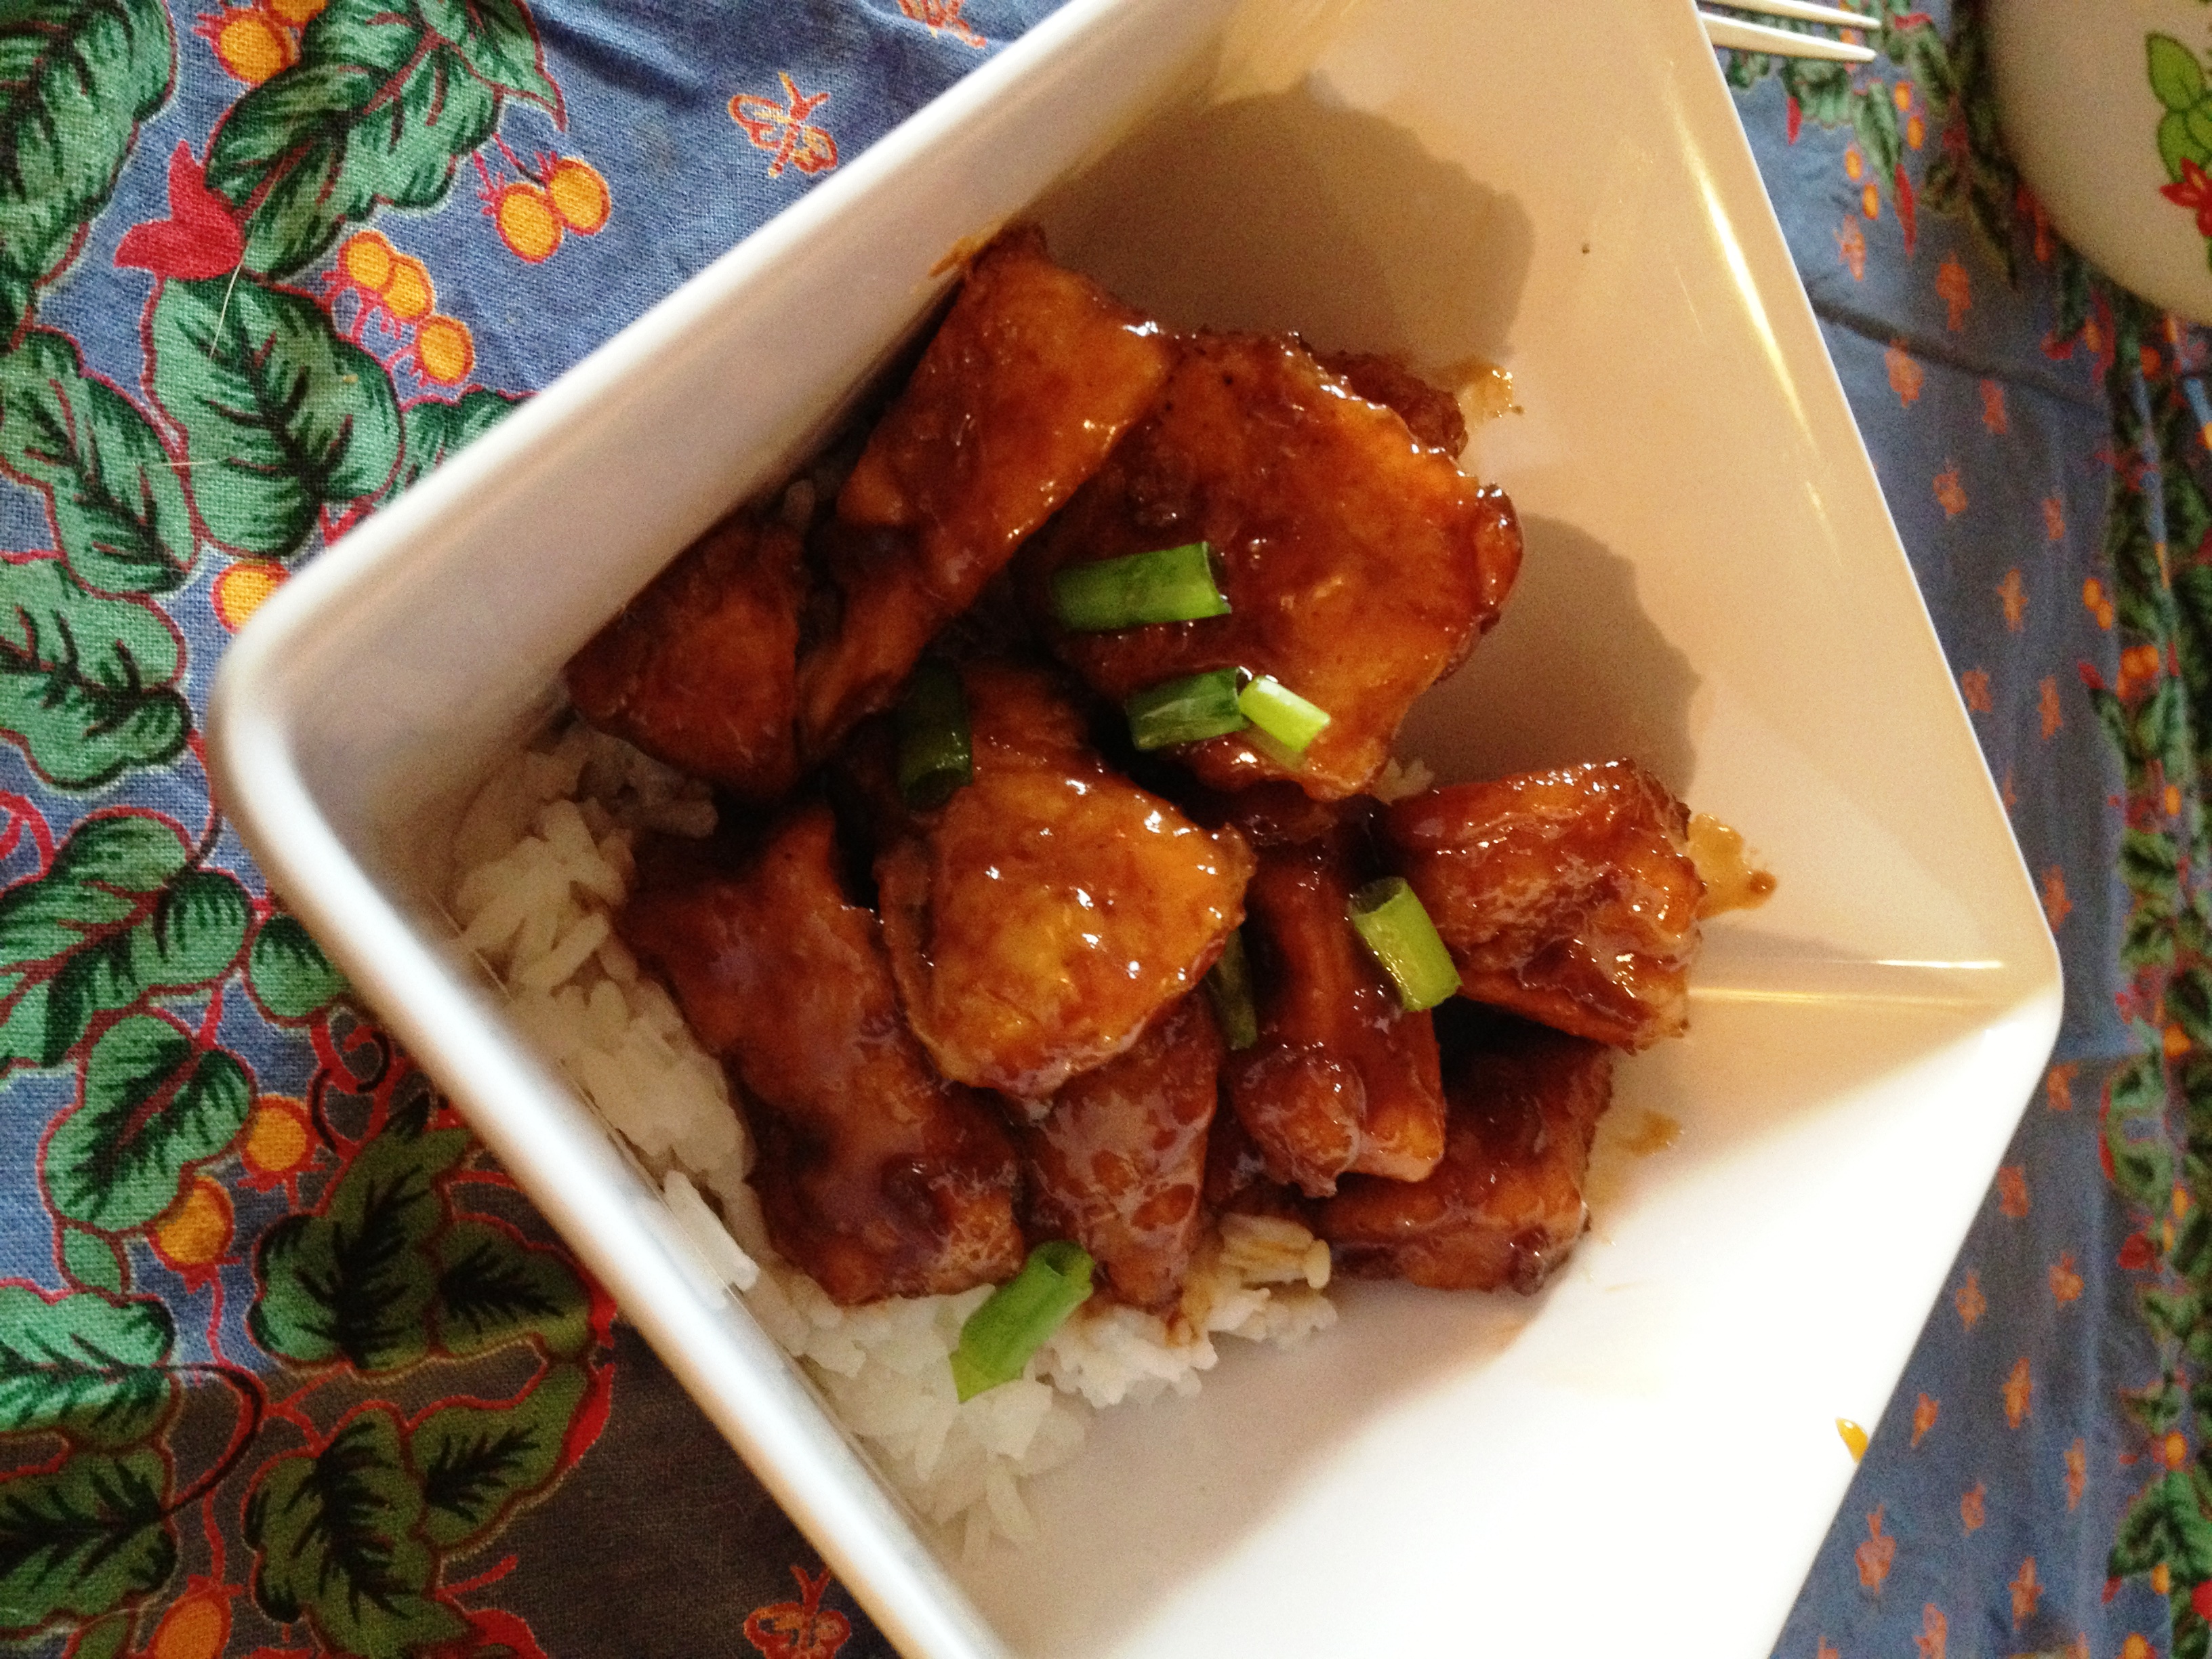
The name says it all. It’s a pow!pow! in the mouth. This chicken has some heat- but it also has a ton of flavor and a some sweet so everything’s balanced out nicely.
While this dish does have to cook in the oven for 1 hour the prep time and initial cooking take no more than 25 minutes-unless you’re really really really slow. Then allow a few minutes to reduce the sauce.

Pow! Pow! Chicken
Ingredients:
- 1.5lb boneless skinless chicken breast, trimmed of any fat and cut into 1 inch pieces
- 3 tsp canola oil
- 1/2 cup cornstarch
- kosher salt and freshly ground black pepper
- 2 large eggs, beaten
- Arrowroot (optional-for a sauce thickener if needed)
- Sliced scallions (optional-for garnish)
For the sauce:
- 1/3 cup Franks Hot Sauce
- 1 cup packed brown sugar (light or dark is fine)
- 1 tbsp water
- 3 tsp cider vinegar
Instructions:
- Season chicken with salt and pepper and place into a large ziplock bag. Add the cornstarch, smush around to coat, and set aside.
- Pre-heat the oven to 325 and find a baking dish who’s base is large enough to fit all of the chicken in one layer.
- Place the eggs in a shallow dish and set aside.
- Combine all ingredients for the sauce in a bowl and set aside.
- In a skillet over medium heat place 2 tsp of the oil and wait for it to get hot. When hot start to cook the chicken pieces in batches as follows until all are cooked: shake off excess corn starch, coat in egg, shake off excess and brown in pan one minute on each side then place in baking dish. Do a few pieces at a time being careful to not crowd the pan.
- When all chicken is in the baking dish pour the sauce over it and place in the oven. Cook for 30 minutes then turn the pieces over and cook for another 30 minutes.
- When the oven time is finished remove the dish from the oven. Place the chicken on a plate and pour the remaining sauce into a small sauce pan. Put the chicken back into the dish and back into the oven (which is now off) to keep warm. Cook the sauce over medium/low heat until thick and reduced, stirring continuously. Add arrowroot if you have it and if you need it.
- When the sauce has thickened enough to coat the back of a spoon remove the dish with the chicken from the oven, pour the thickened sauce over it and stir to combine.
- Garnish with sliced scallions if desired and serve over rice or plan.
This recipe falls into the category of ‘who knows where it came from’. If it’s yours or you know please email me through the contact information tab and I’ll give proper credit.
07 Jun 2013
by sparksfromthekitchen
in Lunch, Main Dish, Salad, Side Dish
Tags: burrito, mexican
I admit I’ve never had a burrito bowl. I hear a lot about them but never actually ate one. I mean I guess, essentially, it is just really a salad of sorts but with the contents of a burrito without the actual burrito. Ok.
So for this month’s swap with the Mexican theme hosted by Sarah at http://tasteofhomecooking.blogspot.com I was given the burrito bowl from Jenni’s blog doughseedough I was pretty excited. It looked delicious and I love burritos! It didn’t disappoint. What a great recipe. It came together pretty quickly (it took less than an hour including all prep and rice cooking from start to finish on a weeknight) and was just good all around. Jenni’s recipe called for brown rice but since I’m not really a fan I used white. I also added some green chilies and corn. That’s what was so nice about her recipe-the ability to add or remove something to taste easily. So go make one to your taste!!!

Burrito Bowl
Ingredients:
- 1 cup white rice, cooked
- 1/2 lime, zested and juiced
- 1/4 cup fresh cilantro, chopped small
- 1 boneless, skinless chicken breast trimmed of fat and cut into evenly sized strips about 1 inch thick
- 1/4 tsp chili powder
- 1/2 tsp granulated dried onion
- 1/2 tsp garlic powder
- 1/2 tsp ground cumin
- 1/2 tsp italian seasoning
- 1 tsp olive oil
- Goya Salsita Chipotle sauce (optional)
- 2 ripe tomatoes, chopped small, guts removed
- 1/4 red onion chopped very small
- kosher salt and freshly ground pepper to taste
- 1 can black beans, drained and rinsed
- 1 can yellow corn, drained and rinsed
- 1 small can green chiles, drained and rinsed
Topping ideas:
- Fat free sour cream
- Freshly grated cheddar or monterey jack cheese
- Sliced avocado
- Hot sauce (same as above or different)
- Jalapenos
Instructions:
- Cook rice according to package instructions. When cooked stir in half of the cilantro, half of the lime juice and half of the lime zest. Set aside.
- In a small bowl mix the chili powder and other spices through the italian seasoning and set aside.
- In a skillet set over medium/high heat warm the oil. When hot add the chicken and cook until cooked through. Place the chicken on a cutting board and chop into small pieces. Put it back into the same pan.
- Into that pan add the spices from step #2 and stir to combine for a minute until spices are fragrant. Into the same pan add the beans, corn and chiles and lower heat to medium/low to heat the new ingredients and stir to evenly distribute the spices. If desired add a few splashes of salsita for a kick.
- In another small bowl mix the tomatoes, the remaining cilantro, zest and juice of the lime and the onion and stir. Season with salt and pepper if desired.
- Assemble your bowl! Start with some rice on the bottom, some chicken and bean mixture, some of the tomato mixture and top with whatever you’d like!
I made mine this way: rice then chicken mixture then grated cheese (so it would melt-YUM), tomato mixture, sour cream. I sliced half of an avocado and put the pieces around the plate.
This recipe makes about 2 medium sized soup bowl’s worth.

Check out the other great swap recipes here:

01 Jun 2013
by sparksfromthekitchen
in Lunch, Main Dish, Salad
Tags: chicken, salad
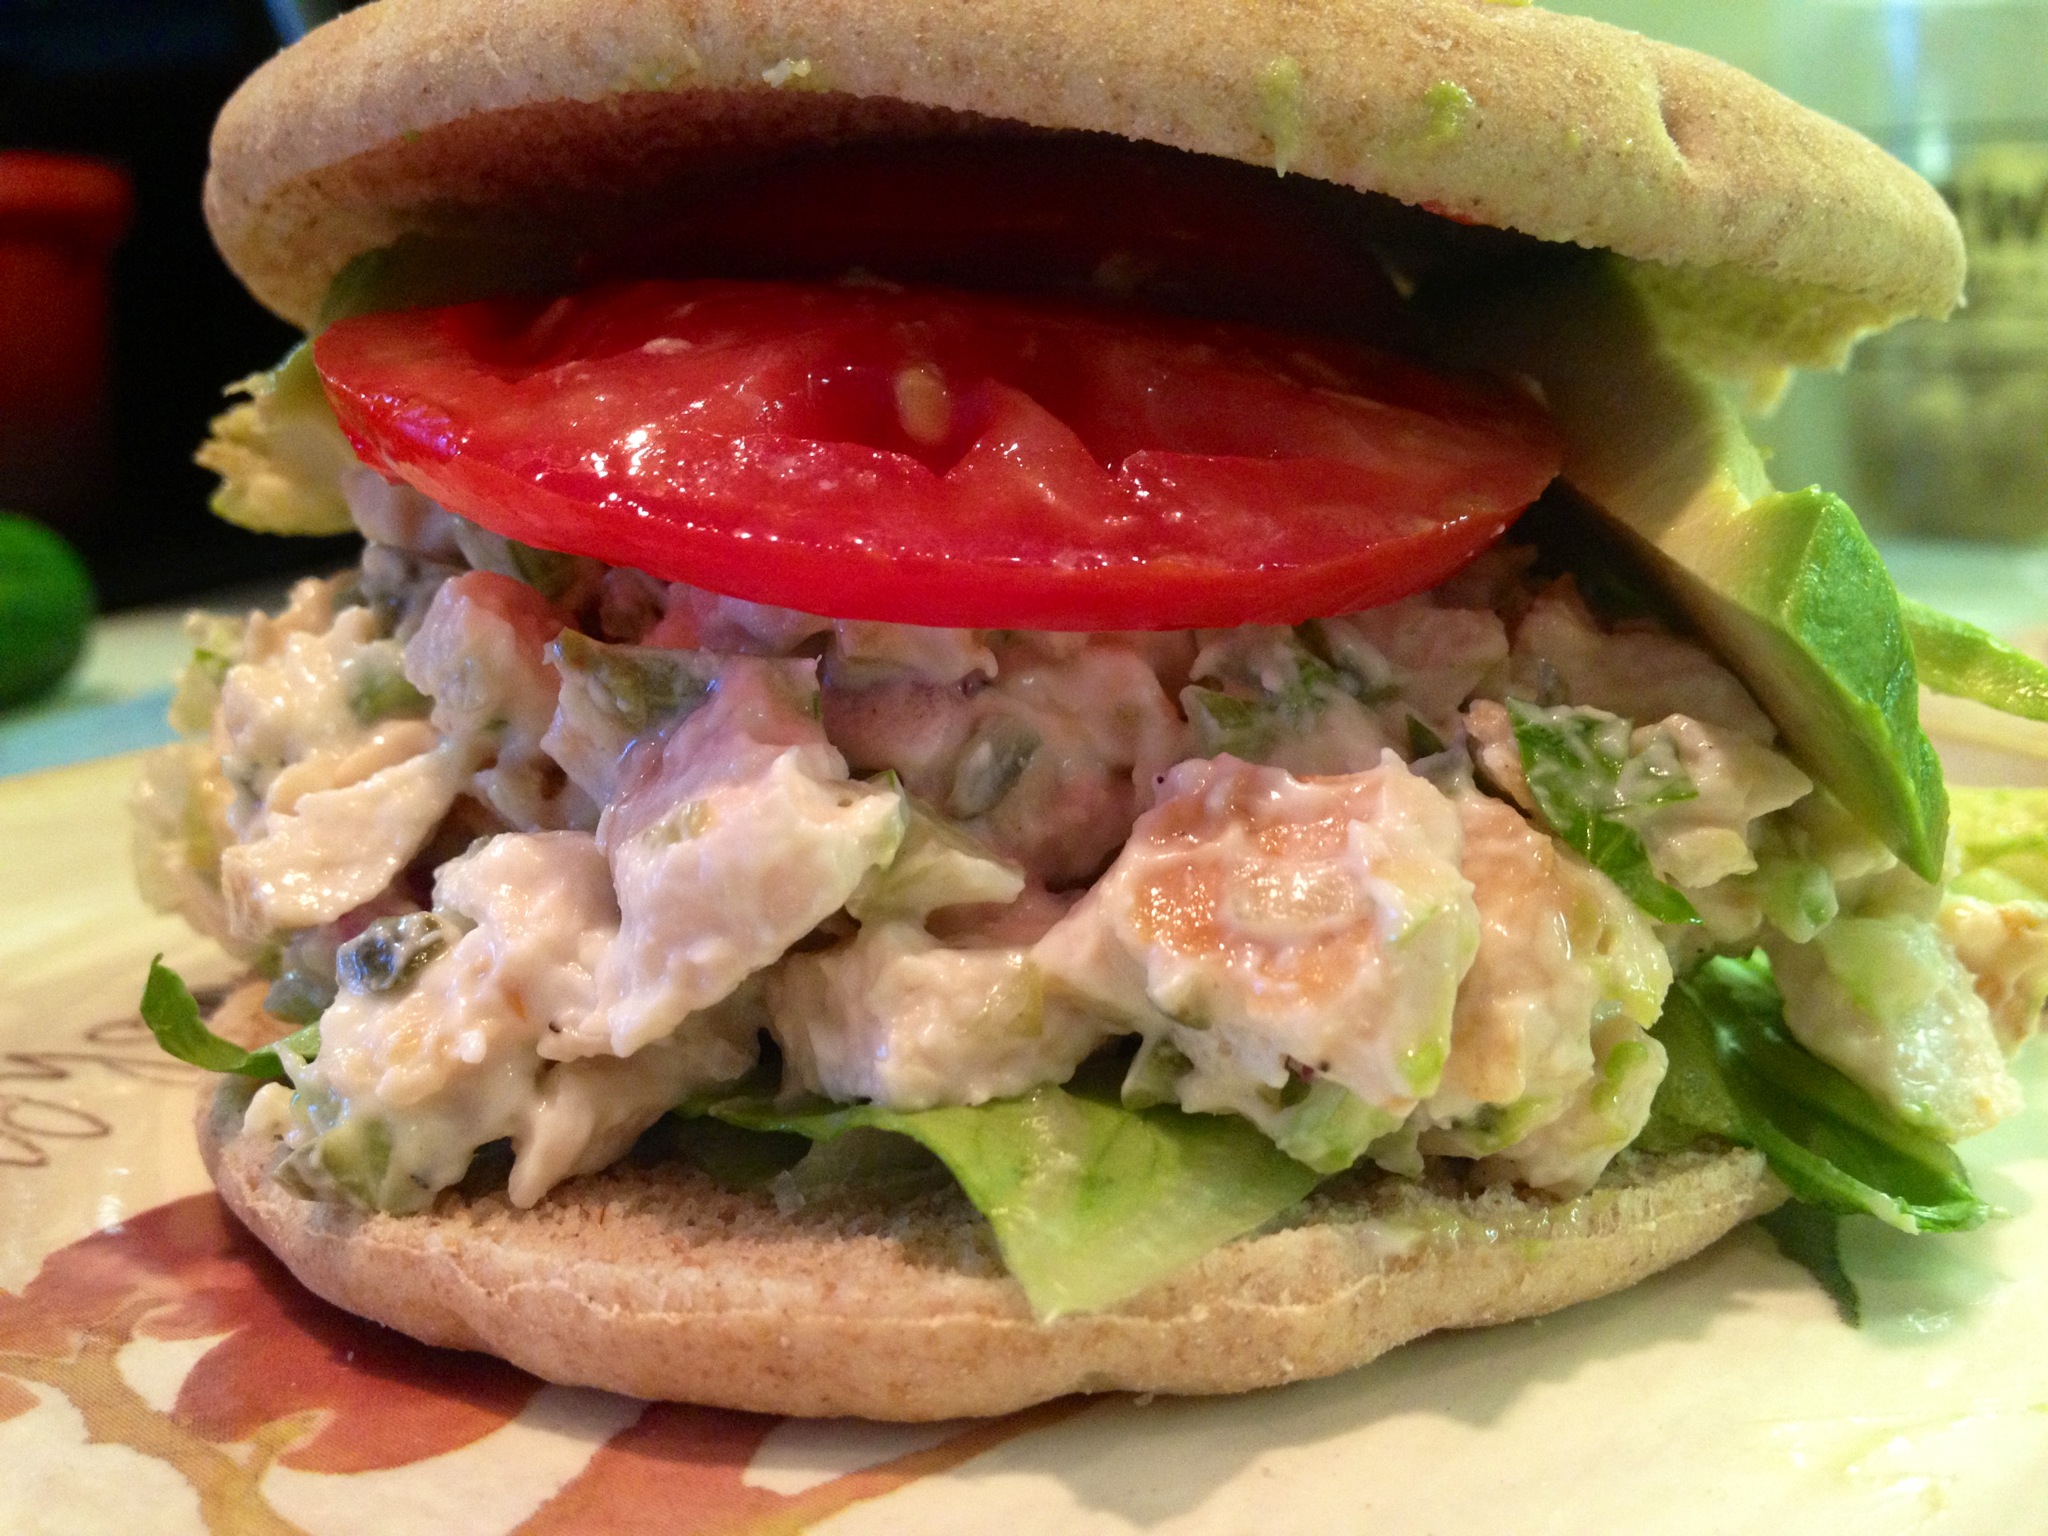
Every once in a while I get the urge to have a chicken salad sandwich. I’ve tried a few recipes over the years and wasn’t ever happy with any of them for one reason or another-too much mayo, didn’t like the curry etc… and I didn’t ever take the time to mess around with the recipes to get it just right. So I’d go to my local deli and get a chicken salad sandwich which is neither waist-line or budget friendly.
Well my friends-my search is over. Last night I made (in my opinion anyway) the perfect chicken salad. Not too much sauce, tang from the gherkins (or cornishons if you’re feeling saucy), crunch from the celery, onion and gherkins, and a ton of flavors from the Dijon, lemon juice and parsley. The best part is I don’t feel like I’m the size of a hippo after I’ve eaten it-and it’s just darn tasty to boot.
I ate my chicken salad sandwich on one of the Pepperidge Farm sandwich flats with sliced tomato, a few wedges of avocado and some romaine lettuce and it made a pretty tall sandwich.
I think this would also be great served on pieces of cucumber, rolled up in lettuce leaves or even crackers for an appetizer. This would also be amazing eaten from an avocado cup. I think I’ll try that next time.

Winner Winner Chicken Salad
Ingredients:
- 1 large boneless, skinless chicken breast (about .75lb) cooked and cut into small pieces (mine were about the size of my pinky nail)
- 1.tsp Dijon Mustard
- 1 tsp lemon juice-freshly squeezed
- 2 tsp fresh parsley, minced
- 1/3 cup light Hellman’s mayonnaise
- 2.5 tbsp fat free sour cream
- 1/2 cup celery, diced small
- 2 tbsp red onion, diced small
- 1/3 cup gherkins, diced small
- kosher salt and white pepper to taste
Instructions:
- Add everything into a bowl and stir to combine.
Notes:
- For the celery, onion and gherkins I used my little Kitchen Aid chopper to have all uniform sized pieces.
- I cut the chicken breast into about 7 equally sized strips and then cooked them on my panini press. I then cut them up into small nugget sized pieces and put them on a plate in the fridge to cool down so that I could make the salad. They only took only about 25 minutes to cool.
30 May 2013
by sparksfromthekitchen
in Appetizer, Lunch, Main Dish, Salad, Side Dish
Tags: feta, pasta, salad
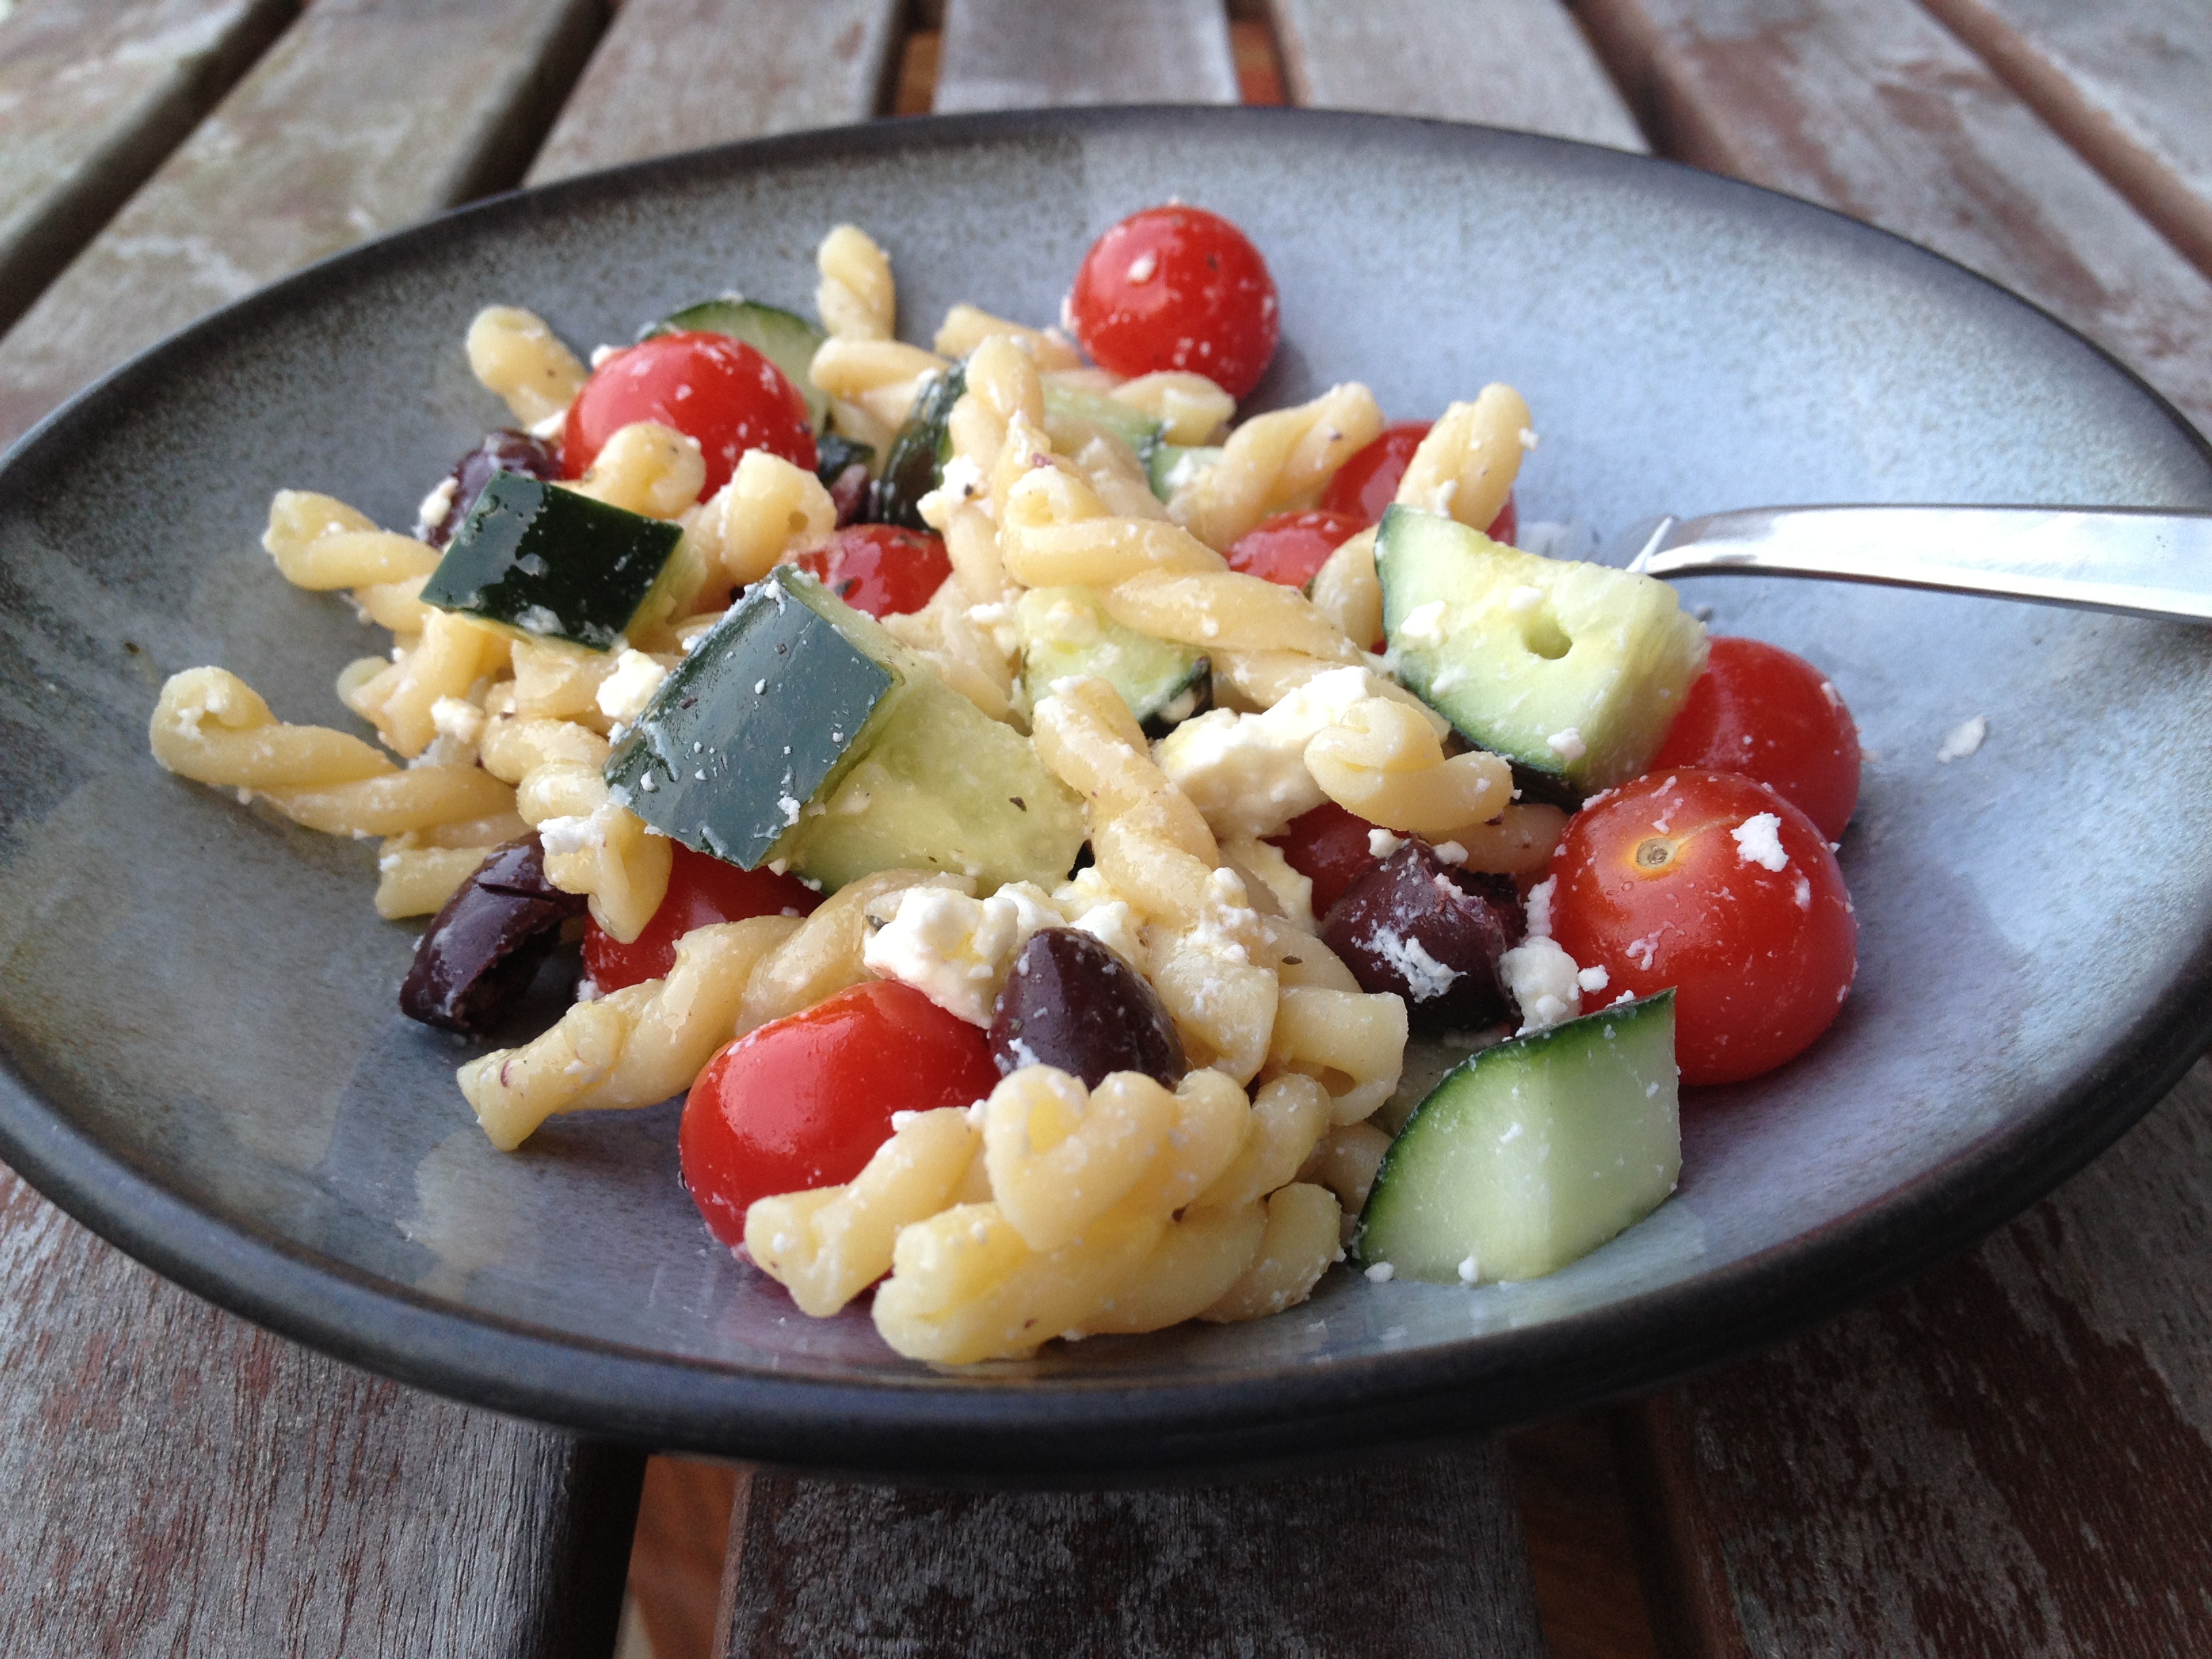
I cannot believe Memorial Day Weekend has come and gone. It’s almost time for summer fruits and veggies again.
That being said this pasta salad is perfect for the warm weather. There’s a ton of veggies, a bit of cheese and a great light vinaigrette. It can be made in advance and kept in the fridge too. You can feel free to add other veggies too-maybe some red or yellow peppers, onions etc….

Veggie & Feta Pasta Salad
Salad Ingredients:
- 1/2 lb gemelli pasta
- 1 pint cherry tomatoes
- 1 cup chopped kalamata olives (pitted obviously)
- 1 cucumber cut into 1/2 inch pieces
- 1/4 cup feta cheese
Dressing Ingredients:
- 1 tsp Dijon mustard
- 1 tsp Italian seasoning
- 1 large clove of garlic, put through press or mashed to a paste
- 1/4 tsp kosher salt
- 1/4 tsp white pepper
- 1/4 cup red wine vinegar
- 1/3-1/2 cup extra virgin olive oil
Instructions:
- Cook pasta in salted boiling water until al dente, drain and rinse with cold water. Shake out as much of the water as possible.
- In a large mixing bowl combine all of the salad ingredients above and mix well to combine.
- In a small bowl whisk together all ingredients except the olive oil until evenly combined. Then, while whisking, add the olive oil and continue to whisk until emulsified.
- Pour dressing over salad, mix to evenly distribute the dressing, and serve or refrigerate until ready to serve.
28 May 2013
by sparksfromthekitchen
in Lunch, Main Dish, Side Dish
Tags: bacon, tart, vidalia onion
It’s Vidalia season again!! I picked up two of those beauties at my grocery store a few days ago and have been wondering what to make. While I did find a roasted Vidalia onion salad that sounded promising I wanted to somehow incorporate this month’s What’s Baking theme of Puff Pastry into it too. So I searched and searched and found a delicious sounding Vidalia Onion Pie recipe from Paula Deen. I haven’t ever made anything of hers but it looked like exactly what I was hoping for. A nice pie with crumbly bacon topping, sweet browned onions and (my idea) a flaky crispy crust-not the pie crust that Paula’s recipe called for.
Truth be told I was secretly thinking that the crust wouldn’t ever work right and I’d have to throw everything out. I’ve never switched out a puff pastry for a pie dough before but I thought if I pre-bake it that it will be just fine. And it was. It was glorious!! And surprisingly easy to make too!
It’s not a deep pie-only about an inch since I used a tart pan. It’s a very light custard type of filling-surprisingly light and the onions–OH THE ONIONS!!-beautifully sweet just like they should be.

Vidalia Onion Pie
Ingredients:
- 3 cups thinly sliced Vidalia onions (I used about 1 & 1/2 onions)
- 3 tbsp butter
- 1 sheet puff pastry (thawed if frozen-I like Pepperidge Farm)
- 2 eggs
- 2 tbsp AP flour plus more for rolling out dough
- 1/2 cup milk
- 1 & 1/2 cups sour cream
- 1 tsp kosher salt
- 5 slices bacon, cooked to crispy and crumbled (4 for pie, 1 for dog 🙂
Instructions:
- Pre-heat oven to 350.
- Roll out the pastry until it’s thin enough to cover entire inside, sides and have a small amount hang over sides of tart pan.
- Lay pastry in pan and press all around to fill evenly. Using a fork poke holes in the dough on the base of the pan and in the edges around the outside. Cover the edges with 1 layer of foil and bake for about 15-20 minutes.
- While the pastry is baking prepare the onions. In a medium skillet over medium-high heat melt the butter and then add the onions. cook them until they’re lightly browned. Then remove from heat and set aside.
- In a small bowl beat the eggs and then add the flour and whisk to combine. Then add the milk sour cream, and salt. Whisk to combine.
- When the pastry is done spread the onions over the bottom of the pan and then pour the egg mixture over it. Sprinkle the bacon on top and bake for 30 minutes.
- Serve right away.
I only had about 1& 1/4 cups of sour cream. I subbed a new Greek Yogurt/Cream cheese mix that I had for the remaining 1/4 cup. It worked out fine.
It will help you a lot if you put the tart pan onto a cookie sheet for the duration of the recipe so you don’t run the risk of messing up the edges of the dough getting it in and out of the oven.

Cara from The Boys Made Me Do It was the host of this month’s challenge. Check out all of the other dishes made here!

Previous Older Entries Next Newer Entries